User Management
In this article
User Management provides a streamlined interface for administrators, enabling them to manage users and permissions efficiently.
Oversee user privileges, roles, and collaborations through Role-Based Access Control (RBAC) in Gathr application as an Organization Administrator.
Assign specific permissions to users based on their roles within the organization, ensuring that individuals have the appropriate access to perform their tasks.
My Roles
Access the My Roles tab directly from the Main Menu > User Management section.
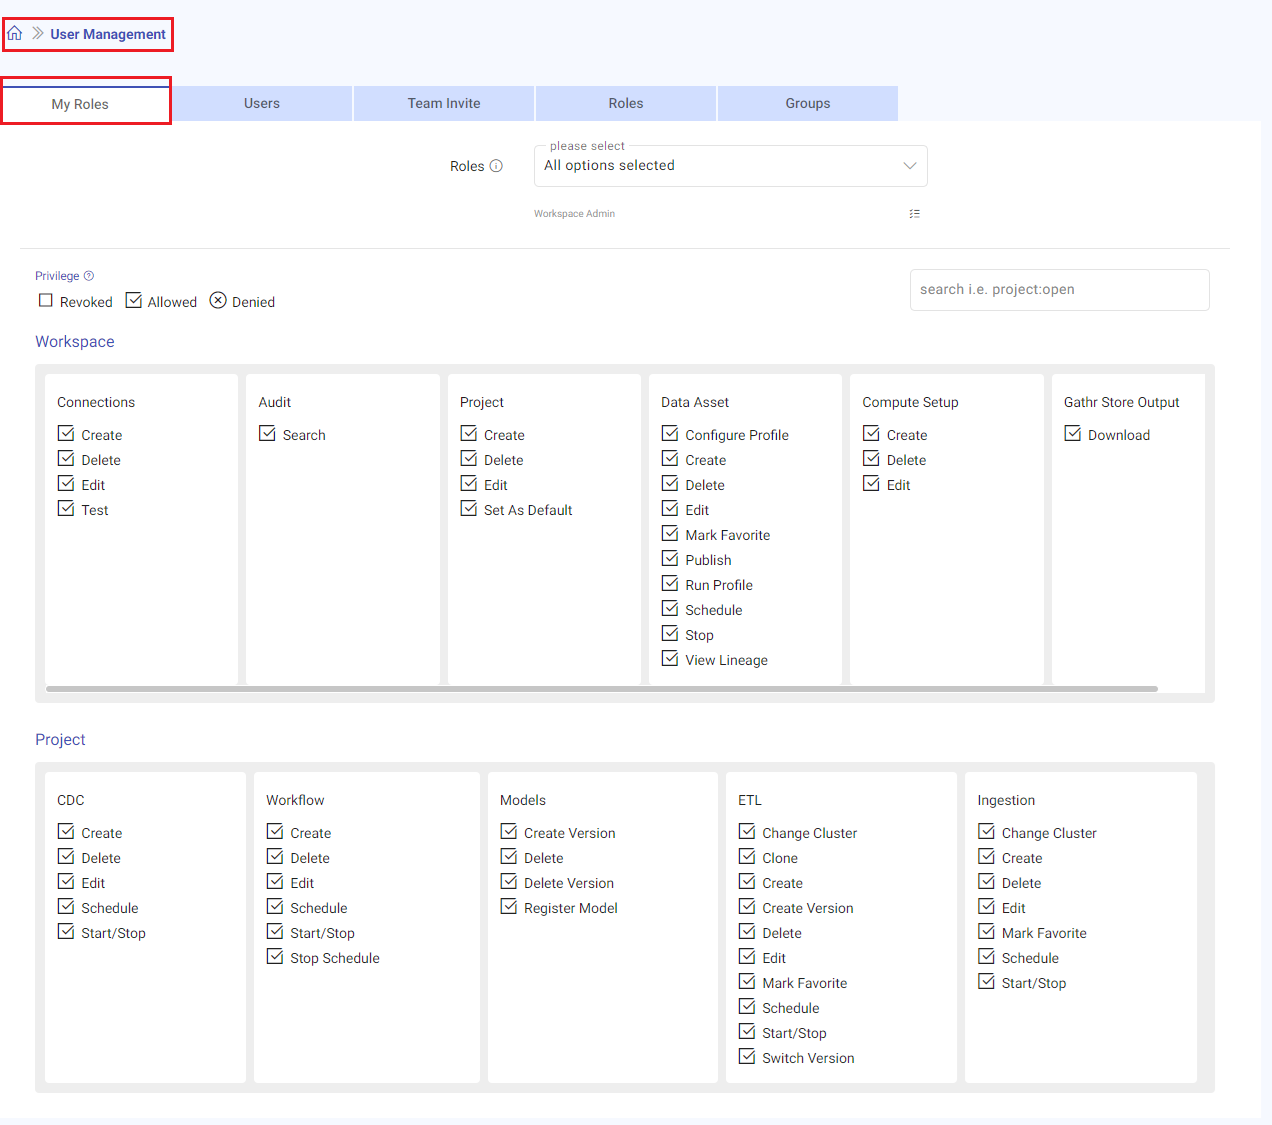
View and verify your assigned roles and privileges.
Review the list of Roles assigned to you.
Understand the Privileges associated with each role.
Revoked: You will not be able to perform the revoked action(s). Request your Organization Administrator to allow any revoked privilege(s) that you may need.
Allowed: You will be able to perform the allowed action(s) unrestricted.
Denied: You will not be able to perform the denied action(s).
Privilege preference on a feature if multiple roles are assigned to a user:
Allow + Revoke + Deny = Deny
Allow + Revoke = Allow
Allow + Deny = Deny
Revoke + Deny = Deny
Direct Privileges
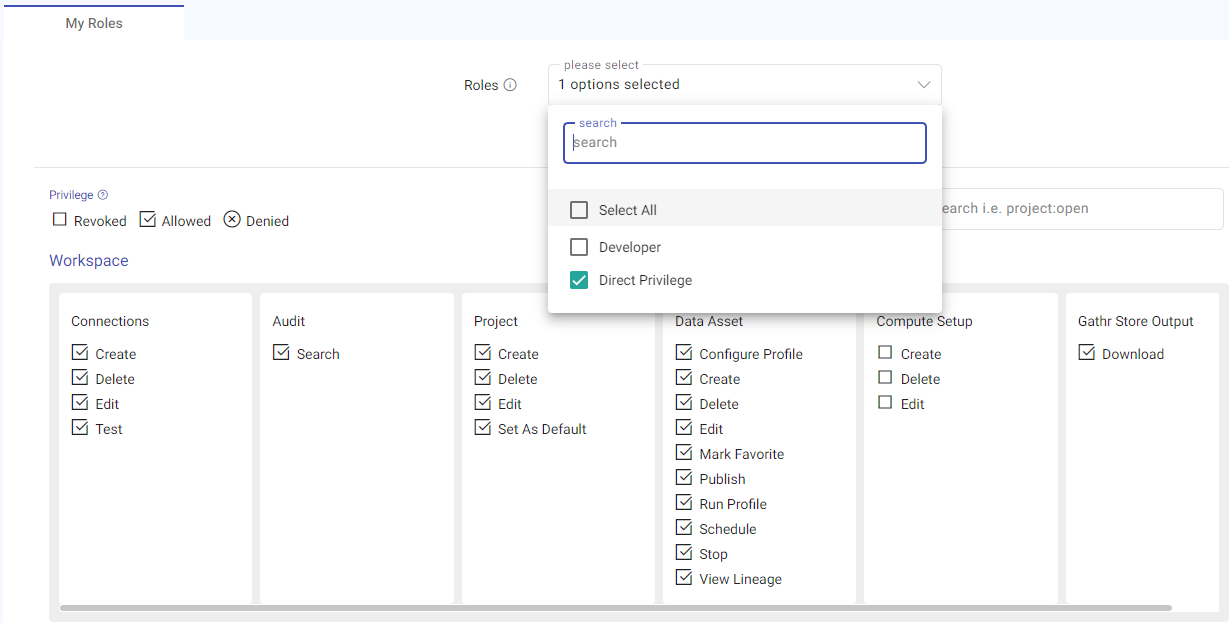
Organization Administrators can modify default privileges for Global Roles.
For example, a Developer role has the “Compute Setup” feature allowed by default, but this can be changed to “Revoked” by the Organization Administrator, reflecting as a “Direct Privilege”.
Users
The Users tab is designed for organization administrators to manage users and their roles.
Access the Users tab directly from the Main Menu > User Management section.

Only an Organization Administrator can manage users in Gathr.
For the first sign in, an Organization Administrator can see a message that the Gathr Support Team is registering their organization.
After registration, Organization Administrators can invite users to sign up with Gathr.
Here, all registered users from the organization are listed with essential information.
Information Displayed:
Search: Option to search information in the users listing table.
Name: The user’s name or email Id.
Email Id: The registered email address.
Auth Type: The authentication method with which users can sign in.
Gathr: Option to sign in with credentials using non-SSO method.
Azure AD: Option to sign in using SSO method enabled for Azure AD identity provider.
Okta: Option to sign in using SSO method enabled for Okta identity provider.
Created Date: The date the user account was created.
Assigned Roles: Indicates the roles assigned to the user.
Actions: Options available for user management.
Manage Users and Roles
Assign roles and set privileges for users.
Go to the User Management > Users tab and click on the Manage Users & Roles option.
Add any existing roles as needed. If you wish to create a new role or set specific privileges, you can do so manually.
Specify the desired privileges that the role will encompass. This could include actions such as creating, editing, or deleting a Project.
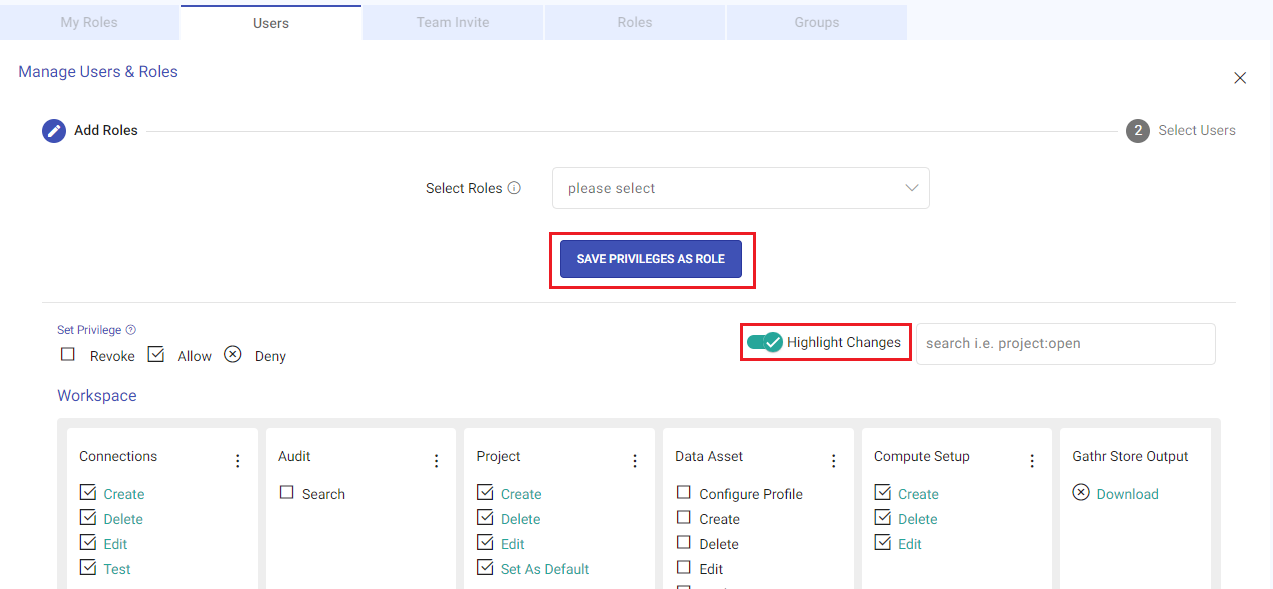
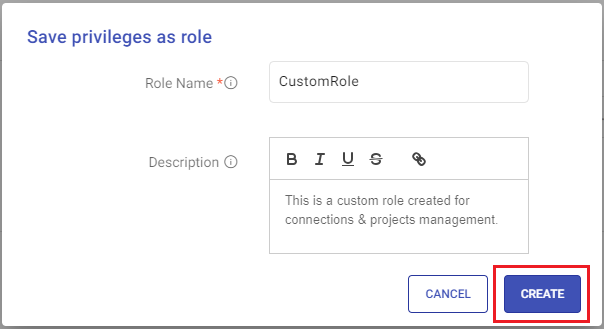
You can save the selected privileges as a new role.
Proceed to the next step and select the users for whom these roles and privileges will apply.
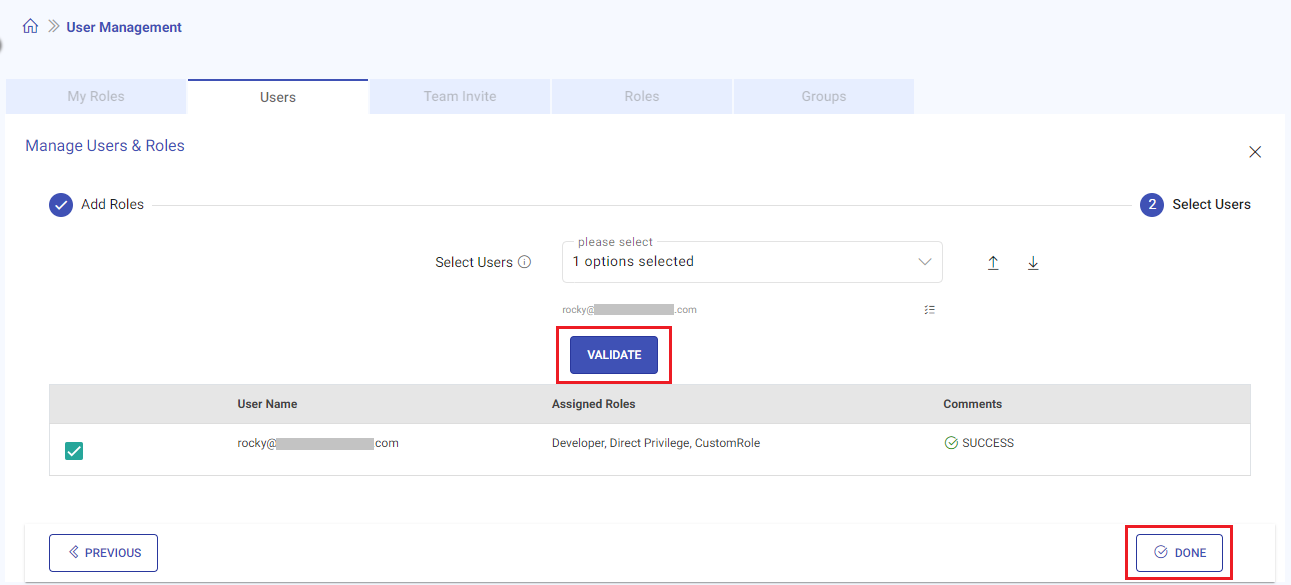
Select users by:
Upload a CSV File: Download a sample CSV file, modify it to include the list of users you wish to assign the new roles or privileges to, and then upload the updated CSV file.
Select Existing Users: Alternatively, you can choose users directly from the existing user list displayed.
Validate the provided user list. This step ensures that all listed users exist within Gathr and are eligible for the assigned roles.
Click on Done to apply the changes. This will update the users’ roles and privileges based on your selections.
Steps to Disable a User
As an Organization Administrator you can temporarily disable a user.
Click Users menu.
Click on the Disable option available in the Actions column of the users listing page.
Steps to Activate a User
As an Organization Administrator you can activate a temporarily disabled user.
Click Users menu.
Click on the Activate option available in the Actions column of the users listing page.
Steps to Delete a User
As an Organization Administrator you can permanently delete a user’s Gathr account.
Click Users menu.
Click on the Delete option available in the Actions column of the users listing page.
Team Invite
Invite users from your organization to join Gathr. This feature ensures that onboarding new team members is quick and efficient.
Access the Team Invite tab directly from the Main Menu > User Management section.

Click on the INVITE USERS option to enter the email addresses of your users and send them an invitation link to sign up for Gathr.
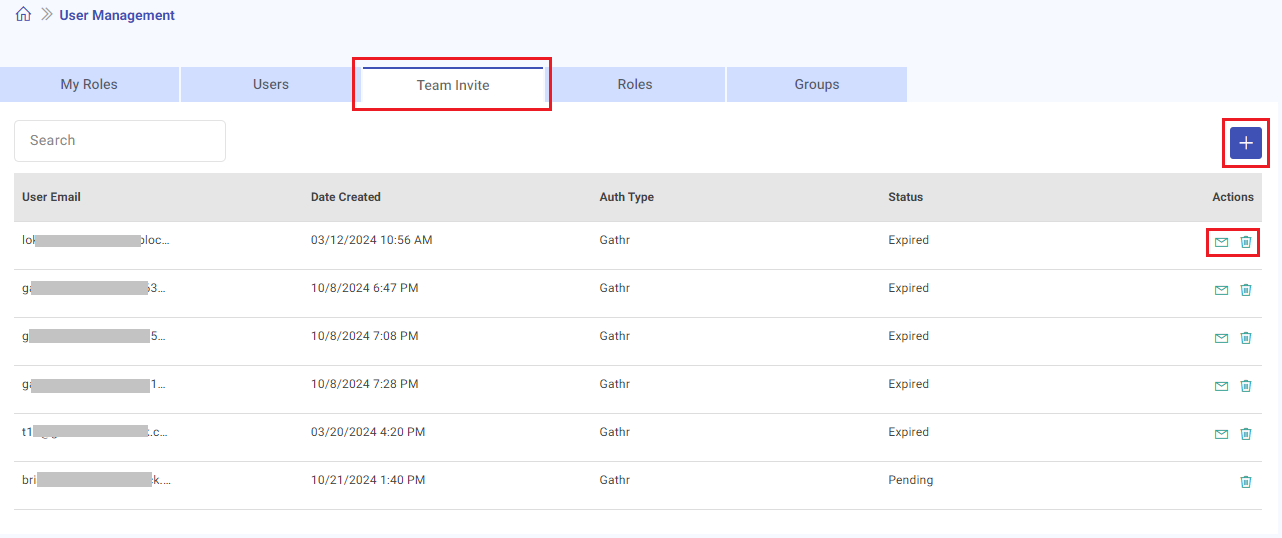
An email notification is sent to all users requesting to sign up with Gathr.
Available Actions
Invite Users: Send invitation emails to your organization users.
Resend Invitation: If an invitation link expires, administrators can resend it easily.
Delete Invite Link: Administrators can delete an invitation link if it is no longer needed.
Roles
The Roles tab allows organization administrators to manage both Global and Custom Roles.
Access the Roles tab directly from the Main Menu > User Management section.
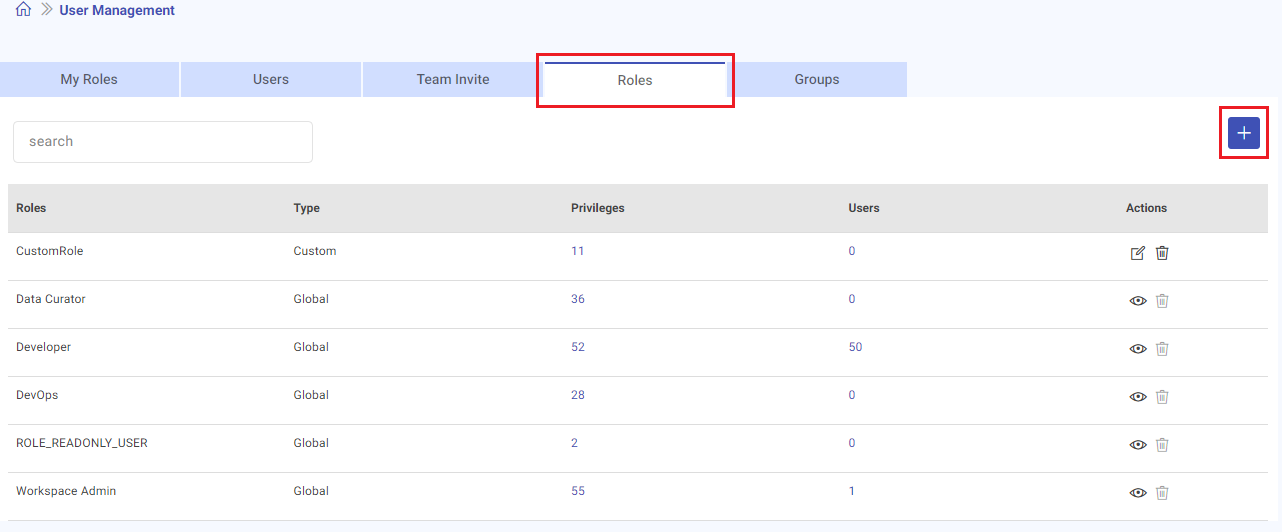
Global Roles
These roles are predefined and include:
Data Curator
Developer
DevOps
Read-Only User
Workspace Admin
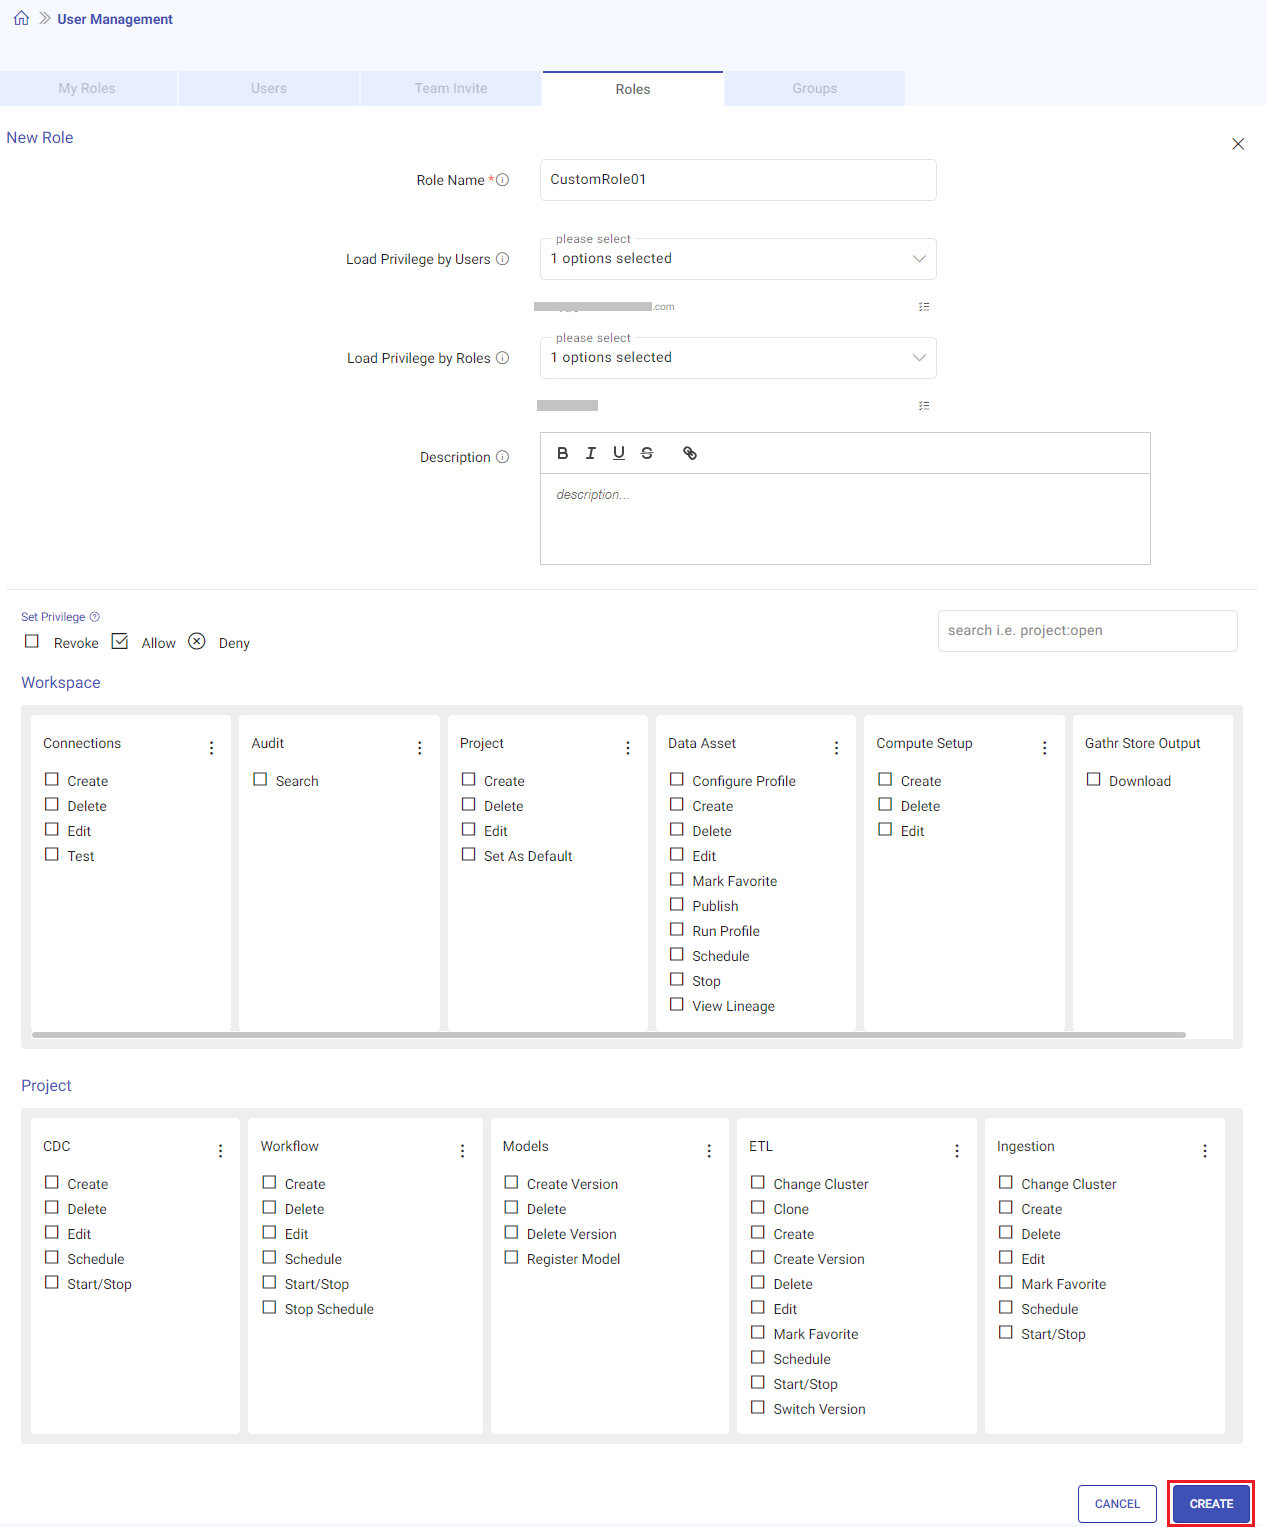
Custom Roles
Administrators can create, modify, or delete custom roles as needed to fit specific organizational requirements.
How to Use:
Access the Roles tab.
View existing Global and Custom Roles.
Use the Actions to create or manage Custom Roles.
Organization Administrator
When a user signs up with Gathr using the Organization Sign-Up option, they are automatically assigned the Organization Administrator (Workspace Admin) role.
Adding More Users as Organization Administrators
As an Organization Administrator, you can invite team members to sign up with Gathr through the Team Invite tab.
Users who sign up via the invitation link are assigned the Developer role by default. As the Organization Administrator, you can manage user roles from the Users tab.
Approaches to Assign Organization Administrator Role:
Approach 1: Assign Multiple Organization Administrators at Once
Navigate to the User Management page and go to the Users tab. Click on Manage Users & Roles.

In the step Add Roles, click the Select Roles drop-down and choose Workspace Admin. Click Next.
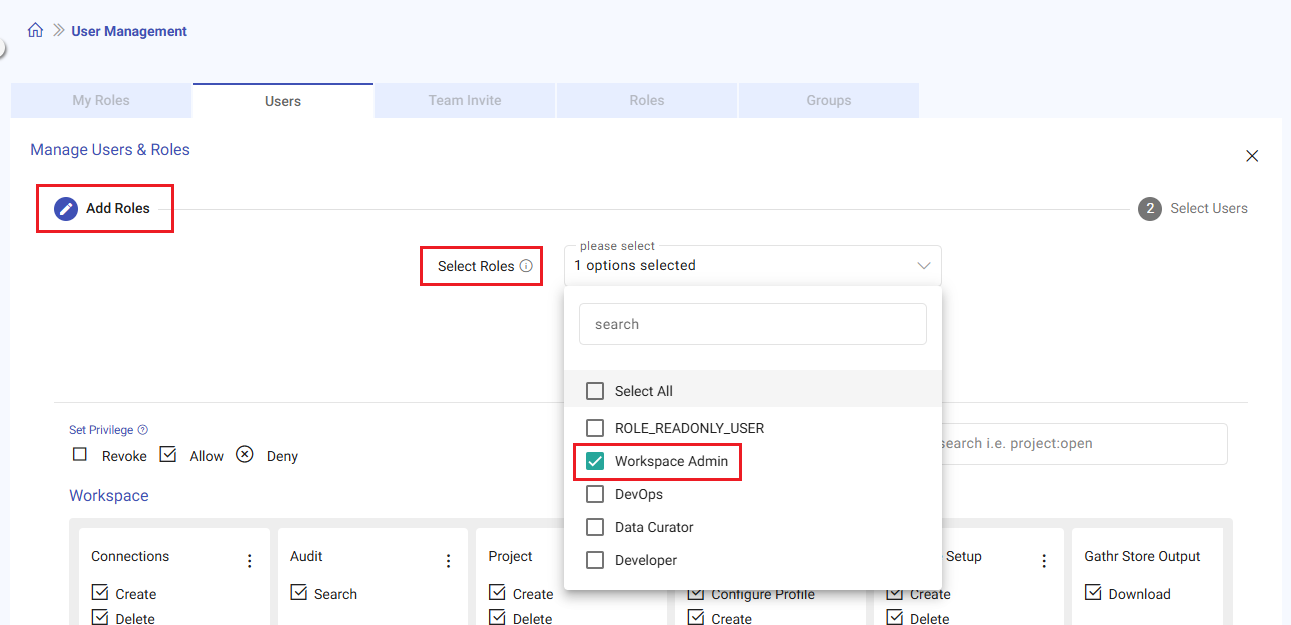
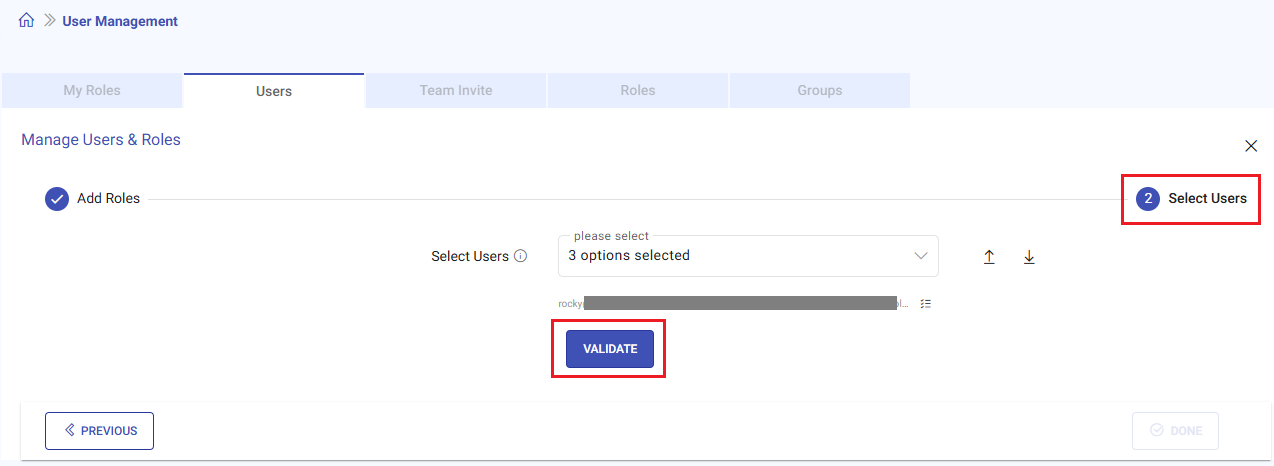
In the step Select Users, click the Select Users drop-down to choose the users you want to assign the Organization Administrator role. Alternatively, you can upload a CSV file with the list of users. Once ready, click Validate.
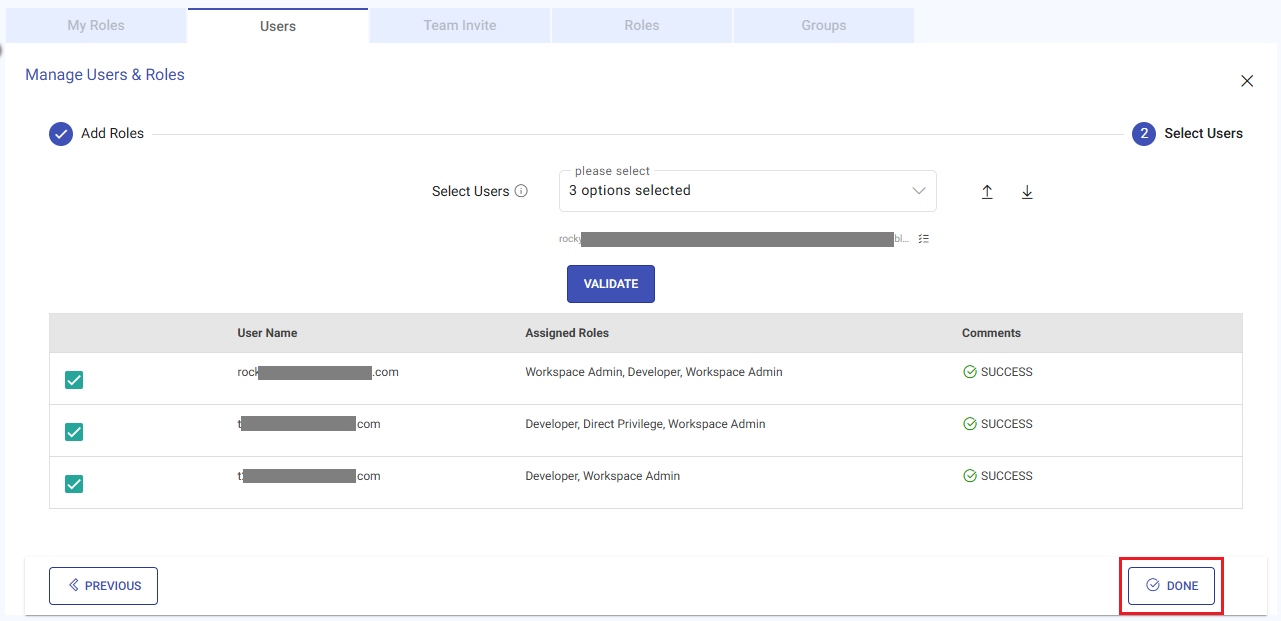
Review the list of users to be assigned the Workspace Admin role. Click Done to complete the process.
Approach 2: Assign One Organization Administrator at a Time
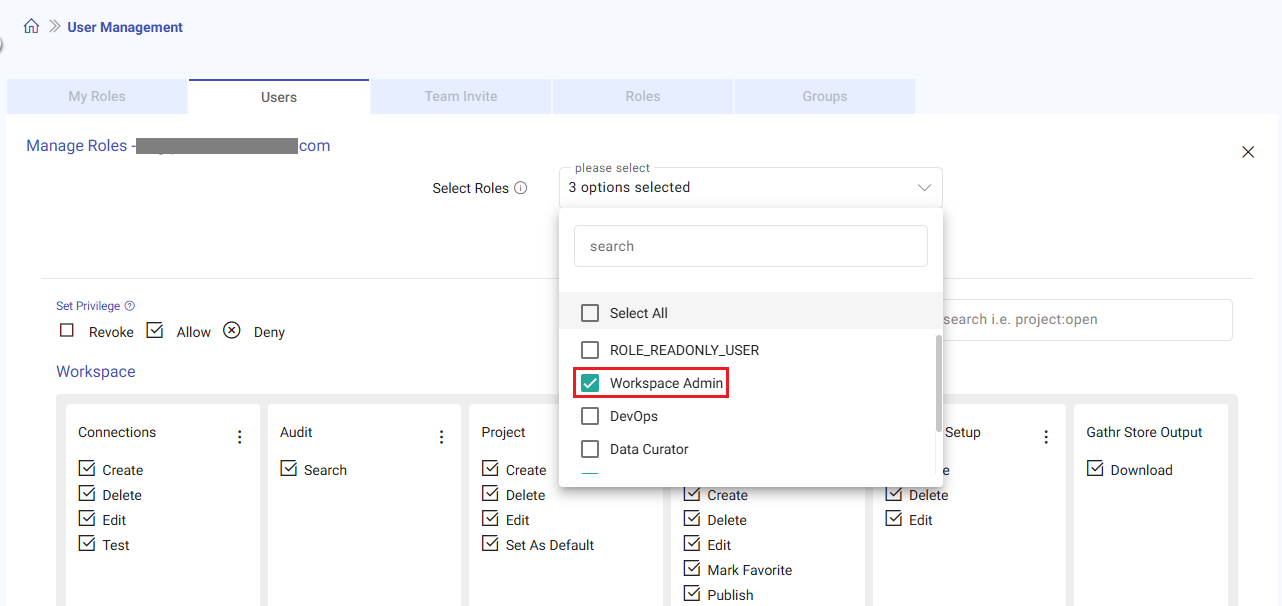
For the user you want to assign the Organization Administrator role, click the Edit Roles option next to their name.

In the Select Roles drop-down, choose Workspace Admin and click Save to apply the changes.
Note: If the primary Organization Administrator needs to delete their account, the billing details (such as the email address) will need to be updated. To transfer billing responsibilities to a new Organization Administrator, please contact Gathr Support.
Groups
Combine multiple users into a single group for easier management of privileges.
Using Groups simplifies the assignment of roles and permissions for multiple users at once and enhances organization by categorizing users based on their roles or functions.
Access the Groups tab directly from the Main Menu > User Management section.
Steps to create a Group
Create a new group or manage existing groups.

Provide a name for the group and select the users.

Add users to the group.
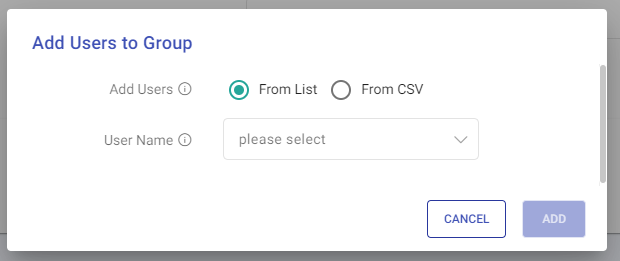
Users can be added from the list of existing users or by uploading a CSV file having usernames.
From the Set Privileges tab, associate privileges for the selected users.
Manually select and set role privilege(s), or instantly load privilege(s) by selecting the existing role(s).
Set privileges with below preferences:
Revoke: Set by default. User(s) assigned with this role will not be able to perform the revoked action(s).
Allow: User(s) assigned with this role will be able to perform the allowed action(s) unrestricted.
Deny: User(s) assigned with this role will not be able to perform the denied action(s).
Revoke and Allow can be changed to any other privilege as required (by providing direct privilege) when the existing roles are later mapped to user(s). But, Deny privilege(s) strictly remain unchanged.Click on Create option to create the user group.
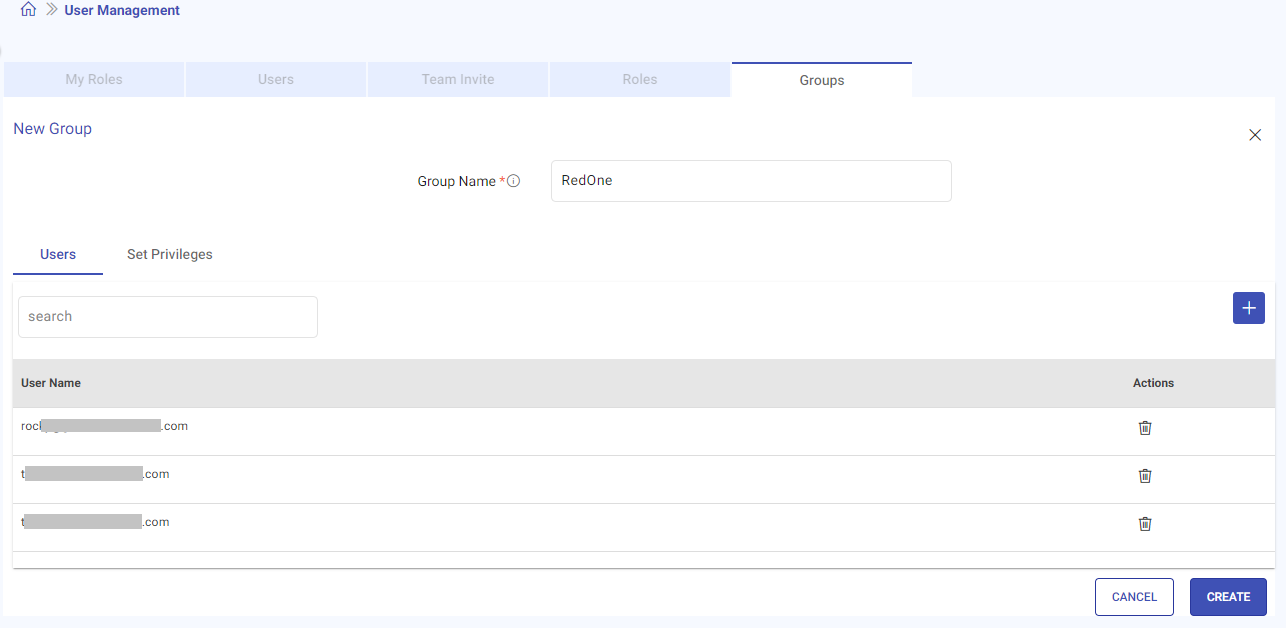
The user group will get listed as shown below:

You can edit or delete user groups from the Groups tab.
If you have any feedback on Gathr documentation, please email us!