Create MySQL-MySQL Application
Make sure that the MySQL database is configured for CDC. For more details, see Enable CDC for MYSQL .
The steps to create a MySQL to MySQL CDC application are as follows:
Go to the Applications home page from the main menu and click on the CREATE CDC APPLICATION option.

Provide a name for the CDC application to be created and select the source as MySQL and the target as MySQL.
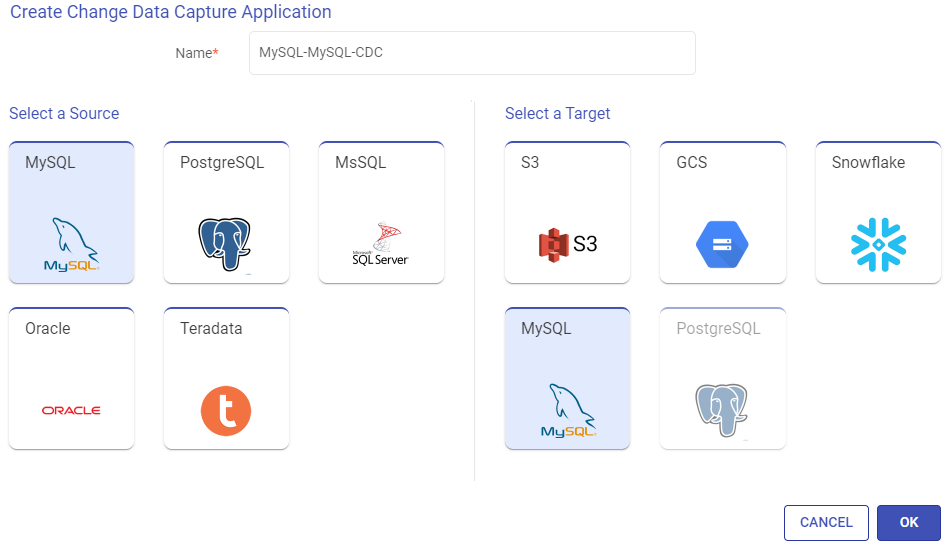
Click OK to continue.
Configure the CDC application as per the descriptions given below for each section:
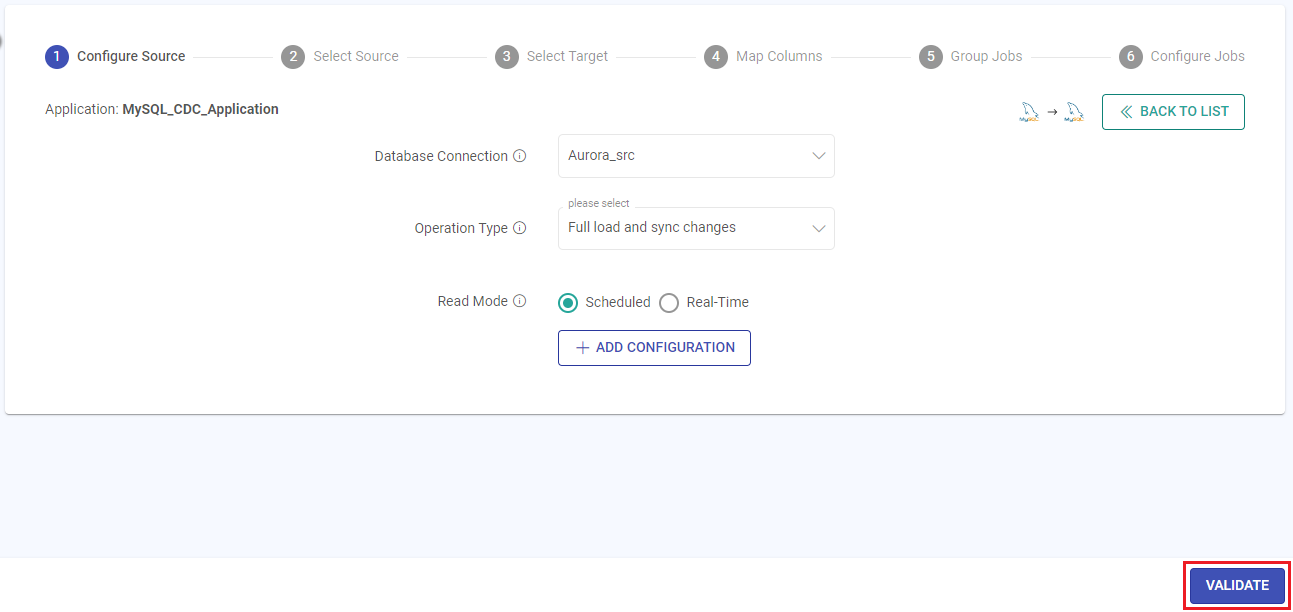
Configure Source
On the Configure Source panel, provide the details for each field as described below.
Database Connection
Connections are the service identifiers. A connection name can be selected from the list if you have created and saved connection details for MySQL Database earlier. Or create one as explained in the topic - JDBC Connection →
Operation Type
Select the operation type for loading data to the target.
Full load and sync changes: The existing data and the latest changes will be loaded to the target.
Full load: The entire source data will be loaded as per the application’s configuration to the target.
Sync changes only: Only the latest data from the last application run will be loaded to the target.
Read Mode
Select how the application should trigger.
Scheduled: Option to run the application in batch mode. For scheduling a CDC application, this mode should be selected. Scheduling can be done using the Schedule option available on the listing page.
Real-Time: Option to run the application in streaming mode.
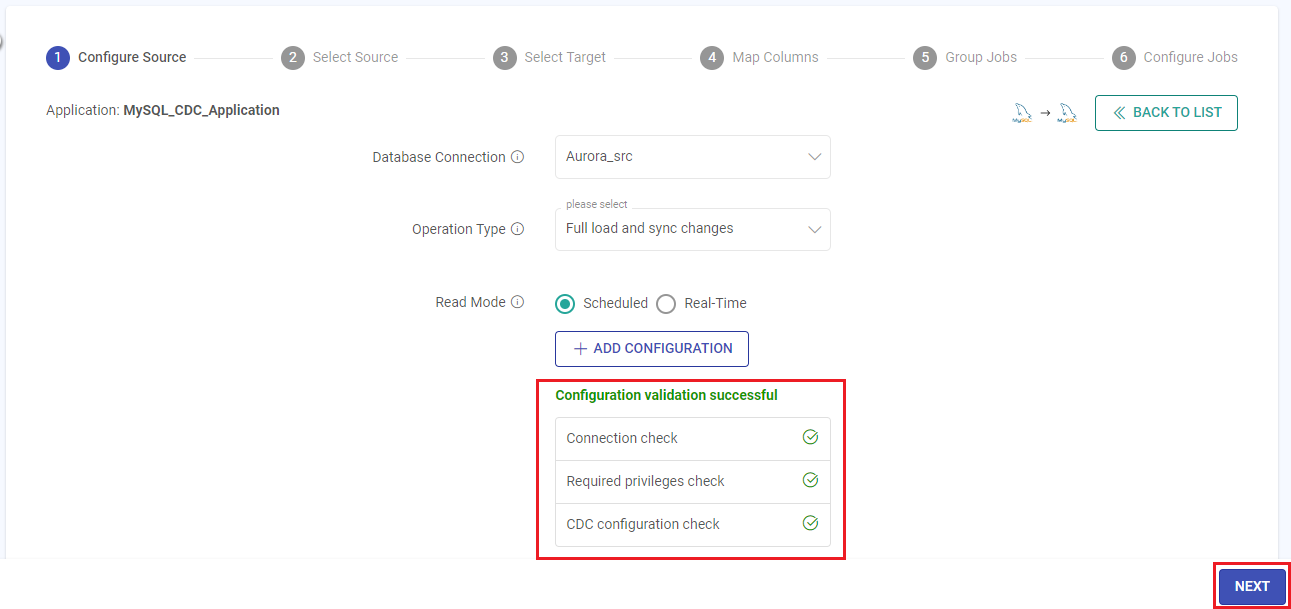
After providing the source configuration details, click on VALIDATE.
Validate Source Configuration
Validation ensures the prerequisites are met to perform CDC on a data source with the provided connection details.
Connection Check: This check ensures a valid connection between Gathr and the data source.
Required privileges check: This check ensures that the necessary privileges are available for the specified connection role to perform the CDC operations.
CDC configuration check: This check ensures that CDC is enabled on the database.
Once the validation is successful, click the NEXT button to configure the source table.
Select Source
As per the MySQL source configuration details provided in the previous step, all the source databases will be listed on the Select Source panel.
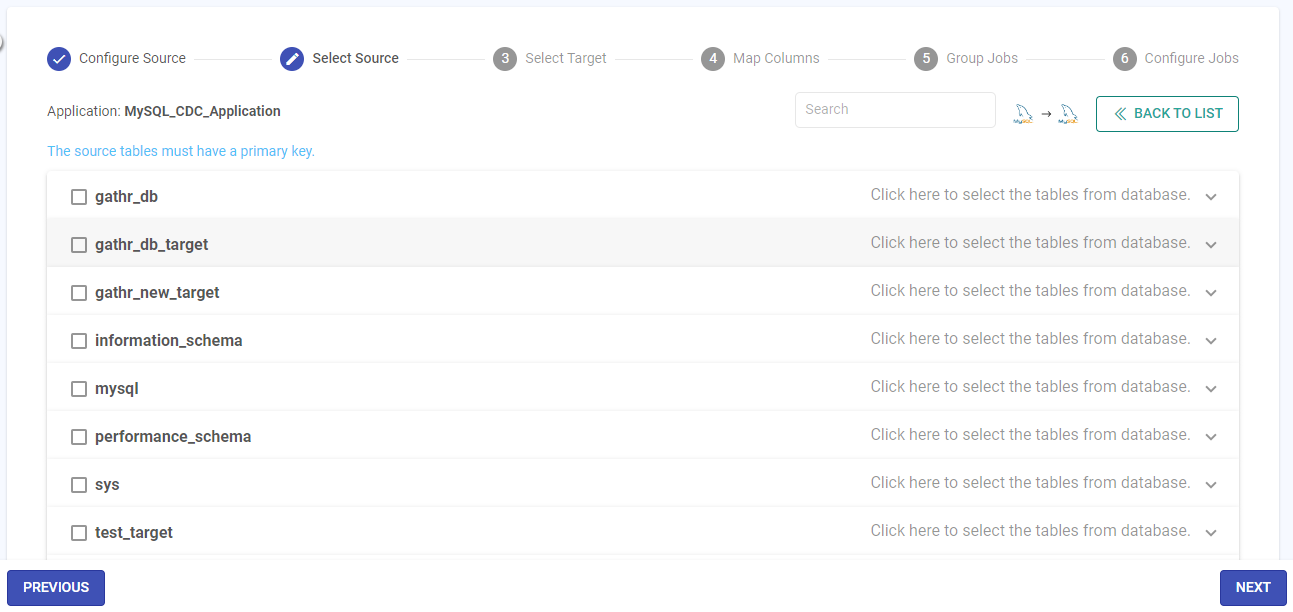
Expand the accordion view to access the tables for each listed database.
Choose the required database(s) and table(s) on which CDC is to be performed.
Once selected, click NEXT.
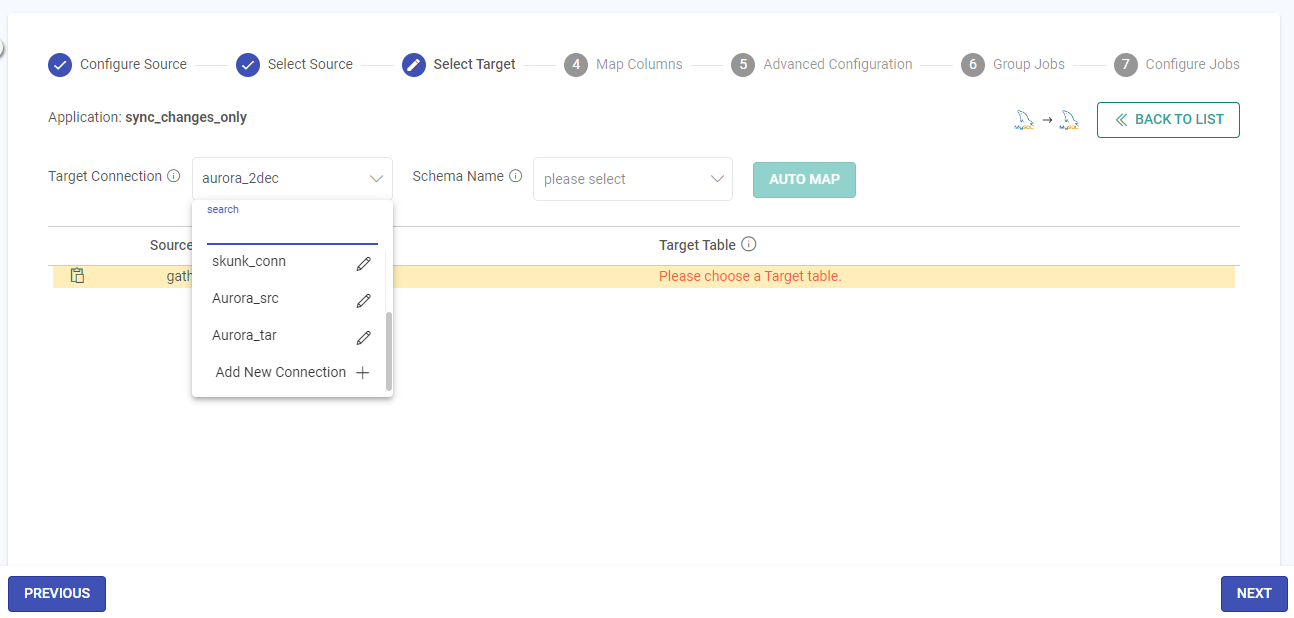
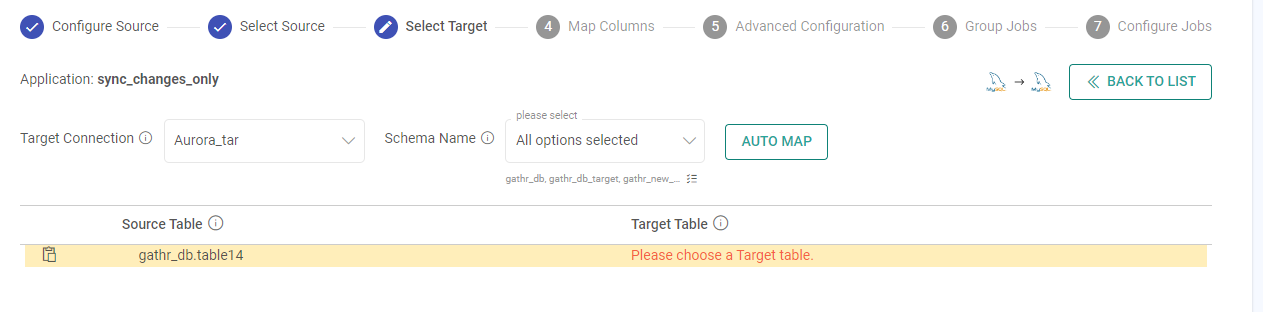
Select Target
On the Select Target panel, provide the details for each field as described below.
Target Connection
Connections are the service identifiers. A connection name can be selected from the list if you have created and saved connection details for MySQL Database earlier. Or create one as explained in the topic - JDBC Connection →
Schema Name
The schema for the configured MySQL target connection will appear as per the target connection configuration.
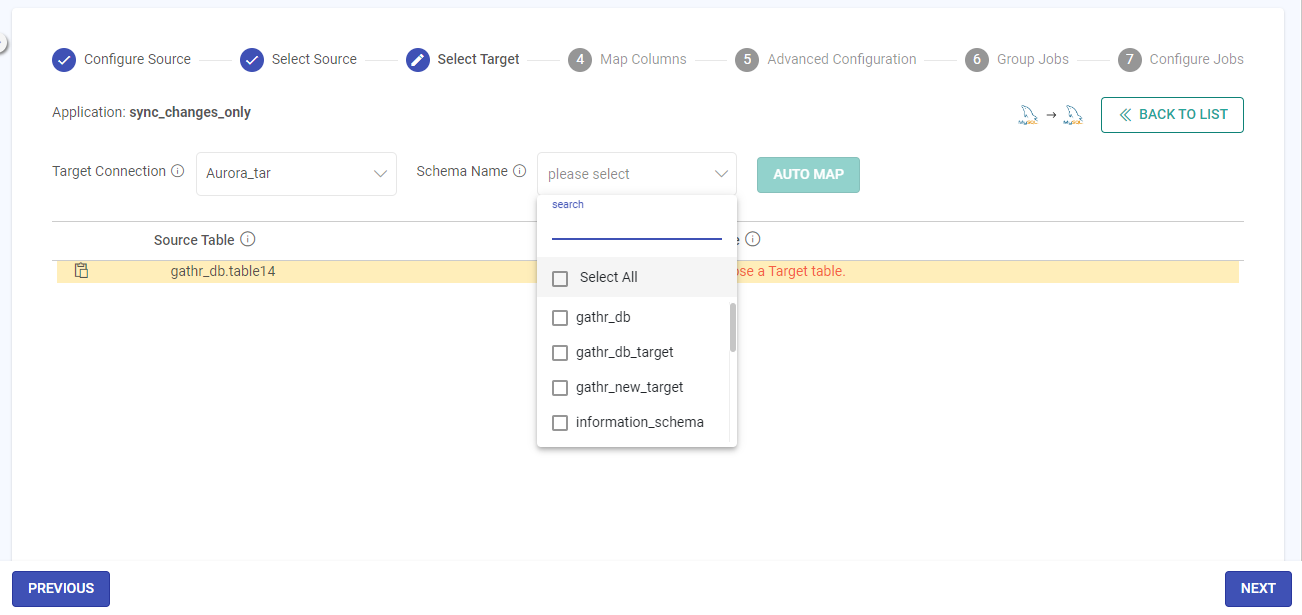
Select one or more schema names, containing target schema details that match the selected source table(s) schema.
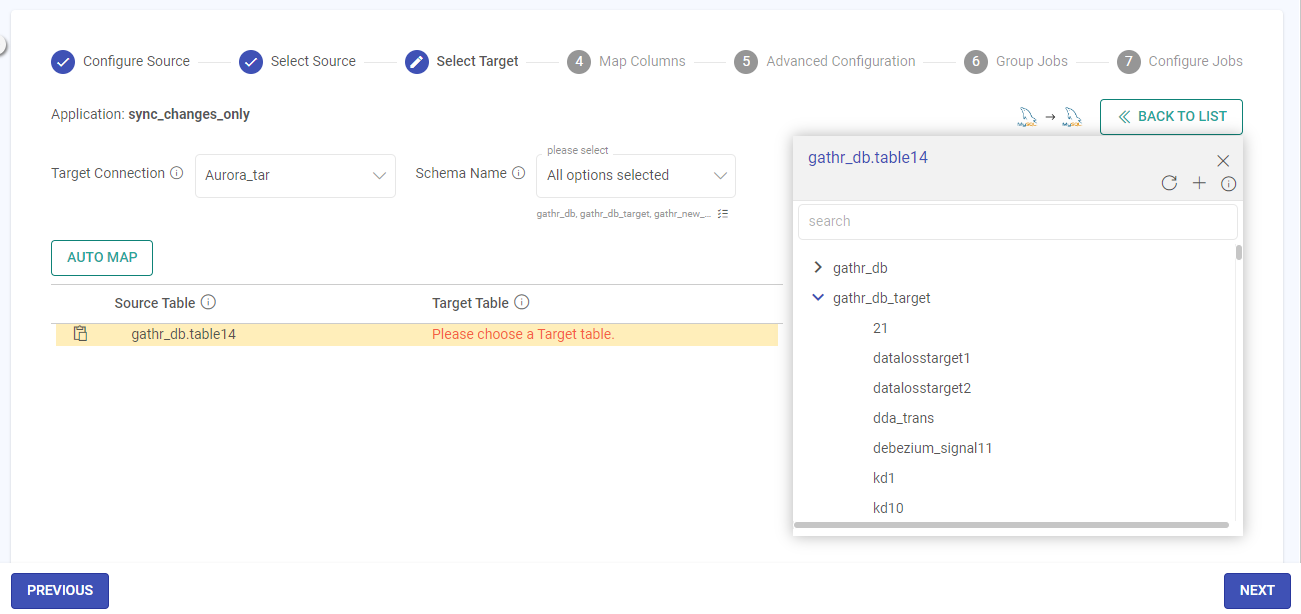
Map Source and Target
The schema details of the source tables can be mapped with the target tables in two ways.
Using this option, a single source table can be mapped to multiple targets.
Manual Source and Target Mapping
Click on each Source Table to see the target tables path available as per configured connection.
Refresh Tables/Folders
There is an option to refresh the tables/folders.
Create Table
There is an option to create a target table corresponding to the source.
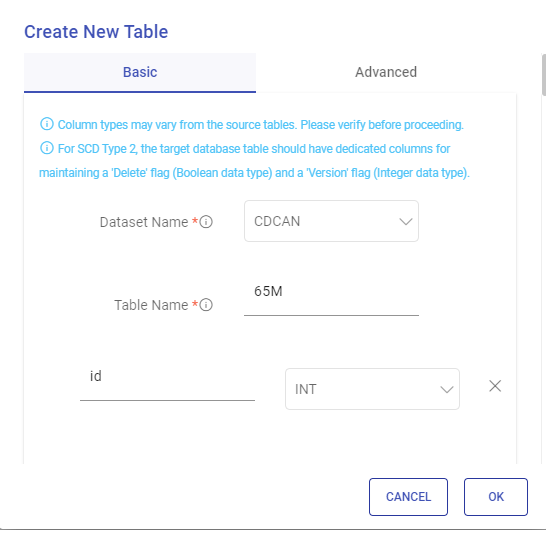
Specify a name for the new table.
You can add or remove columns and confirm the data type for each column for the new table.
Toggle between Basic and Advanced tabs to define the columns for the table.
Once completed, click OK. The new table will list in the public database or in the specified one.
Map each source table to the corresponding target table.
Auto Map Source and Target
Once the Schema Names are selected that may contain the source schema, use the AUTOMAP feature to automatically map the source and target tables schema.
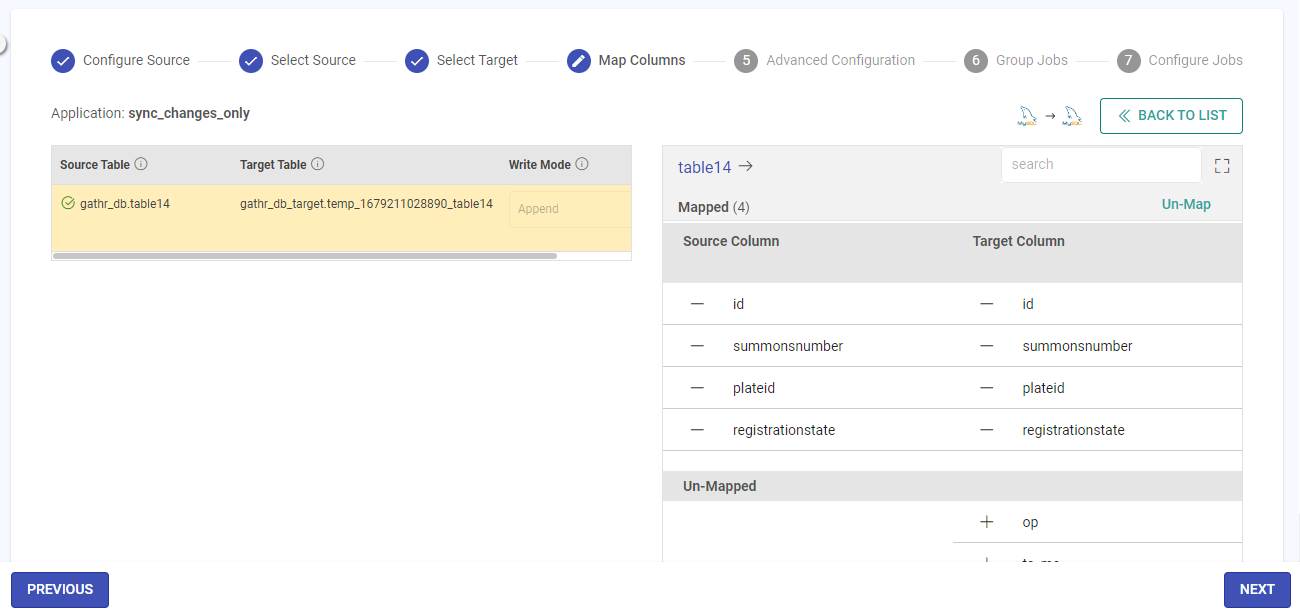
Map Columns
Once the target mapping is done, click the Next button to Map Columns.
The Map Columns panel has two major sections:
First has the list of Source Table, their corresponding Target Table, SCD Type, version column and deleted flag column, and
The second is where the Target table columns will remain open to map.
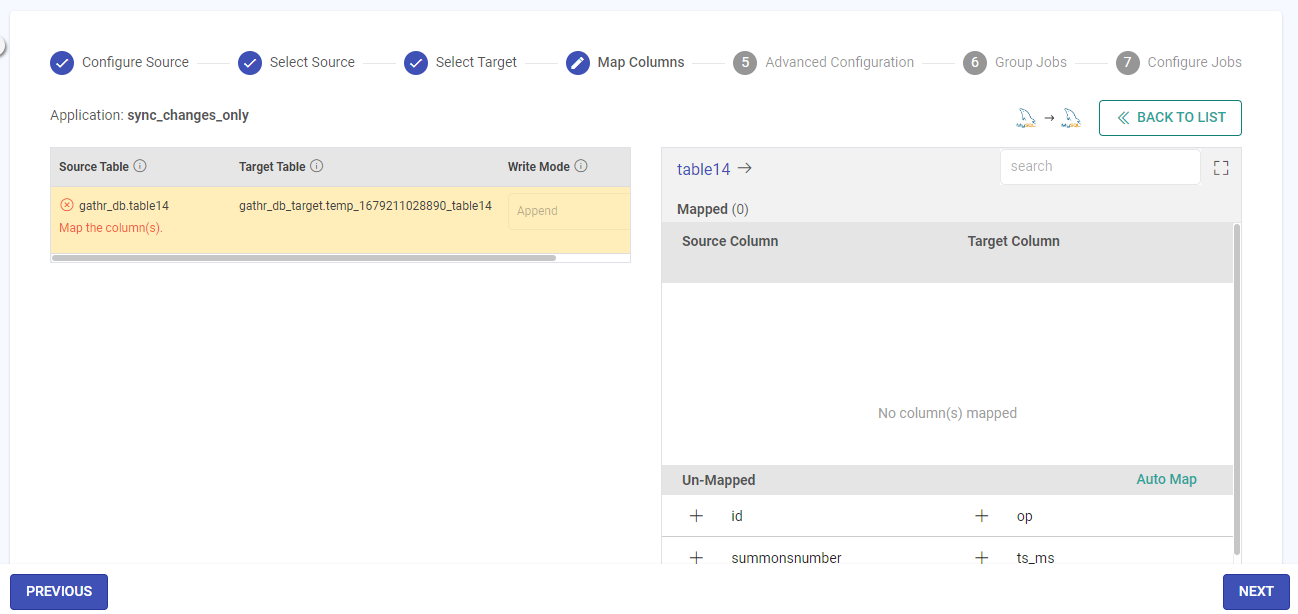
Configure the details for each field as described below:
Source Table
Source Table is the table for which you want to capture the CDC.
Target Table
The target Table is the table where you want to capture the Source table CDC.
SCD Type
Select the Slowly Changing Dimension (SCD) type that should be used for streamlining your data flow to capture the CDC.
Type 1: It will only contain the updated records while selecting.
Type 2: It will maintain the entire history of the source.
Therefore, you need to have two additional columns in case of Type 2.
One of the columns will maintain a version of the record and the other will maintain DELETED_FLAG.
Version
For SCD Type 2, a dedicated column should exist in the target database table to maintain a version for each record.
Please select the column to track the version of the operation performed.
Deleted Flag
For SCD Type 2, a dedicated column should exist in the target database table to maintain delete flags for each record.
Please select the column to track the delete flags.
Column Mapping Section
In the Column Mapping Section, the columns of both the source and target can be mapped.
The source can be mapped with the corresponding columns of the target table.
There could be a case where you have multiple columns in your source table, but, you require to select a few columns and map them to the target table.
There could be a scenario where the source table column names are not like that of the target table names. To map those, you can simply drag and drop the columns against each other and map them.
You may also click on the automap button at the top right of the screen to map a similar name source column with the target column.
Source Column: Source Column is the specific column from the source table for which you want to capture CDC.
Target Column: Target Column is the corresponding column to Source column for which you want to capture Source table CDC.
Column Types: The Partition key is the prime factor for determining how the data is stored in the table. The key helps to organize the tables into partitions by dividing them into different parts.
Join Key: The Join key helps in incrementing the version of the record by identifying the availability of similar records in the target table.
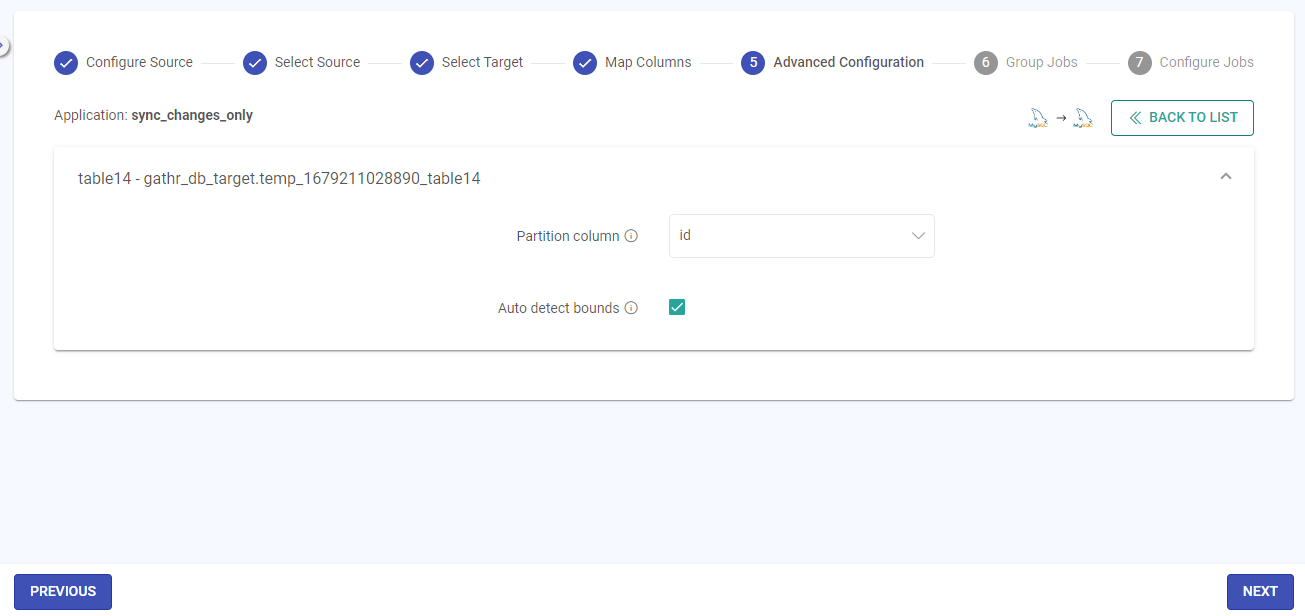
Advanced Configuration
Once the column mapping is done, click the Next button to configure the Advanced Configuration.
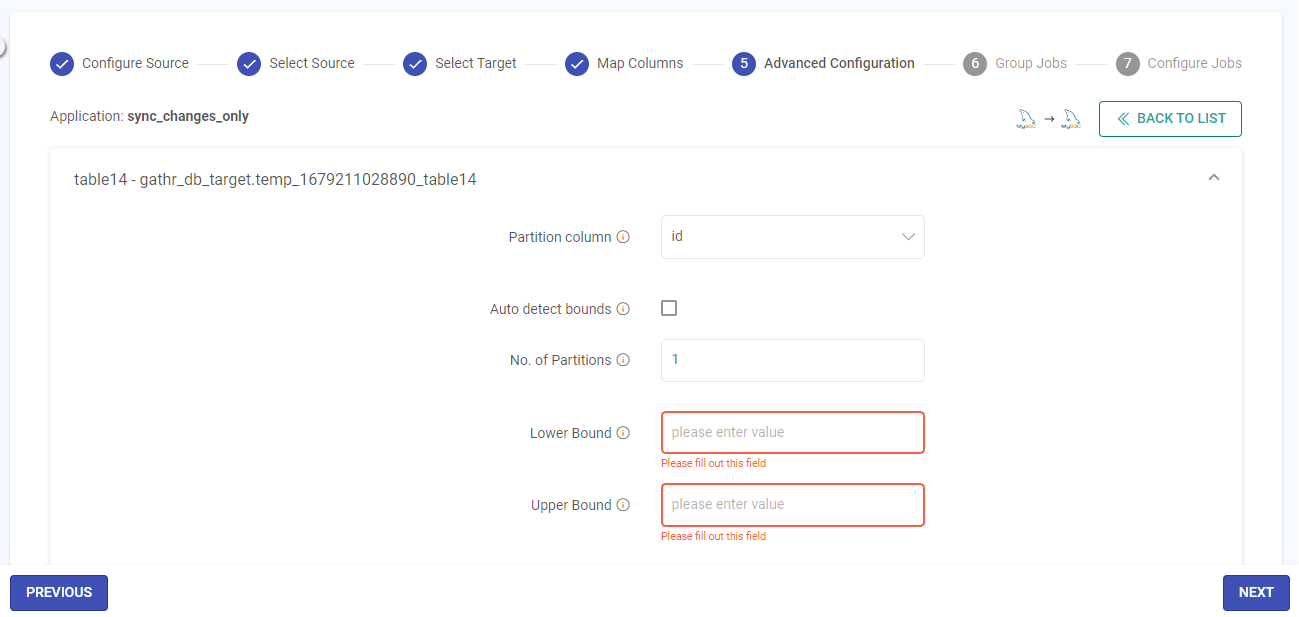
Partition Column
The partitioning column can be any column of type Integer, on which spark will perform partitioning to read data in parallel.
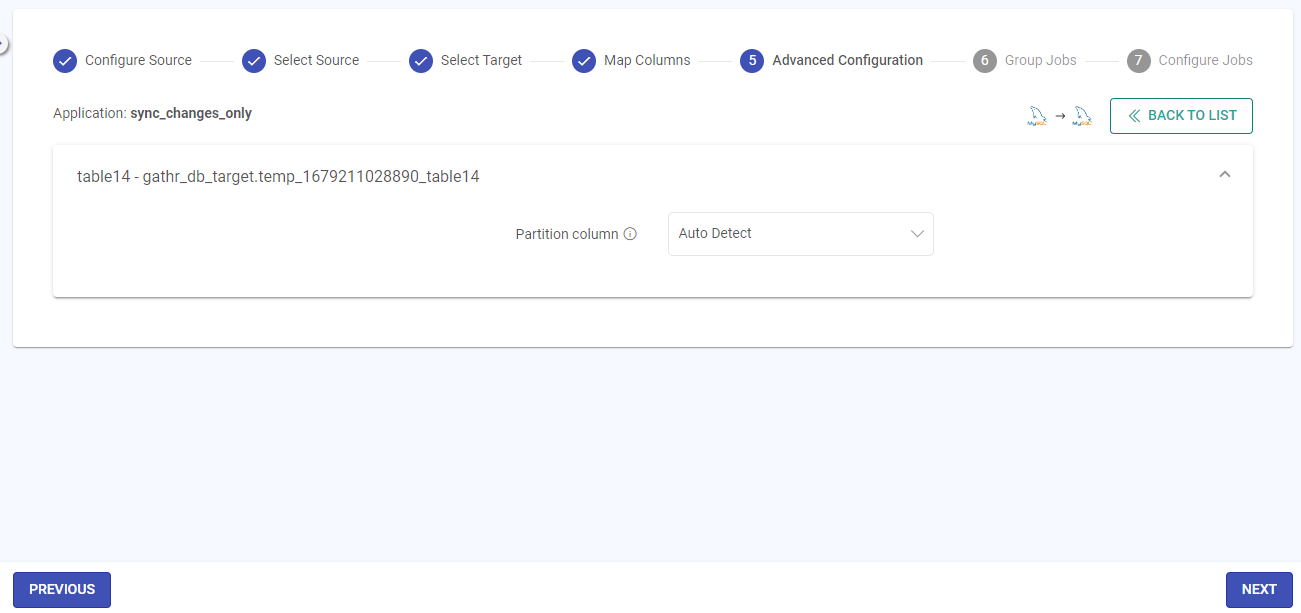
Auto-Detect Bonds
Lower Bound/Upper Bound
Value of the lower bound for partitioning column/ Value of the upper bound for partitioning column.
Group Jobs
Once the Advanced Configuration is done, click the Next button to configure the Grouping.
On the jobs grouping page, you can group the jobs into a single unit.
To create a group, specify the group name and click Create.
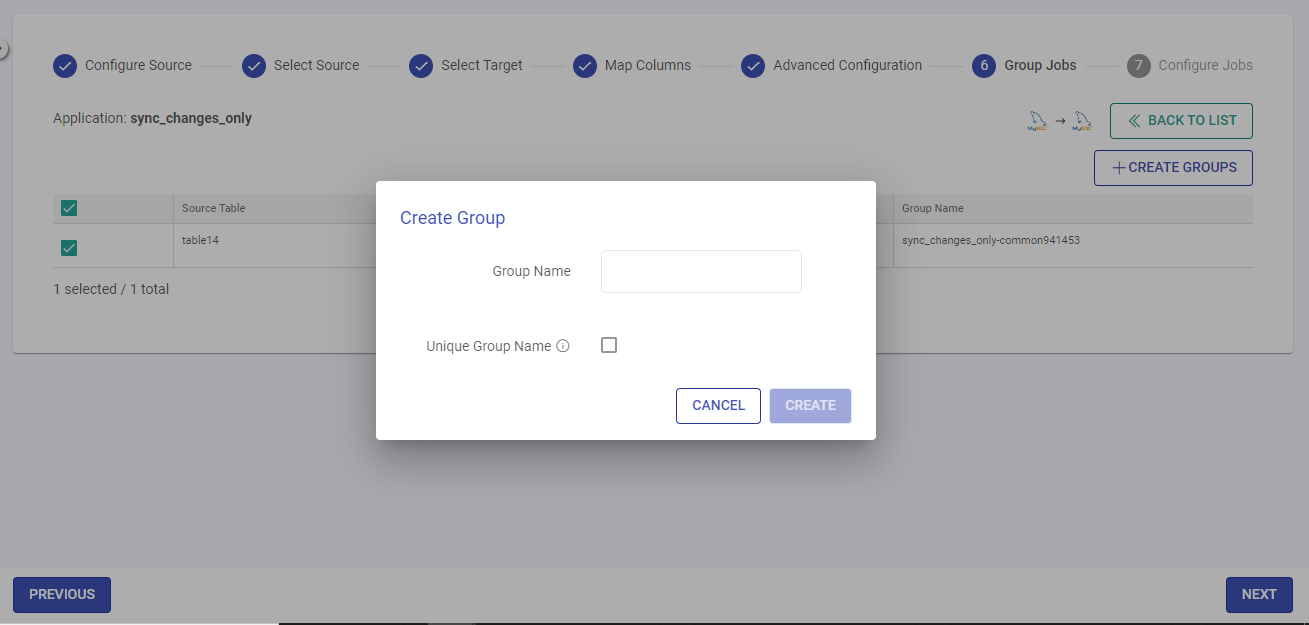
This means the dataflow that you have created can be grouped into a single application or multiple applications.
In certain cases, you may want to combine multiple ‘source to target’ jobs into one group. You can do this easily by assigning a group name to multiple jobs.
Configure Jobs
The last step in creating a CDC application is to Configure Jobs.
Configure the details for each field as described below:
Common fields for Gathr Clusters and Registered Clusters:
Application Deployment
Option to choose the application deployment on either Gathr cluster or EMR cluster associated with the registered compute environment.
The prerequisite to utilizing registered clusters for running applications is to establish a virtual private connection from the User Settings > Compute Setup → tab.
To understand the steps for setting up PrivateLink connections, see Compute Setup →
Cluster Size
Option to choose one amongst Free Tier, Extra Small, Small, Medium, Large, or custom cluster sizes on which the applications will be deployed.
A cluster size should be chosen based on the computing needs.
The credit points (cp) utilization for each cluster is explained below:
- **Extra Small:** 1 credit/min
- **Small:** 2 credits/min
- **Medium:** 4 credits/min
- **Large:** 8 credits/min
The Small, Medium, and Large clusters can only be utilized with a Gathr Advanced or Business plan.
Also, a custom cluster can only be utilized with a registered compute environment that is available in a Business Plan.
Utilize micro cluster if available: Micro cluster option is available for Extra Small Cluster sizes. It uses available free slots on Gathr Compute to optimize the application submission for small-scale applications.
Extra Spark Submit Options
The configuration provided here will be additionally submitted to spark while running the job.
The configuration should strictly be provided in the format given below:
--conf <key>=<value>
Additional configuration fields for Registered Clusters:
AWS Region
Option to select the preferred region associated with the compute environment.
AWS Account: Option to select the registered AWS account ID associated with the compute environment.
DNS Name: Option to select the DNS name linked to the VPC endpoint for Gathr.
EMR Cluster Config: A saved EMR cluster configuration is to be selected out of the list, or it can be created with the Add New Config for EMR Cluster option.
For more details on how to save EMR cluster configurations in Gathr, see EMR Cluster Configuration →
The application will be deployed on the EMR cluster using the custom configuration that is selected from this field.
Group Configuration
Fetch Size
The fetch size determines the number of rows to be fetched in each request.
The default value is 10000.
Maximum Records per trigger
The maximum records per trigger determine the number of records to be fetched in each request.
The default value is 100000.
Reset Offset
Enable this option to reset the default offset and read the data from the beginning.
Monitor Operations Statistics
Enable this option to track the operation statistics for the CDC application. It can be viewed on the application listing page.
Continue with the pipeline definition after providing the deployment preference.
Save and exit the pipeline definition page.
Once you finish doing the jobs configuration, click Done to create the CDC application.
The CDC application once created will appear on the listing page.
On the listing page the option to Run, Edit, View, Schedule and Delete the applications are available for each listed CDC app.
If you have any feedback on Gathr documentation, please email us!