Databricks Ingestion Target
The Databricks Emitter can be customized to send processed data from Gathr to Databricks, enabling a smooth flow of information between the two platforms.
Target Configuration
Configure the target parameters as explained below.
Fetch From Target/Upload Schema File
The data source records needs to be emitted to a Databricks Database target table.
In case if the Gathr application has access to a target table in the Databricks Database, choose the option Fetch From Target.
In case if Gathr application does not have access to a Databricks Database target table, you can choose the option Upload Schema File in order to map the Databricks Database table columns with the source columns during design-time and confirm the data type for each column. In such cases you can run the application in a registered environment, that has access to all the required resources. During run-time, the application will run on the registered cluster of your choice picking up the configuration values as provided during application design.
When you select the Upload Schema File option, a Schema Results section will get displayed at the bottom of the configuration page.
You can then download the sample schema, provide Databricks Database - Table Column Name against mapping values and verify the data type.
Once it is updated, you can upload the saved file to see a sample of how the records from a source column will be written into the corresponding mapped Databricks Database column.
Connection Name
Connections are the service identifiers. A connection name can be selected from the list if you have created and saved connection details for Databricks earlier. Or create one as explained in the topic - Databricks Connection →
Use the Test Connection option to make sure that the connection with Databricks is established successfully.
A success message states that the connection is available. In case of any error in test connection, edit the connection to resolve issue before proceeding further.
Use the Start SQL Warehouse option to initialize the Databricks SQL Warehouse if it is not running.
Is Unity Catalog Enabled?
You can check this option if your Databricks workspace is enabled for unity catalog.
To know how to verify if your workspace is already enabled for Unity Catalog, click here.
Catalog Name
All catalogs associated with your Databricks workspace will be listed when Unity Catalog is enabled.
Choose a catalog to list its schema names in the subsequent configuration.
Schema Name
Choose a schema to list its table names in the subsequent configuration.
Table Name
Table names will get listed as per the connection details configured.
Select the table name to emit the data.
Save Mode
Save mode specifies how to handle any existing data in the target.
The options are:
Append: The source records will be appended in the specified target table as per the schema mapping.
Upsert: When persisting data, if the data already exists, the operation combines existing data with the new data, updating records when there are conflicts and adding new records when necessary. This mode is suitable for merging data and ensuring data consistency by applying a combination of inserts and updates as needed.
Condition Key Columns
Unique columns to be used as condition column for upsert mode should be selected.
Staging Data Storage
When emitting data, you can temporarily store it with Gathr or choose an external location you specify, like Databricks Unity Catalog Volume or Amazon S3. The temporary data is automatically deleted from the selected storage after the application run is completed.
For external option, specify these additional fields.
File System
The temporary data will be stored in the specified Databricks Unity Catalog Volume or AWS S3 file system.
If Databricks Unity Catalog Volume is the chosen option:
Auto-Create Temp Storage Path
At runtime, Gathr will automatically create the temporary data storage path (schema ‘gathr_staging’, UC volume ‘gathr_volume’, and a directory ‘pipeline-name’) in the Catalog provided before.
If disabled, you can specify the path manually in the field below.
Temp Storage Path
Specify the directory path for storing temporary data.
This path should follow the format: /Volumes/CatalogName/SchemaName/VolumeName/FolderPath/.
Ensure that the specified schema and volume exist in the provided Catalog or will be created manually.
If Amazon S3 is the chosen option:
Connection Name
Connections are the service identifiers. A connection name can be selected from the list if you have created and saved connection details for S3 earlier. Or create one as explained in the topic - Amazon S3 Connection →
Note: You will only see the connections created using Role ARN.
Path
S3 file or directory path is to be given where the temporary data will be stored.
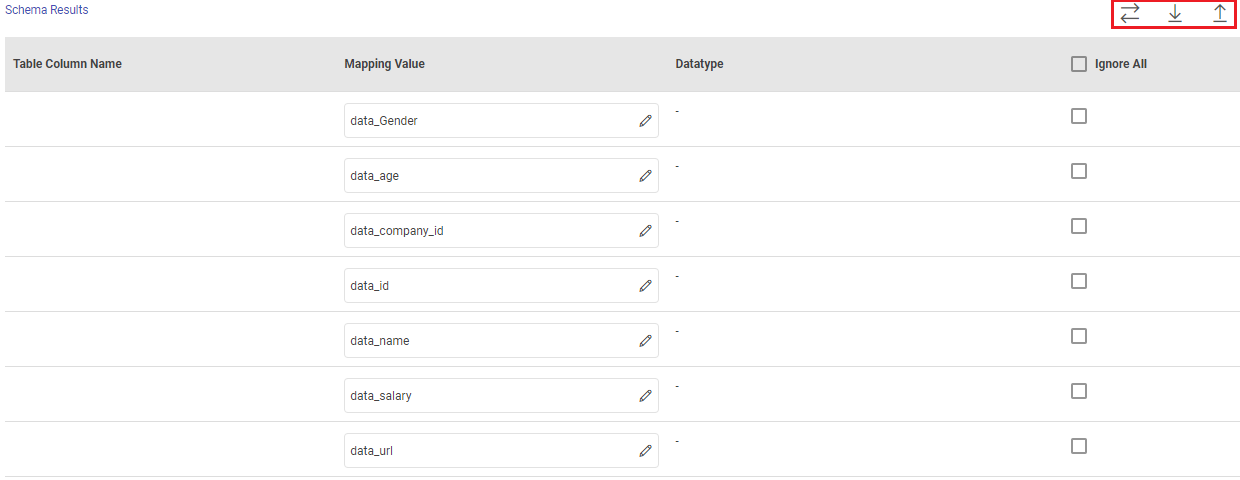
Schema Results
Map the values coming in pipeline with any table columns name.
Table Column Name: The columns from the selected target table are populated here.
Mapping Value: Enter a mapping value to the corresponding column.
Note: An input condition key column cannot be mapped to multiple table columns.
Datatype: The data type of the value, i.e., String, Int, Text and so on.
Ignore All: Use Ignore All or selected fields while pushing data to emitter.
If you have any feedback on Gathr documentation, please email us!