HTTP Ingestion Source
The HTTP data source can fetch data based on requests sent to HTTP and HTTPS resources via Gathr.
Information that will be useful while configuring the data source:
Type of the source data (for example, CSV, JSON, or Text)
Resource URI to access the source data.
Authentication type of the resource and details required for Gathr to access the data (for example, if Auth Type is Basic, then, Username and Password will be needed to access the resource)
Further, the HTTP data source configuration is also equipped to handle SSL-enabled resources.
Data Source Configuration
Configure the data source by providing request parameters that are explained below.
1. Fetch From Source/Upload Data File
For designing the application, you can either fetch the sample data from the HTTP resource by providing its URI or, upload a sample data file in one of the supported formats to see the schema details during the application design.
File Format
Select the File Format matching the format of data in the HTTP resource to be requested.
Gathr supports CSV, JSON, and TEXT file formats for HTTP data sources.
For CSV file format, select its corresponding delimiter.
Header Included: Specify if the first row should be considered a header row while reading the sample file.
For JSON file format, there will be an additional field called Path to Data.
Upload
Please upload the sample data file as per the file format selected. The schema of data items in the sample file should be the same as the HTTP resource that is to be read.
If Fetch From Source is selected, continue configuring the data source.
2. Request Method
The HTTP request method to fetch data from a source should be selected out of GET or POST.
The method selected determines how the configured parameters in the data source will be submitted to the HTTP resource.
GET: Use the GET method if form data is included in the URI, appended as query string parameters.
POST: Use the POST method if the form data is to be given in the request body of the HTTP data source.
3. URI
The HTTP or HTTPS URI should be provided to send requests to a resource via the HTTP data source.
The URI should contain all the details that the HTTP data source will need to find the API resource it is requesting.
Example: https://<hostName>:<portNumber>/path/_queryString
4. Request Body (Optional)
Using the request body option, a data payload can be sent to an HTTP resource in the body of the request.
Example
{
  "from":1,
  "size":10,
  "query":{"match_all":{}}
}
5. Header (Optional)
Use the header field(s) to provide additional requests to the HTTP resource via the HTTP data source.
Example

6. Auth Type
Specify the authorization type that should be used to authenticate the HTTP resource.
The supported authentication types are: None, Basic, Token, and OAuth2. Each type is explained below in detail.
Auth Type - None
Choose this option to access an HTTP resource without needing any authentication.
Auth Type - Basic
If Auth Type is selected as Basic, proceed after providing the below parameters:
Username: Enter the user name for accessing the HTTP resource.
Password: Enter the password for accessing the HTTP resource.
Auth Type - Token Based
If Auth Type is selected as Token, proceed after providing the below parameters:
Token ID: The key with which the token is referred in the request.
Token: Token to access the HTTP resource.
Auth Type - Oauth2
If Auth Type is selected as OAuth2, proceed after providing the below parameters:
Auth Headers: The headers associated with Auth URL should be provided as key-value pairs, through which the authorization code is generated.
Client ID: The client identifier given during the application registration process should be provided.
Secret Key: The secret key given to the client during the application registration process should be provided.
Auth URL: The endpoint for the authorization server, which retrieves the authorization code should be provided.
7. Enable SSL (Optional)
It is set to False by default.
Set this option to True, if the resource that is to be requested using the HTTP data source is SSL-enabled.
If set to True, choose how the SSL-enabled HTTP resource should be verified.
Either a keystore file or a certificate file needs to be uploaded based on the chosen verification method.
The Keystore Password or Certificate Alias should then be provided as per the type of file uploaded for verification.
Add Configuration: Additional properties can be added using this option as key-value pairs.
8. Path to Data (For JSON Data Type)
Path to data is a JSON path expression that points to arrays or JSON.
To derive a JSON path expression, you can follow a structured approach based on the hierarchy and keys within the JSON data. To do it:
Start at the root: Use
$to signify the root of the JSON structure.Navigate through objects: Traverse through the nested objects using dot notation (
.).Access arrays (If Required): If you encounter arrays, use square brackets
[]with appropriate index or wildcard[*]to access array elements.
Example 1
Sample JSON data:
{
	"data": {
		"userlist": [
			{"name": "john", "age": 33, "department": "ICU"},
			{"name": "Mike", "age": 28, "department": "Oncology"},
			{"name": "Den", "age": 30, "department": "Medicine"}
		]
	},
	"metadata": {
		"has_more_records": false
	}
}
Given this JSON structure, let’s derive the path to the userlist array:
- Root:
$ - Navigate to
dataobject:.data - Access
userlistarray:.userlist
Therefore, the path to data is: $.data.userlist
The output corresponding to this path would be:
[
	{"name": "john", "age": 33, "department": "ICU"},
	{"name": "Mike", "age": 28, "department": "Oncology"},
	{"name": "Den", "age": 30, "department": "Medicine"}
]
This output represents the array of user objects within the userlist key of the data object.
Example 2
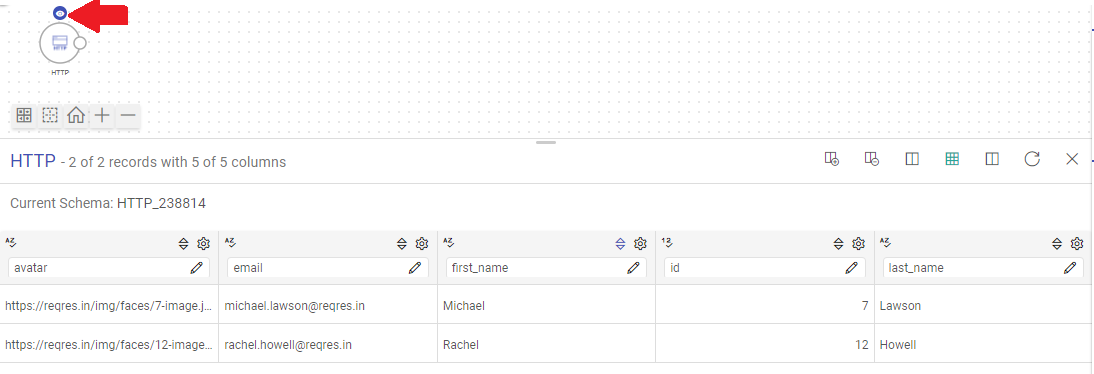
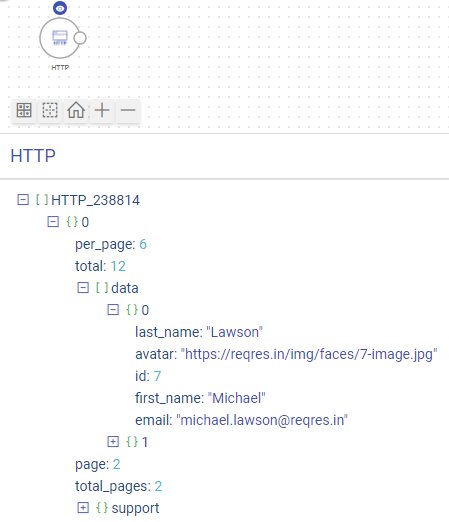
Consider fetching the schema details of a source for the sample JSON file illustrated below:

If you provide the Path to data field value as $.data, then only the attributes of the data element along with their values will get fetched from the source as shown in the image below:
If you keep the Path to Data field value as $ (i.e., default value), then as per the data source configuration the entire JSON file will get fetched.
Example 3
Sample JSON data:
{
  "books": [
    {
      "book": {
        "title": "The Great Gatsby",
        "author": {
          "name": "F. Scott Fitzgerald",
          "birth_year": 1896
        },
        "genre": "Classic Fiction"
      }
    },
    {
      "book": {
        "title": "To Kill a Mockingbird",
        "author": {
          "name": "Harper Lee",
          "birth_year": 1926
        },
        "genre": "Southern Gothic"
      }
    },
    {
      "book": {
        "title": "1984",
        "author": {
          "name": "George Orwell",
          "birth_year": 1903
        },
        "genre": "Dystopian Fiction"
      }
    }
  ]
}
This JSON path expression starts at the root of the JSON structure, goes to the books array, and for each element in the array, extracts the book object.
We provide the path to data as: $.books[*].book
The output corresponding to this path would be:
[
  {
    "title": "The Great Gatsby",
    "author": {
      "name": "F. Scott Fitzgerald",
      "birth_year": 1896
    },
    "genre": "Classic Fiction"
  },
  {
    "title": "To Kill a Mockingbird",
    "author": {
      "name": "Harper Lee",
      "birth_year": 1926
    },
    "genre": "Southern Gothic"
  },
  {
    "title": "1984",
    "author": {
      "name": "George Orwell",
      "birth_year": 1903
    },
    "genre": "Dystopian Fiction"
  }
]
More Configurations
9. Design Time Request Body (Optional)
Use this option to limit the volume of data fetched from a source during the application design time. Here, the main objective is to see the schema details of the incoming source data.
Example
{
  "from":1,
  "size":5,
  "query":{"match_all":{}}
}
Schema
Check the populated schema details. For more details, see Schema Preview →
If you have any feedback on Gathr documentation, please email us!