Snowflake ETL Target
You can use snowflake cloud-based data warehouse system as an emitter in the ETL pipelines.
Target Configuration
Connection Name: Connections are the service identifiers. A connection name can be selected from the list if you have created and saved connection details for Snowflake earlier. Or create one as explained in the topic - Snowflake Connection →
Schema Name: Required schema name is to be selected from the Snowflake database schema list that appears as per the selected Snowflake connection.
Table Settings Mapping and Tracking
Configure table details where you want to emit the source data. The available options are Use Existing Table or Create New Table.
If Use Existing Table is selected, configure the below fields:
Table Name: Target tables that are contained in the schema that you selected before, will list as a drop-down. An existing table name should be selected in which the source data is to be emitted.
If a compute environment is to be used for running the application, schema mapping for the target can be provided using the Upload Schema File option. In this case, you can also fill-in the name of an existing table in the table name field if it does not appear in the list.
Next, the schema results will be displayed for mapping.
Schema Mapping when an Existing Table is used
There are two ways in which schema mapping can be provided for an existing table, Fetch from target and Upload schema file.
Fetch From Target
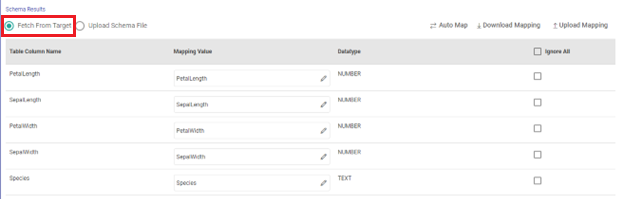
With fetch from target you can directly fetch the schema to be applied from the Snowflake target.
Table column names will get populated and the Auto Map option can be used to fill-in the mapping values.
To do bulk changes in the mapping values, you can use Download Mapping option to download the schema file. Update mapping values in the downloaded file. Then, use Upload Mapping option to provide the mapping values.
The columns that are selected to ignore will not be considered for mapping.
Upload Schema File

The upload schema file option is preferable when the application is supposed to be submitted on a registered cluster. Here, you can upload the sample schema to be applied on the Snowflake target table.
Use Upload Schema option to provide a sample schema file if you have one.
Then, the Auto Map option can be used to fill-in the mapping values.
Else, use Download Sample Schema option to download a sample schema file. Update mapping values in the downloaded file and then upload it to provide the schema mapping.
The columns that are selected to ignore will not be considered for mapping.
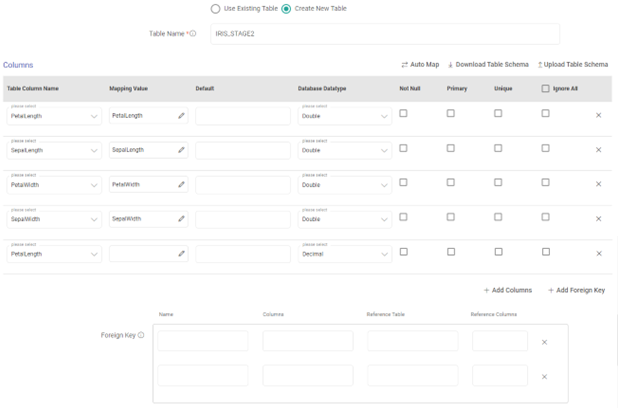
If Create New Table is selected, configure the below fields:
Table Name: A table name should be provided that will get created in the schema that you selected before. The source data will be emitted to this table.
Next, the Columns section will be displayed for mapping.
Use Upload Schema option to provide a sample schema file if you have one.
Then, the Auto Map option can be used to fill-in the mapping values.
Else, use Download Sample Schema option to download a sample schema file. Update mapping values in the downloaded file and then upload it to provide the schema mapping.
The columns that are selected to ignore will not be considered for mapping.
Each column can then be defined with its data type, and optionally whether the column:
Requires a value (NOT NULL).
Has a default value.
Has any referential integrity constraints (primary key, or unique key).
Additionally, you can also provide the constraints for reference table and reference columns using the Add Foreign Key option.
Continue to configure the new table options as follows:
Comments: Optional comments can be added for the table.
Cluster By: Specify column or column expressions that should be referenced as the clustering key in the table.
To know more about data clustering in Snowflake, click here.
Data Retention Time: For how many days the table needs to be retained can be specified.
Change Tracking: If set to true, an individual table stream tracks the changes made to rows in a source table.
Copy Grants: Check-marking the box for grants, copies permissions from the table being replaced with CREATE OR REPLACE (if it already exists), and not from the source table(s) being queried in the SELECT statement.
Table Options: Create table method should be selected out of the following:
Create table if not exists: A new table will get created as per the configurations provided if it does not exist in the target.
Truncate & create table: If the table name provided already exists in Snowflake database, it will be truncated and a new table will then be created with the source data.
Truncate table: If the table name provided already exists in Snowflake database, it will be truncated with the source data.
Warehouse Settings Cluster and Scaling
Configure Warehouse details to specify the compute resources. The available options are Use Existing Warehouse or Create New Warehouse.
If Use Existing Warehouse is selected, configure the below fields:
Warehouse Name: Warehouse list for the selected warehouse connection will be displayed here. The user can select the warehouse from the list.
If Create New Warehouse is selected, configure the below fields:
Warehouse Name: Provide a warehouse name for the new warehouse to be created.
Warehouse Configuration
Warehouse Name: New Warehouse name should be provided.
Warehouse Size: Preferred warehouse size should be selected.
Maximum Cluster Count: The maximum number of clusters required for the warehouse should be specified.
Scaling Policy: The scaling policy should be selected out of Standard or Economy.
Auto Suspend: Auto suspend value for the warehouse should be provided (in seconds).
Auto Resume: Specifies whether to automatically resume a warehouse when a SQL statement (e.g. query) is submitted to it.
Comments: Optional comments can be added for the warehouse.
Advanced Settings
Advanced settings will vary in case of batch and streaming data sources in the pipeline.
Advanced settings options with a Batch Data Source in pipeline:
Save Mode: Specifies how to handle the existing data in the target. The options are, Append and Truncate and Overwrite.
Append: Contents of the schema will be appended to existing data/table.
Use External Storage: If the user is doing an external data transfer, and has to store the temporary data in S3, select the external storage option.
External Storage: The temporary data will get stored in S3.
Connection Name: Connections are the service identifiers. A connection name can be selected from the list if you have created and saved connection details for Amazon S3 earlier. Or create one as explained in the topic - Amazon S3 Connection →
Path: Optional. S3 file or directory path is to be given where the temporary data will get stored.
Purge: Optional. The purge option can be used to delete the intermediate data from S3.
Add configuration: Additional properties can be added using Add Configuration link.
Advanced settings options with a Streaming Data Source in pipeline:
Streaming Stage Name: Stage name to be used for creating stage in Snowflake.
Output Mode: The output mode to be used while writing the data to the Streaming sink.
Append: Output Mode in which only the new rows in the streaming data will be written to the target.
Enable Trigger: Trigger defines how frequently a streaming query should be executed.
Processing Time: Processing Time is the trigger time interval in minutes or seconds. This property will appear only when Enable Trigger checkbox is selected.
Add configuration: Additional properties can be added using Add Configuration link.
Post Action
To understand how to provide SQL queries or Stored Procedures that will be executed during pipeline run, see Post-Actions →
Notes
Optionally, enter notes in the Notes → tab and save the configuration.
If you have any feedback on Gathr documentation, please email us!