AWS Compute Setup in Gathr
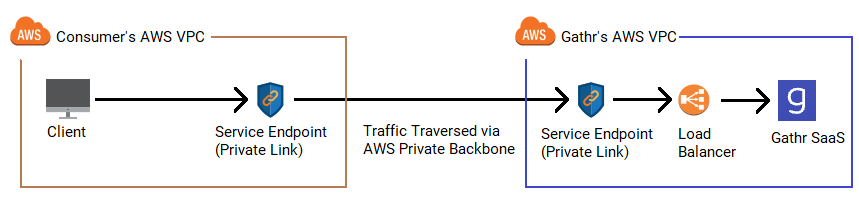
This topic covers information on how you can leverage AWS PrivateLink to run Gathr applications in the region of your choice.
The compute setup feature allows you to associate your cloud accounts with Gathr.
By doing so, you can run the Gathr applications on clusters that belong to the cloud accounts that you register.
You can link your AWS accounts with Gathr and use VPC endpoint service to securely manage data traffic while running Gathr applications.
You can add AWS accounts with Gathr and setup compute environments in few simple steps. Available with AWS multi-region support, once registered you can bring your own compute environments in Gathr to run Data Ingestion, CDC and Advanced ETL applications.
Prerequisites
There are certain prerequisites that needs to be fulfilled before using EMR clusters as registered compute environments in Gathr:
- User must have a Gathr account and at least one AWS account.
- User must have permissions to create VPC instances, new policies and roles in AWS console.
- The following roles must be created in the user’s AWS account:
- EMR_DefaultRole
- EMR_EC2_DefaultRole
- EMR_AutoScaling_DefaultRole
- AWSServiceRoleForEMRCleanup
Create EMR Roles
Before launching an EMR Cluster in Consumer’s AWS Account, specific EMR service roles must be created in the AWS account.
While launching EMR Clusters from Gathr, these roles need to be provided as part of configuration options but will only be visible if these roles exist in the Consumer’s AWS Account.
These roles are used only by the EMR service in your AWS account to create and terminate the clusters and access other AWS services as per the requirements of the pipeline executing in the EMR clusters.
Make sure that the key-pair tag 'for-use-with-amazon-emr-managed-policies=true' is attached to the VPC, Subnets, and Security Groups.
This tag is required to launch EMR clusters with EMR V2 IAM Roles.
Additionally, if any of the following security groups exist in your VPC, add the same key-pair tag 'for-use-with-amazon-emr-managed-policies=true' in each security group.
- ElasticMapReduce-master
- ElasticMapReduce-Master-Private
- ElasticMapReduce-ServiceAccess
- ElasticMapReduce-slave
- ElasticMapReduce-Slave-Private
Steps to create the required EMR roles
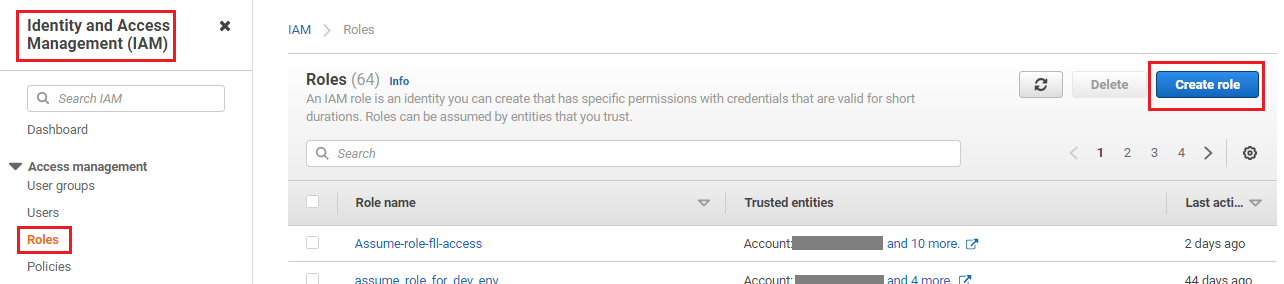
Sign in to the AWS Management Console and open the IAM console.
Follow the steps given below for creation of each role.
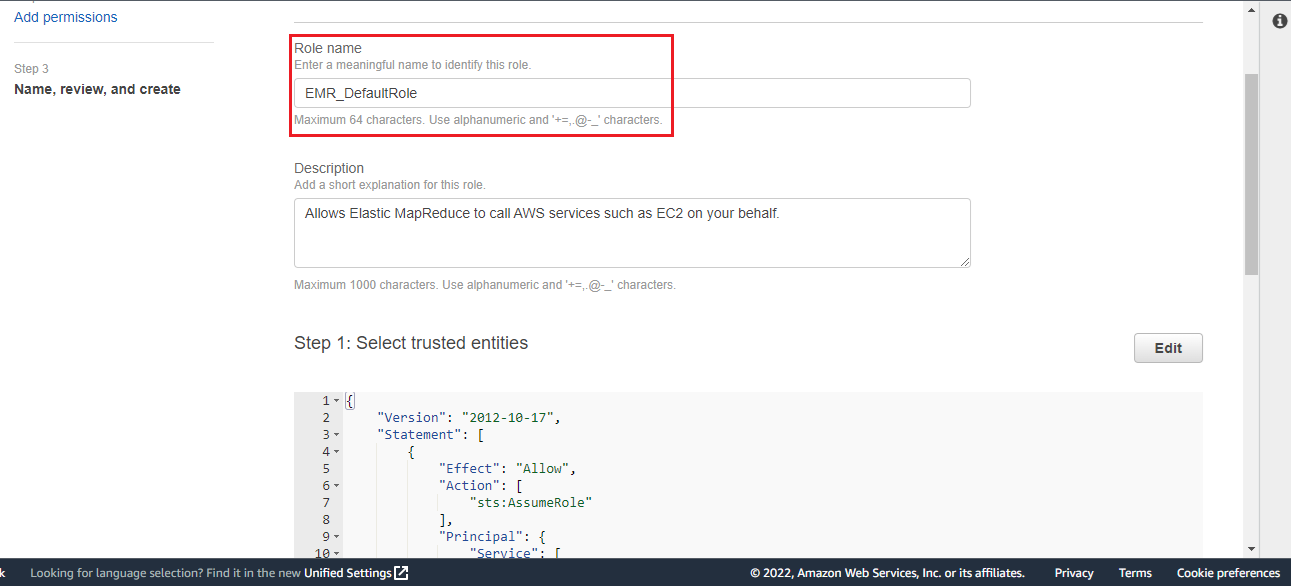
EMR_DefaultRole
Steps to create the EMR_DefaultRole
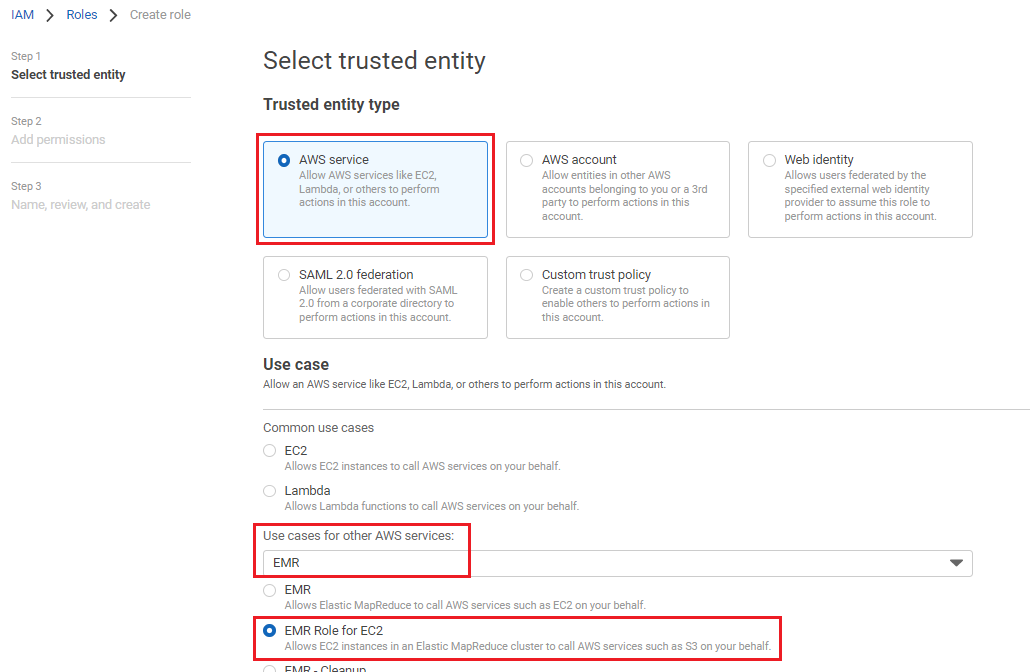
In the navigation pane of the console, choose Roles and then, Create role.
Select AWS services Radio Button.
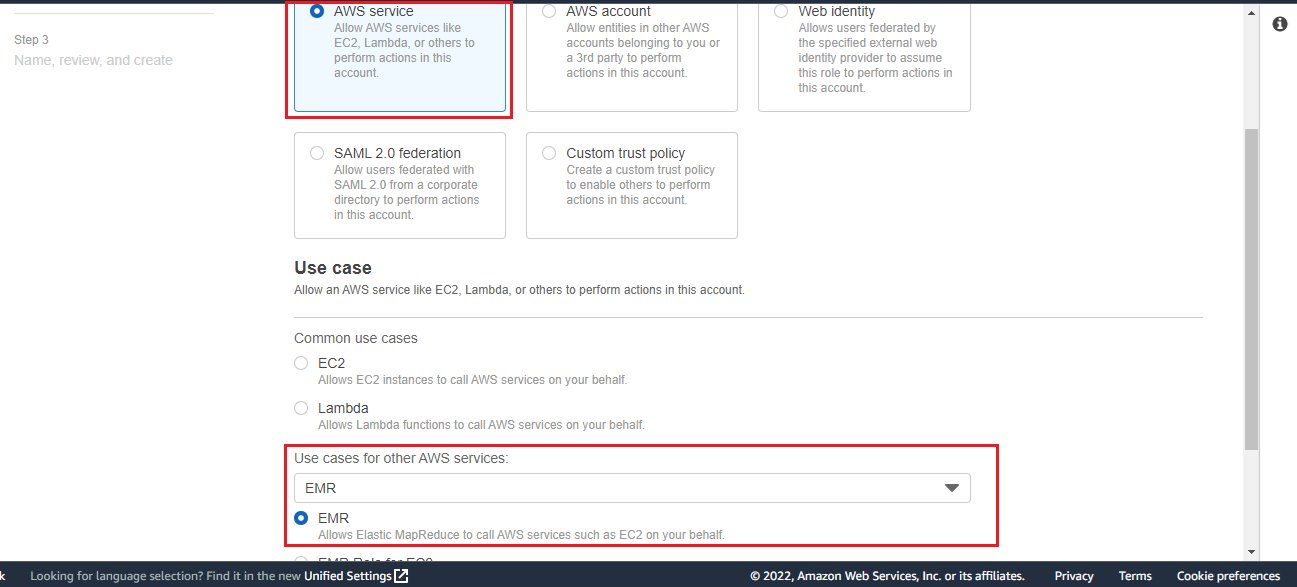
Go to Use cases for other AWS services.
Search EMR and select the option EMR.
Click Next.
On the Add permissions page, click Next.
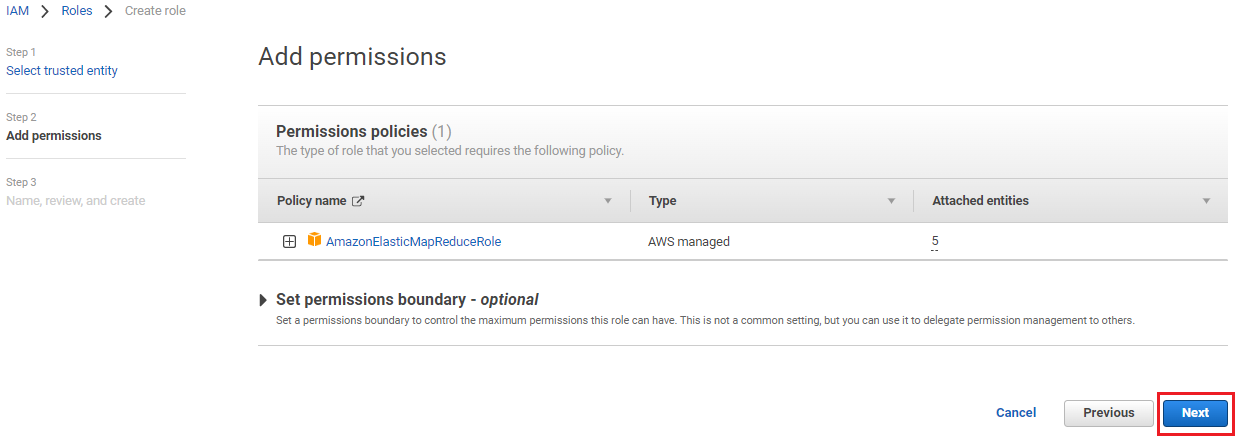
Enter the Role name as EMR_DefaultRole and click Create role.
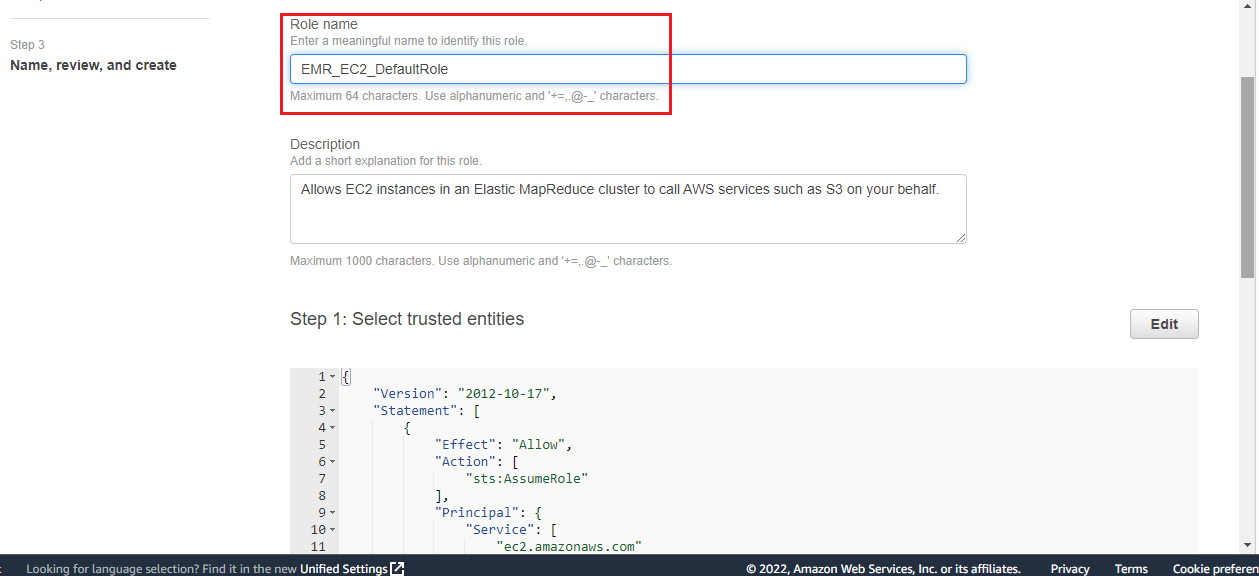
EMR_EC2_DefaultRole
Steps to create the EMR_EC2_DefaultRole
In the navigation pane of the console, choose Roles and then, Create role.
Select AWS services Radio Button.
Go to Use cases for other AWS services.
Search EMR and select the option EmrRole For EC2.
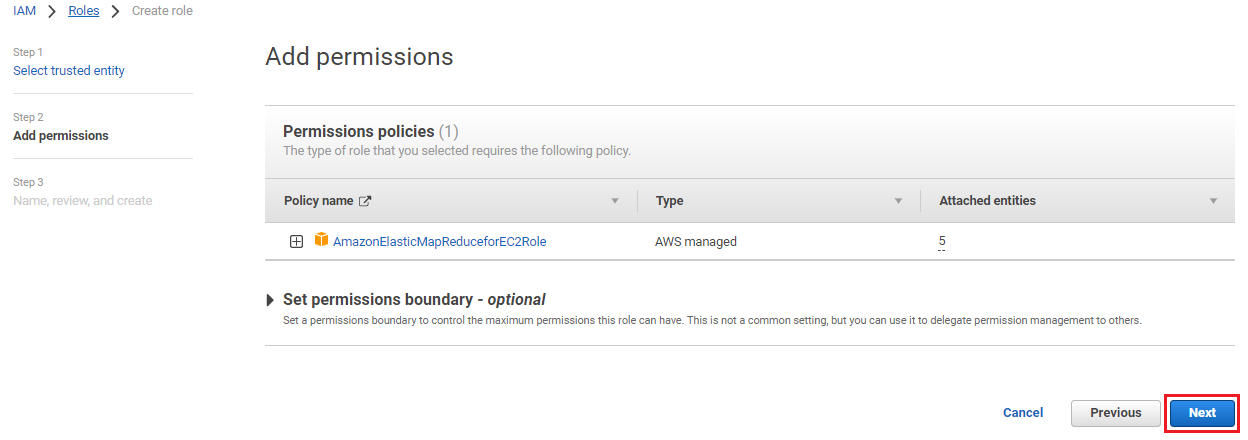
Click Next.
On the Add permissions page, click Next.
Enter the Role name as EMR_EC2_DefaultRole and click Create role.
EMR_AutoScaling_DefaultRole
Steps to create the EMR_AutoScaling_DefaultRole
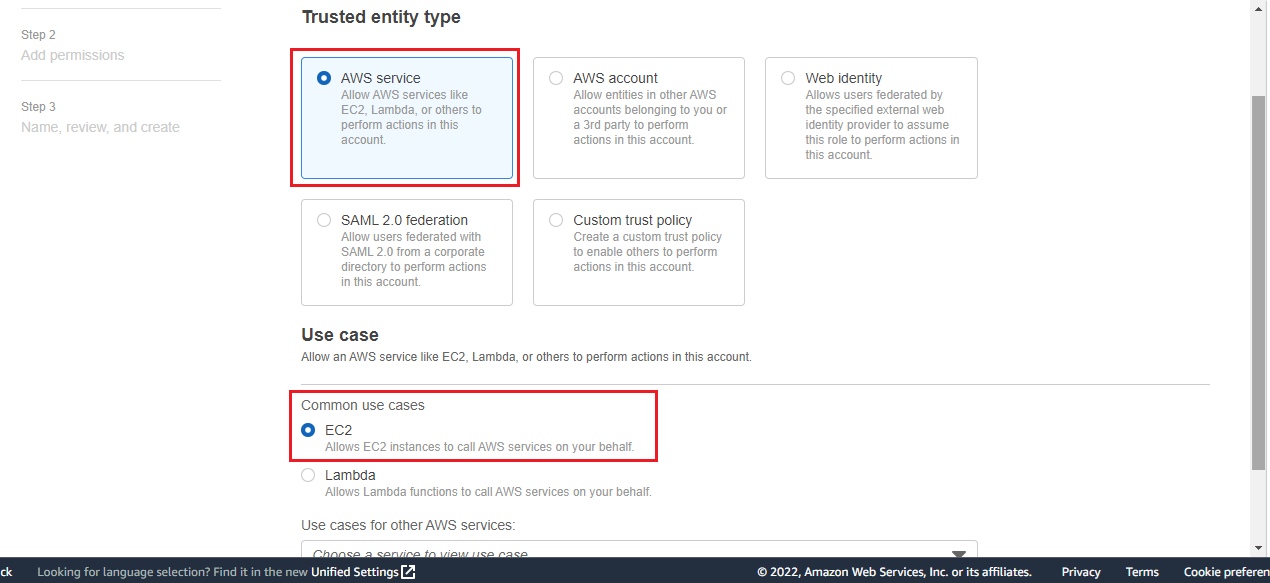
In the navigation pane of the console, choose Roles and then, Create role.
Select AWS services radio button.
Select the EC2 option and click Next.
On the Add Permissions page, search and add the policy AmazonElasticMapReduceforAutoScalingRole and click Next.
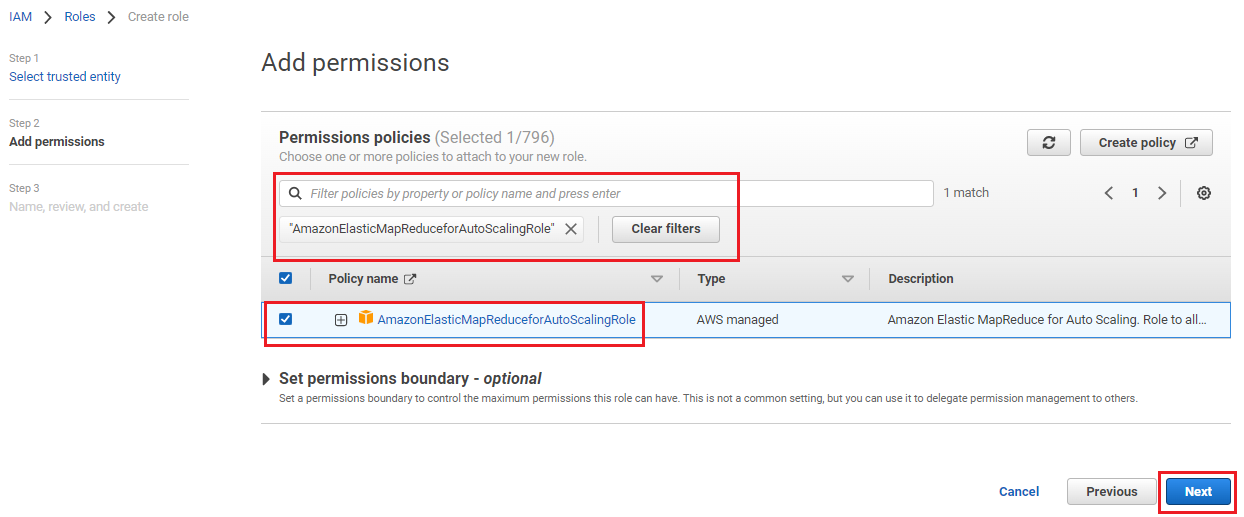
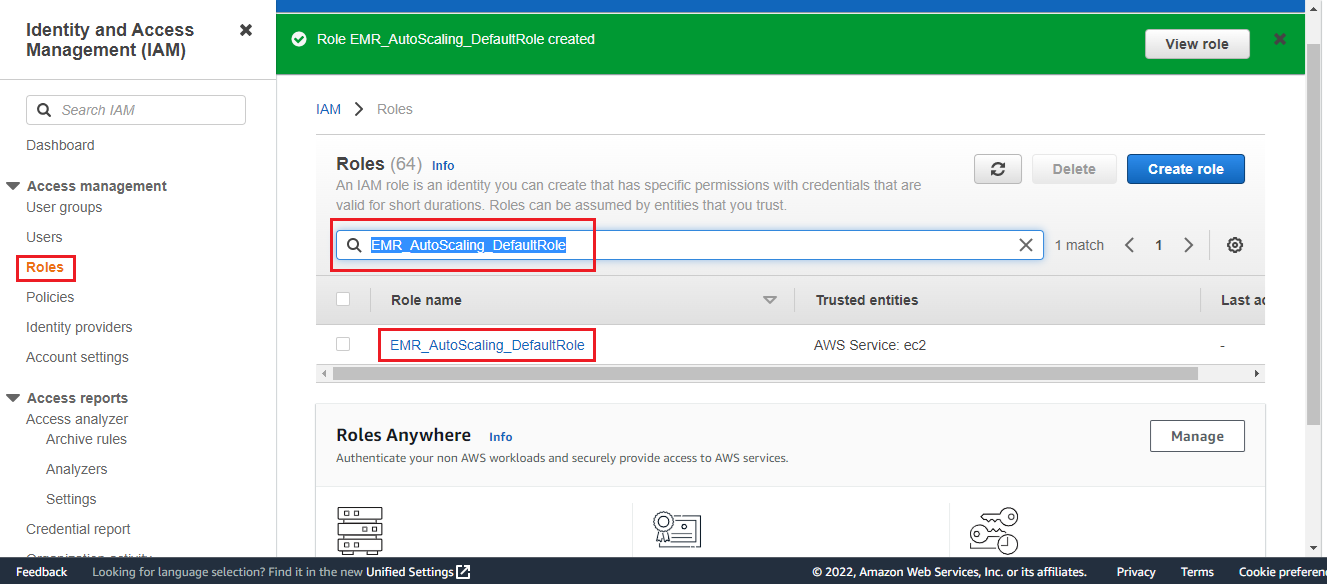
Enter role name EMR_AutoScaling_DefaultRole and click Create role.
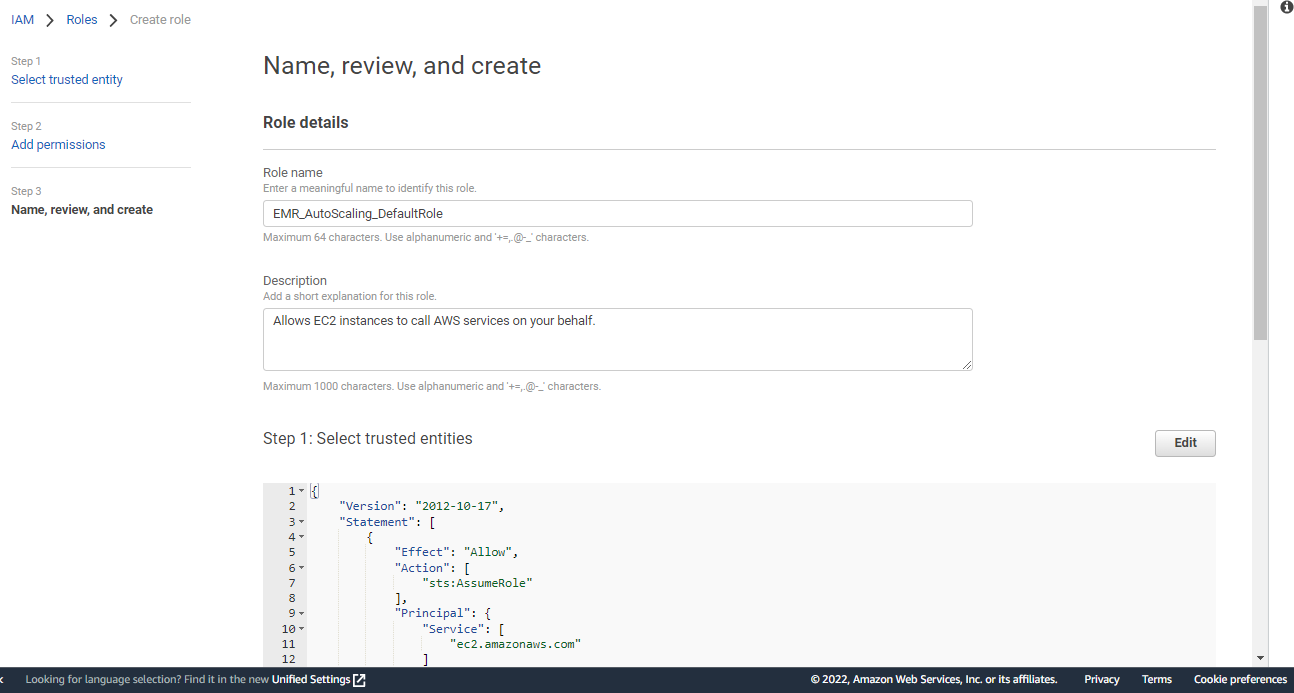
Modify the trust relationship for the role as follows:
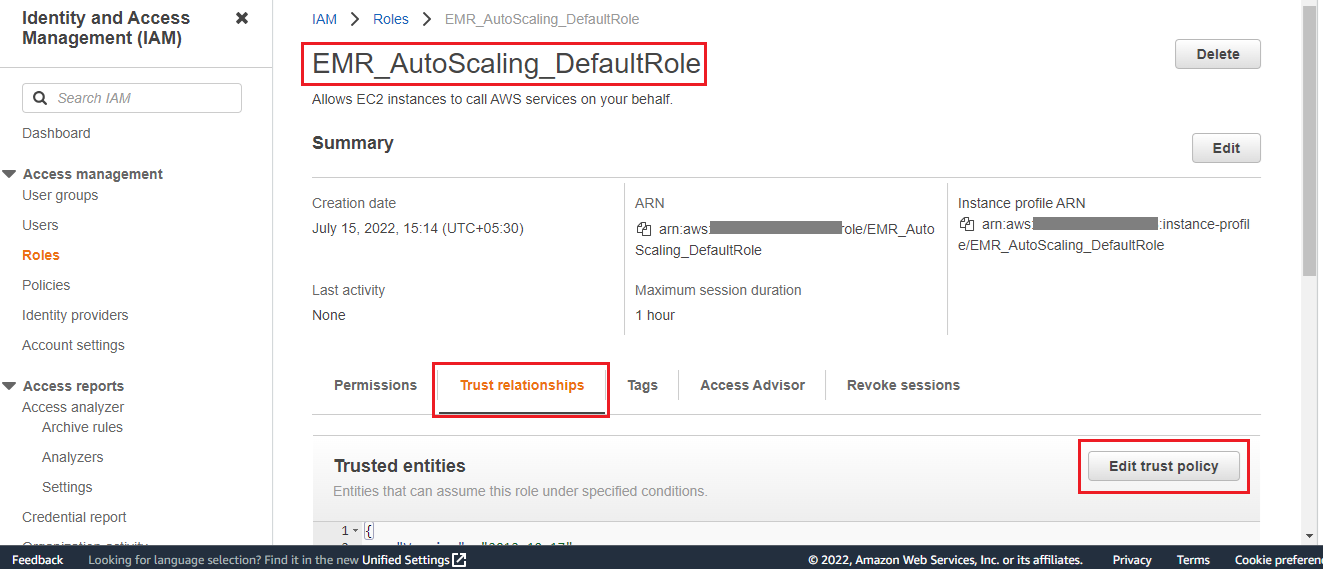
In the Roles dashboard, search the role by name EMR_AutoScaling_DefaultRole.
Open this role and then click on Edit trust policy.
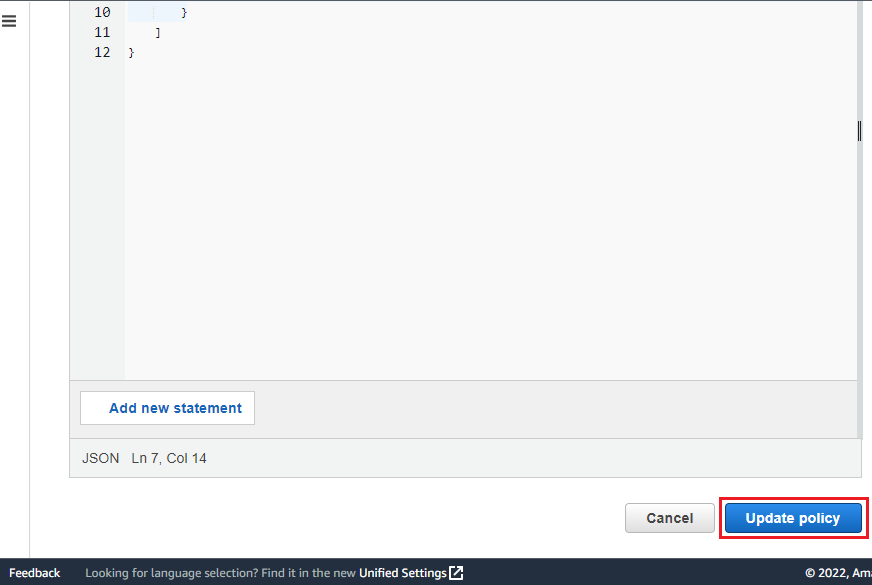
Replace the existing JSON file with the following configuration JSON.
{
    “Version”: “2012-10-17”,
    “Statement”: \[
    {
        “Effect”: “Allow”,
        “Principal”: {
            “Service”: \[
                        “application-autoscaling.amazonaws.com”,
                        “elasticmapreduce.amazonaws.com”
                        \]
                    },
        “Action”: “sts:AssumeRole”
    }
    \]
}
Click on Update policy.
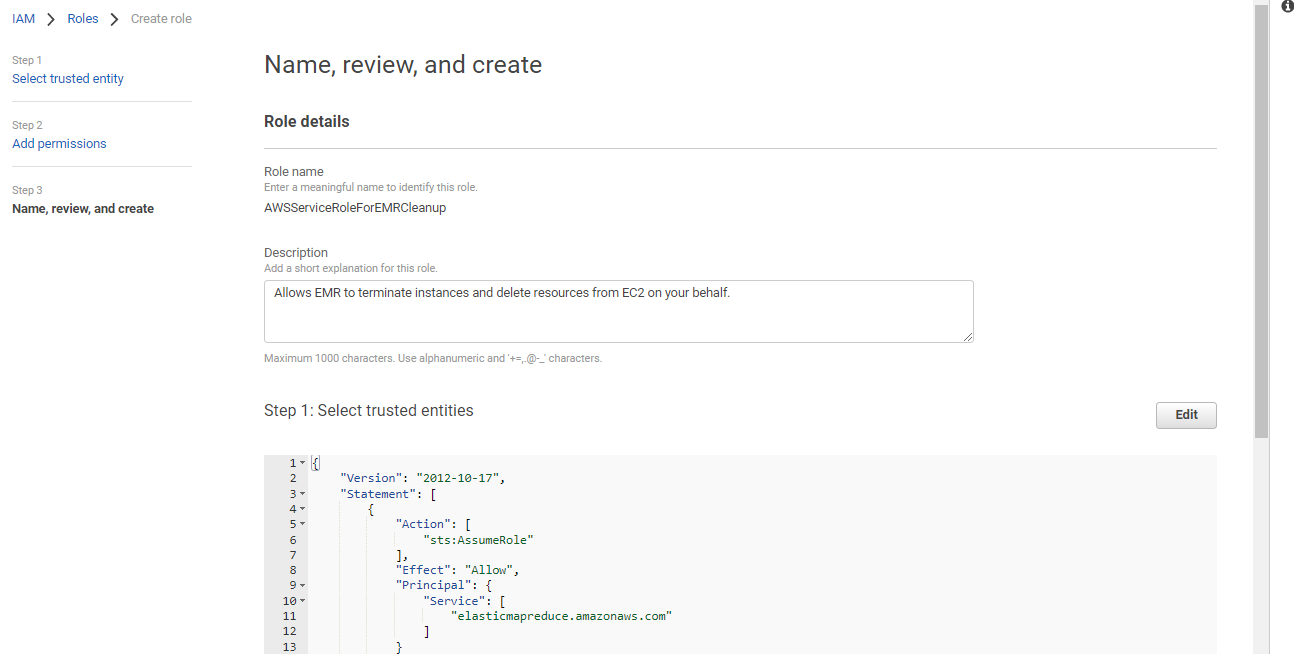
AWSServiceRoleForEMRCleanup
Steps to create the AWSServiceRoleForEMRCleanup
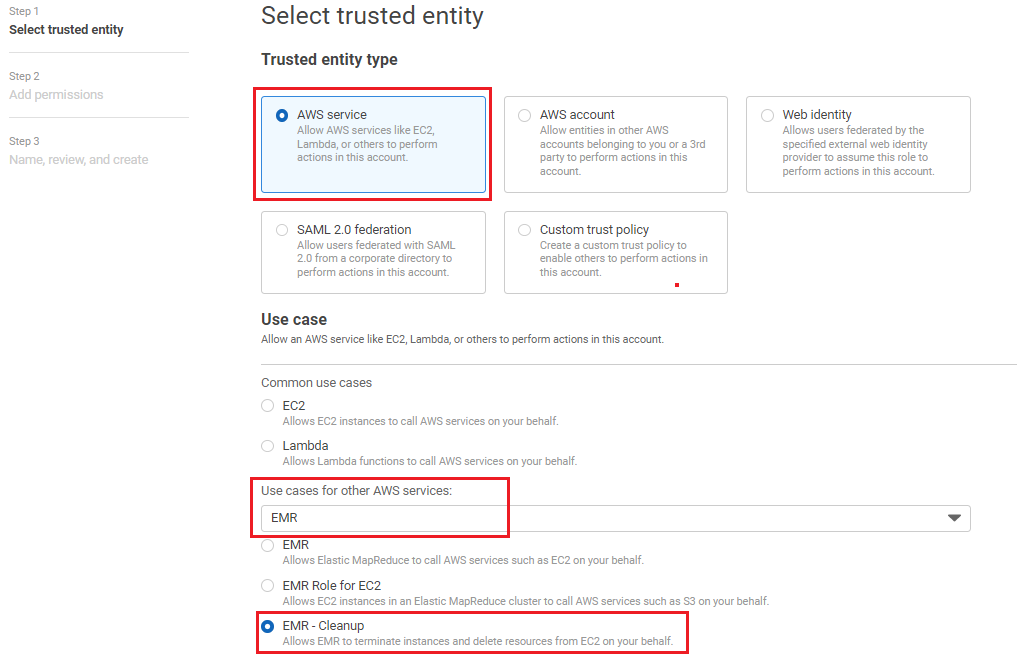
In the navigation pane of the console, choose Roles and then, Create role.
Select AWS services radio button.
Go to Use cases for other AWS services.
Search EMR and select the option EMR-Cleanup.
Click Next.
On the Add permissions page, click Next.
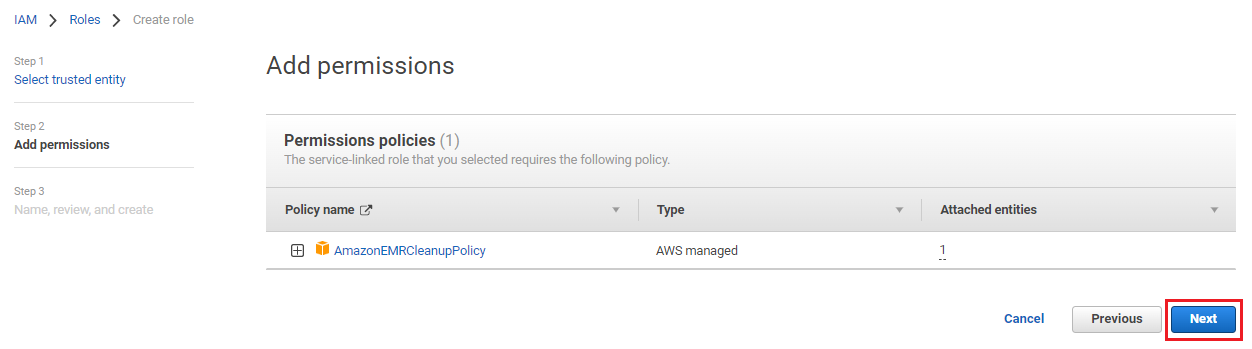
A default role name will we there, click Create role.
AWS PrivateLink Endpoint Security Group
If you do not have a security group for Gathr, create one by following the steps given here.
Steps to Update Security Group
Update the AWS PrivateLink Endpoint Security Group in AWS Console as follows:
Navigate to VPC > Security groups.
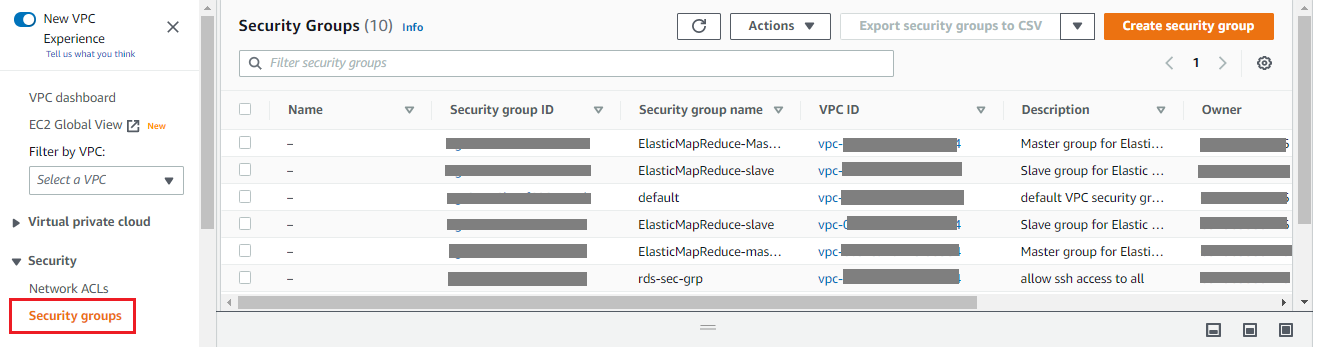
Search and open the preferred
for Gathr. Click the option to Edit Inbound rules for the security group.
Select the rule type as Custom TCP and add the following rules:
- Custom TCP: 12348
- Custom TCP: 31218
- Custom TCP: 32900
- Custom TCP: 36627
All 4 rules are self-referencing (enter same security group ID of this security group).
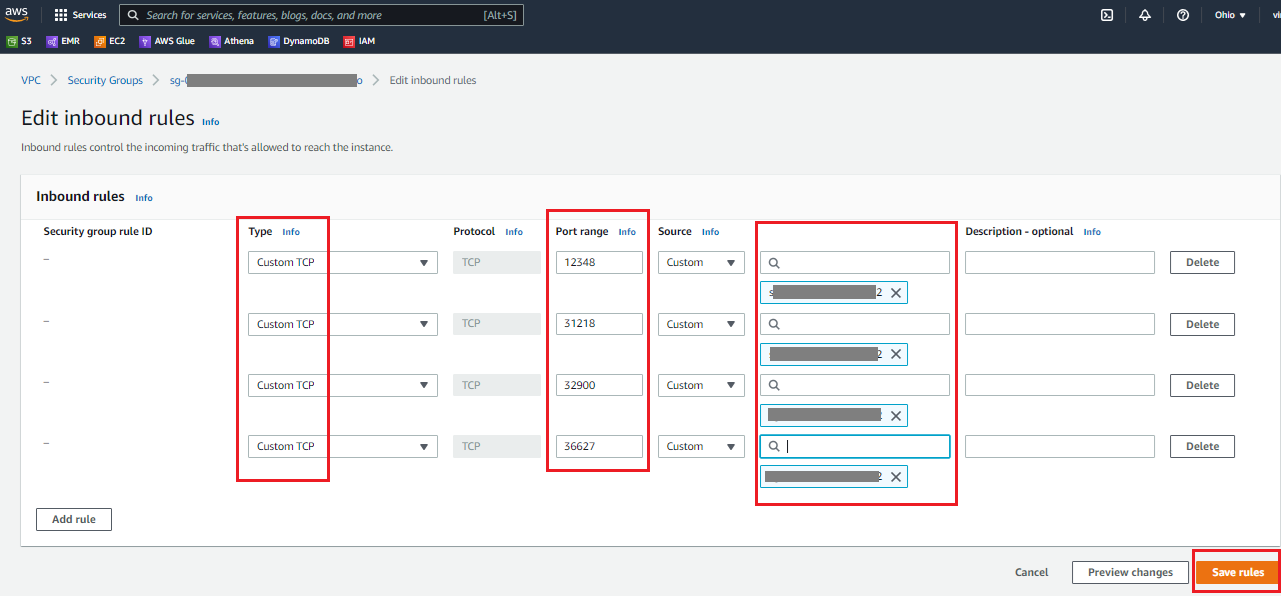
- Click on Save rules.
If you have any feedback on Gathr documentation, please email us!