Data Asset Details
The Details tab contains crucial information for managing a data asset effectively.
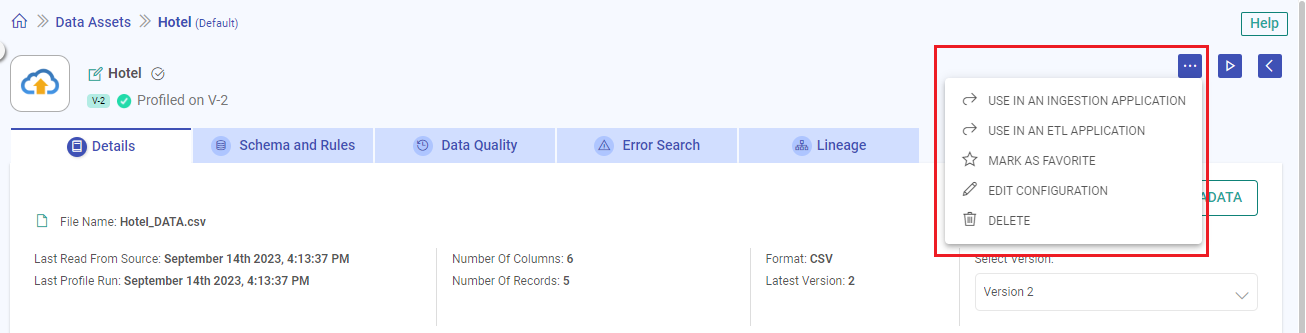
Actions Available
There are various actions that can be performed on each tab of the view data asset, in addition to the listing page.

Edit Data Asset Name: Modify the name of the data asset to better suit your needs.
Additional Options: Access a range of actions including deletion, utilization in Ingestion or ETL Applications, marking as a favorite, and configuring the data asset.
Start Profiling: Initiate data profiling to gain insights into your data’s characteristics and quality.
Back to Data Assets Listing: Return to the list of all data assets for an overview of your data
Overview
It shows a quick summary of the data asset, including:
File Name: If a sample file was used to obtain schema information during the data asset creation, its name is displayed.
Last Read From Source: The date and time of the most recent reading of the data source is displayed.
Last Profile Run The date and time of the most recent profiling of the data asset is displayed.
Number of Columns: The total number of columns in the data asset.
Number of Records: The total number of records in the data asset when its last profile was generated.
Latest Version: The latest available version of the Data Asset is displayed.
Select Version: Option to switch between versions of the data asset to view their details.
Generate Metadata
The Generate Metadata feature in Gathr’s Data Assets allows users to automatically generate metadata, including column descriptions, for selected entities. This is a version-specific implementation, meaning different versions, including the working copy, can have distinct descriptions.
Steps to Generate Metadata
Follow these steps to automatically create and update a data asset’s column descriptions:
Navigate to Details Page:
Navigate to the Data Assets listing page.
On the Details page of a specific data asset, click the GENERATE METADATA button.

Initiate Metadata Generation:
A modal window will open with two tabs: Select Columns and Generate Metadata.
On the “Select Columns” tab:
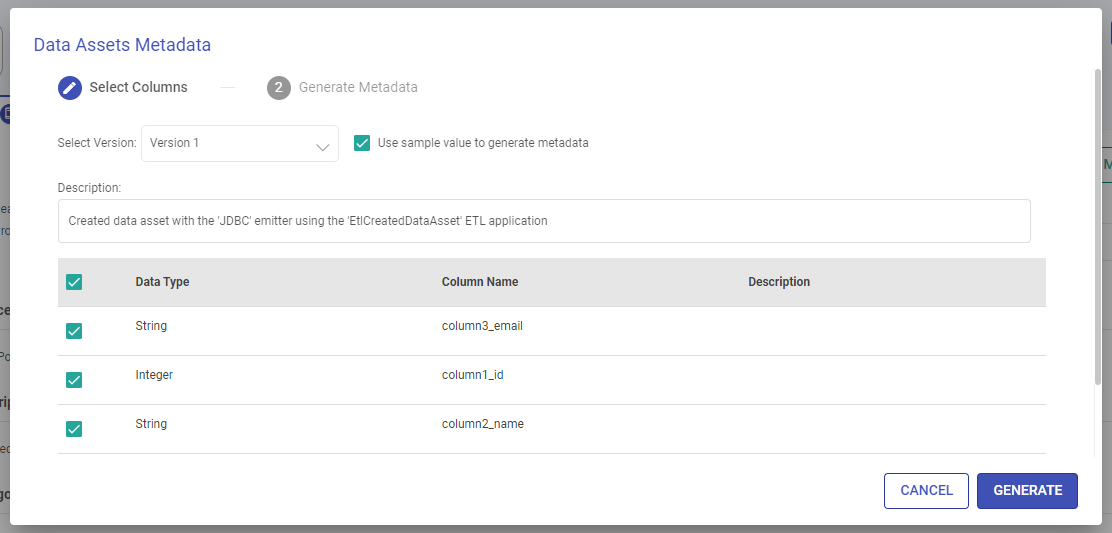
Choose the data asset version from the drop-down.
Opt for using the sample value to generate metadata, particularly useful when column names lack a logical interpretation of their contained data. For instance, when dealing with generic labels like c0, c1, c2.
Select the columns for which metadata (column descriptions) are to be generated.
Click the Generate button to proceed to the next tab.
Review and Save Changes:
On the “Generate Metadata” tab:
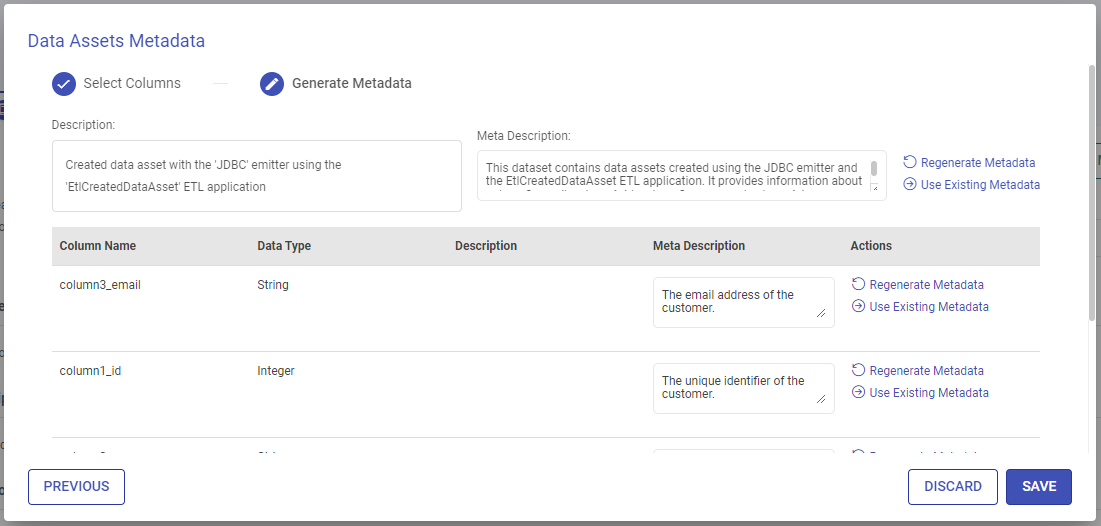
Auto-generated meta descriptions appear in a new column adjacent to the original descriptions for all selected columns and the data asset.
Users can regenerate metadata for specific entities, or, use existing metadata if descriptions were provided before.
Choose to either save all the changes or discard them.
Saving the changes will update the generated meta descriptions for all selected entities.
Updated descriptions will reflect wherever the description for those entities appears in the Data Assets feature.
Discarding changes takes the user back to the Details page without saving any modifications.
Source
The data source and connection name used in creating the data asset.
Description
The data asset’s purpose and relevance will be summarized in a concise description provided by the user.
Update Details
You can edit this field. Follow these steps to update the details of the data asset:
Click on the edit icon available against the description field.
Describe the data asset or add notes.
The Tags can also be updated using this option.
Click on Update to save the changes.
Category
The custom categories associated with the data asset will be displayed here.
Categories List
Click on the categories list option to manage the existing categories.
A Data assets categories window opens.
Here, you can add a new category, or, edit or delete an existing category.
Add a new Category
A new category can be added using the ADD NEW CATEGORY option.
Provide a name for the category and an optional description and proceed to save the category.
Once saved, it can be associated with data assets.
Edit a Category
A category can be edited using the Edit Category icon.
Update the category name and description and proceed to save the changes.
Once saved, the updated category details will reflect.
Delete a Category
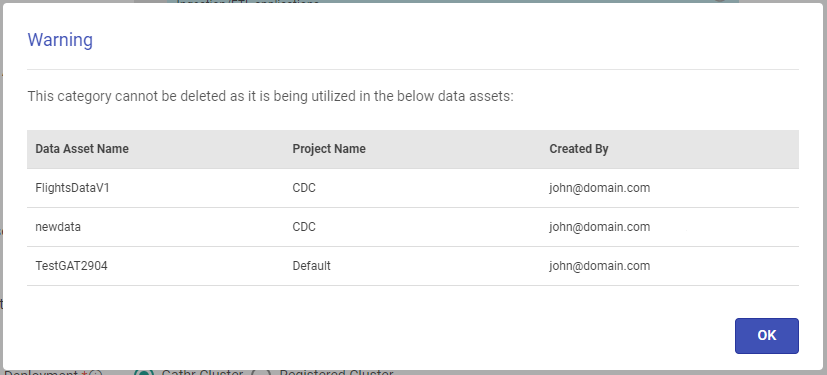
A category can be deleted using the Delete Category icon.
If there are no associations of any data assets with the category, it will be deleted at once.
After deletion, the category will be removed from the list.
An existing category associated with a Data Asset cannot be deleted. A warning message will be shown as given below:
Add Category
Use this option to add a new category for a Data Asset.
Click on the Add Category option and provide a name and optional description for the category to be added.
Edit Category
Use this option to add categories or remove any assigned categories to the Data Asset.
Tags
Associate tags with the Data Asset.
Tags can also be updated from the same window.
State
The state of a data asset represents its current stage in the lifecycle, including Draft, Published, or Deprecated, each influencing its usability and versioning.
Explained below are the State of Data Assets in Gathr with Additional Conditions.
Draft State
The characteristics of the draft state are:
It’s the initial state upon creation.
Exclusively visible to the owner on the Data Assets Listing Page.
Ineligible for use in Ingestion or ETL applications.
Rule changes can be applied exclusively to the Working Copy.
Owner can publish the data asset from the Schema & Rules section.
Published State
The characteristics of the published state are:
Only the owner can apply and save rule changes to the Working Copy.
Versions will get incremented upon publishing.
Previous versions remain unchanged and accessible for ETL and Ingestion applications.
Editing is disabled on all fields involved in creating a new version for non-working copy versions.
Email notifications are triggered for ETL and Ingestion users upon version publishing.
Deprecated State
The characteristics of the deprecated state are:
The owner of a Published data asset can use the ‘MARK AS DEPRECATED’ option found in the Details tab to mark the asset as deprecated.
The maintenance of the data asset is stopped, and no new versions are published.
It is still accessible for use in Ingestion and ETL applications despite being marked as ‘Deprecated.
Email notifications are triggered for ETL and Ingestion users upon data asset deprecation.
Special Condition
When saving a data asset using ‘Save as Data Assets’ from an ETL or Ingestion application’s target component, the default state is ‘Published’.
Schema and Rules
This section displays the count of rules applied on the Data Asset.
Click on the View Schema and Rules option to see the schema of a Data Asset and rules applied on its selected version.
Applications Using Data Asset
A list of Data Ingestion and Advanced ETL applications that are using this Data Asset will be displayed here.
The following details are shown when you click on the number displaying the count of applications using data asset:
Application Name: The application utilizing the data asset.
Application Type: The application type ((ETL or Ingestion)) associated with the data asset.
Project Name: The project under which the application is organized.
Created By: The email ID of the user responsible for creating the application.
Data Asset Version: The version of the data asset linked to the application.
Last Updated: The timestamp of the latest modification or update made to the application.
Actions: Access application details by clicking the eye icon, redirecting you to the ‘Details’ tab.
If you have any feedback on Gathr documentation, please email us!