ETL Apps Listing Page
Create and manage robust ETL applications with Gathr:
Design data pipelines.
Easily drag, drop, and connect processors to build applications.
Monitor detailed metrics for each task and instance.
Harness the efficiency of Gen AI capabilities. Simplify ETL application creation by providing natural language inputs to the Gathr’s AI Assistant.
All ETL applications created within your project will be listed on the ETL Applications page.
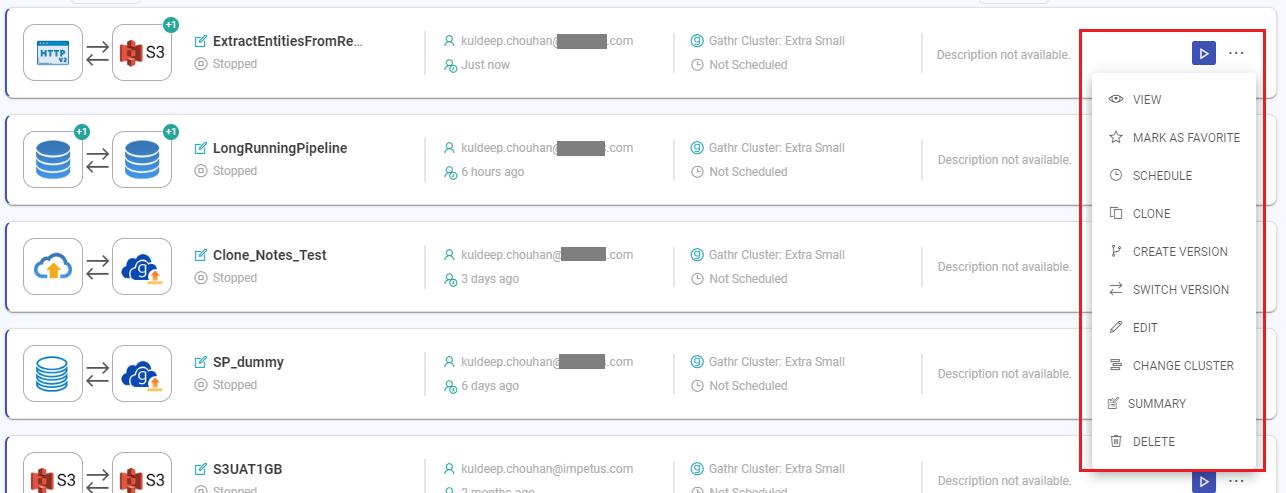
Manage ETL Listing Page
Here’s an overview of the actions available on the ETL listing page.

Create Application
Create an ETL application using this using this option.
It is located on the top-right side of the listing page.
Refresh Applications
Quickly refresh all listed applications with a single click.
It is located on the top-right side of the listing page.
Save User Preferences
Customize your experience by saving your preferences.
Adjust sorting choices, default filters, and more to tailor the page to your needs.
Simply make your selections, click Save Preferences button, and your chosen settings will be remembered.
Filter By
Filter ETLs through the search field. Search allows filtering by:
Application Name: Filter applications by their names.
Source: Filter applications by the type of data source they use. Example: S3 Batch.
Target: Filter applications by the type of data emitter they use. Example: S3.
Processor: Filter applications by the type of transformations they use. Example: Masking.
Analytics: Filter applications by the type of analytics component they use. Example: Decision Tree.
Enter relevant keywords in the search bar and click the Search Application option to easily find applications.
Sort By
Sort the displayed applications in ascending or descending order using the following criteria:
Name: Alphabetically arrange the applications by their names.
Updated Date: Sort the applications based on the most recent update.
Next Scheduled Date: Arrange the applications by their next scheduled dates.
Manage Listed ETLs
Here’s an overview of the actions available for the applications listed on this page.
Start Application
Each listed ETL application has a Start button, enabling users to trigger the application.
After clicking the Start button, a confirmation prompt will appear to ensure that the application is submitted.
Stop Application
The stop button becomes active after an application is started.
Terminate the execution of a running application by clicking the Stop button.
After clicking the Stop button, a confirmation prompt will appear to ensure that the application is submitted.
View Application
Explore detailed information and insights about the ETL application, including its history, monitoring data, error search capabilities, audit activity, and additional notes.
Schedule Application
Automate the execution of the application according to your desired timeframes and intervals.
Scheduling Frequency
Configure automatic scheduling for the application based on various frequencies.
Minutes: Specify the interval in minutes at which the application should be executed. For example, if you set it to 15 minutes, the application will run every 15 minutes.
Hourly: Choose the frequency for the application to run hourly. You can specify the number of hours between each execution.
Daily: Set up daily scheduling for the application. You can select specific times of the day for execution.
Weekly: Define a weekly schedule for the application. Choose the days of the week and the time for each day when the application should run.
Monthly: Schedule the application to run on specific days of the month. You can choose specific dates or specify criteria like the first Monday of the month.
Yearly: Set up yearly scheduling for the application. Specify the month, day, and time for execution.
Scheduling End Date & Time
Define when the scheduled executions should stop.
You can specify an end date and time after which the scheduling will no longer occur.
This is useful for scheduling tasks that have a finite duration or are only needed for a certain period.
Time Zone
Specify the time zone in which the scheduling should occur.
This ensures that the application runs at the desired time in the specified time zone.
Cron Expression
This field shows the set scheduling pattern in a cron syntax.
For example, a cron expression of “0 0 0 1/1 * ? *” would execute the task at midnight every day.
Un-Schedule Application
Un-Schedule Application refers to the action of removing the scheduling configuration from an application.
When you un-schedule an application, it means that the application will no longer be automatically executed according to the previously defined schedule.
Essentially, it cancels the automated scheduling of the application, allowing you to manually trigger its execution as needed.
Re-Schedule Application
Re-Schedule allows you to adjust or update the scheduling configuration of an application.
This could involve changing the frequency, timing, or other parameters of the scheduled execution.
When you re-schedule an application, you are essentially modifying its scheduling settings to better suit your current requirements or preferences.
This ensures that the application continues to run automatically according to the updated schedule.
Clone Application
Create a duplicate copy of an existing application. Replicate its structure and configuration to reuse or modify it without affecting the original application.
Steps to Clone ETL Application:
Click on the Clone Option associated with the desired ETL application.
This action opens a modal window with the necessary details for cloning.
Provide Details:
Pipeline Name: Input the desired name for the new pipeline. This name will be used to identify the cloned pipeline in the project.
Version: Select the version of the pipeline that you wish to clone. This allows you to choose a specific iteration or configuration of the pipeline for duplication.
Project: Choose the project where the cloned pipeline will be saved.
Description: Optionally, provide any notes or descriptions relevant to the cloned pipeline.
Confirm and Clone:
Once all necessary details are provided, review the information and click on the Clone button to initiate the cloning process.
This action generates a duplicate copy of the selected application and opens the canvas, enabling users to immediately begin editing the cloned application within the project where it is cloned.
Create Version
Create a new iteration of the current application, enabling version control and tracking of changes over time.
Steps to Create Version of an ETL Application:
Click on the Create Version option. This action opens a modal window with the necessary details for version creation.
Provide Details:
Name: The name of the current pipeline is automatically displayed.
Next Version: The next iteration of the application version is automatically specified.
Comment: Optionally, provide comments or notes for the new version.
Confirm and Create Version:
Click on the Create button to initiate the version creation process.
This action generates a new version of the application with the specified details.
Switch Version
Transition between different iterations of the application.
Steps to Switch Version:
Click on the Switch Version option to initiate the version switching process. This action opens a modal window displaying a tabular format with version details. Additional information is provided in the table, such as the parent version, commit message, and commit time.
Select Version:
Review the available versions listed under the Version column.
Choose the desired version to switch to based on your requirements.
Confirm and Switch:
- Click on the Switch Version button to initiate the version switching process.
Edit Application
Modify existing applications by updating data sources, transformations, targets, and their configuration details.
Click the edit option to open the ETL canvas for editing the application. Once done with editing, please save the changes accordingly.
Change Cluster
Change the cluster where your ETL application should be deployed. Options include Small, Medium, Large, and Free Tier. Utilize clusters registered with Gathr by setting up compute environments in Gathr from User Settings > Compute Setup →.
Note: Gathr Advanced or Business plan subscription is required for clusters other than Small. See Subscription Plans → for account upgrade information. |
Notes
Add, view, and edit notes related to the application. These notes serve as a means of documenting important information, updates, or insights relevant to the application’s development and usage.
Click on the Notes option to access the Notes modal window.
This action opens a dedicated space for adding and managing notes associated with the application.
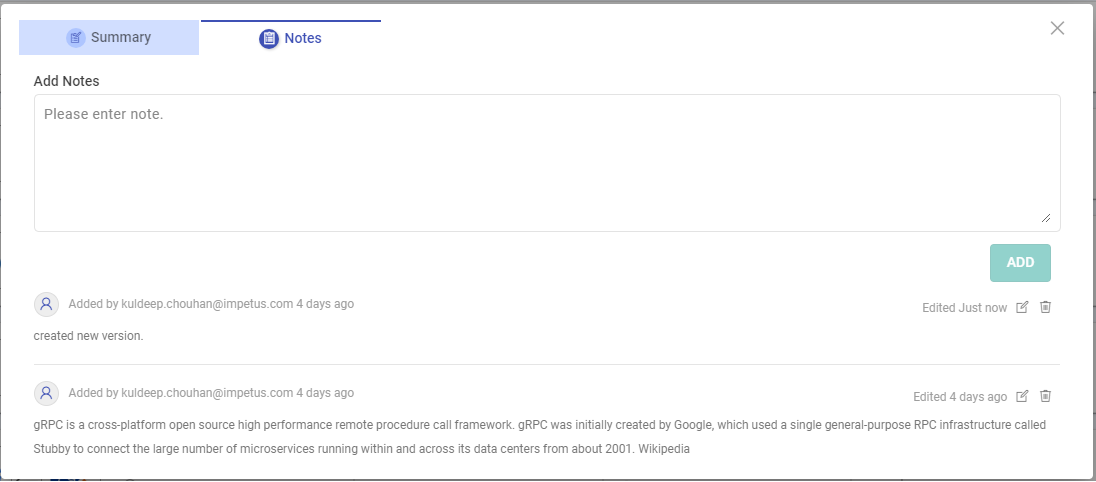
Create new notes or edit existing ones. Input relevant information, observations, or reminders pertaining to the application’s functionality, configuration, or usage.
Delete Application
Delete a listed application and move it to recycle bin.
If an application is in draft state, you will get the options to delete to delete the draft only or both the draft and the original application.
Listed Applications Metadata
The metadata displayed for each listed ETL application includes:

Source and Target: The data source(s) and target(s) used in the ETL are displayed.
For more than one source/target used in the application, a plus symbol is added to the respective source/target icon.
You can hover over the data source/target icon to see the components used.
Application name with an option to edit the same.
Application’s current state. Description for each state is given below:
Validating Connections: The application is in the process of verifying and establishing connections with relevant data sources.
Starting: The application is initializing and preparing to execute its designated tasks.
Active: The application is currently running and performing its assigned data processing and transformation operations.
Stopped: The application has been halted and is not currently executing any tasks.
Error: An error or issue has occurred during the execution of the application, requiring attention and resolution to resume normal operation.
Application owner details and the time since last modification.
Assigned cluster details on which the application will run.
Next schedule frequency for the application run and the end schedule information if applicable.
Application description provided by the user.
If you have any feedback on Gathr documentation, please email us!