HTTP Processor
HTTP Processor is used to enrich the incoming data with the response of external rest calls.
The user can consume different URLs in parallel and use their responses to enrich the resulting data either in a new column or an existing column.
Processor Configuration
Configure the processor by providing request parameters that are explained below.
Request Method
You can choose a request method type based on the HTTP URL.
The following method types are supported:
GET: Use this method to retrieve resources from a server. The GET requests will never change the state of the resource in any way.
POST: Use this method to create a new resource in the existing resource group on a server.
PUT: Use this method to update an existing resource on the server. If the resource does not exist, PUT may create a new resource.
DELETE: Use this method to delete the resources from a server identified by the URI provided in the configuration.
PATCH: Use this method to update a portion of an existing resource.
{'key':'value'}
HTTP URL
HTTP or HTTPS URI to send requests to a resource.
The URL defined can either be provided with actual values or can be parameterized. The placeholders in case of parameterized inputs will be resolved during runtime as per the value of the column name existing in the URL.
Example: http://localhost:1234/${column-name}
Output Column
The output column should be selected in which the response from the HTTP URL will get reflected.
HTTP Response Status Column
Provide a column name to capture the response status code for the HTTP request.
Drop Record
By selecting drop record, the record will be dropped and not shown in the output in case of an exception/error being generated in a URL.
Parameters
You can specify path and query parameters for a request using the URL box or the Parameters tab.
Query Parameters
Query parameters are added after the ? in the HTTP URL, like this: ?id=1&type=new.
To specify a query parameter, add it directly to the URL or select the Parameters tab and enter the name and value.
In the Name field, provide a descriptive label or identifier for the parameter you need to configure. This name helps differentiate and categorize the parameters being set.
In the Value field, provide the corresponding value or content associated with the parameter specified in the Name field. This value could be a specific data value, a query string, or any other information required by the HTTP request to retrieve the desired data from the source.
The Use Input Column checkbox can be used to get a dropdown selection of available column names from the incoming data source.
Use the Add Parameters option to add multiple parameters.
Authentication
Specify the authorization type that should be used to authenticate the HTTP resource.
The supported authentication types are: None, Basic, Token, OAuth2, OAuth2 Client Credentials, and Custom Token. Each type is explained below in detail.
Auth Type - None
Choose this option to access an HTTP resource without needing any authentication.
Auth Type - Basic
If Auth Type is selected as Basic, proceed after providing the below parameters:
Username: Enter the user name for accessing the HTTP resource.
Password: Enter the password for accessing the HTTP resource.
Auth Type - Token Based
If Auth Type is selected as Token, proceed after providing the below parameters:
Token ID: The key with which the token is referred in the request.
Token: Token to access the HTTP resource.
Auth Type - Oauth2
If Auth Type is selected as OAuth2, proceed after providing the below parameters:
Auth Headers: The headers associated with Auth URL should be provided as key-value pairs, through which the authorization code is generated.
Client ID: The client identifier given during the application registration process should be provided.
Secret Key: The secret key given to the client during the application registration process should be provided.
Auth URL: The endpoint for the authorization server, which retrieves the authorization code should be provided.
Auth Type - OAuth2 (Client Credential)
If Auth Type is selected as OAuth2 (Client Credential), proceed after providing the below parameters:
Auth Headers: Header’s parameter name and value can be provided.
Auth Params: Auth parameter name and value can be provided.
ClientId: The client identifier that is given to the client during the application registration process should be provided.
Secret Key: The secret key that is given to the client during the application registration process should be provided.
Auth URL: The endpoint for the authorization server, that retrieves the authorization code.
Use Token: Use generated token in the URL parameter or header of the request.
Auth Type - Custom Token
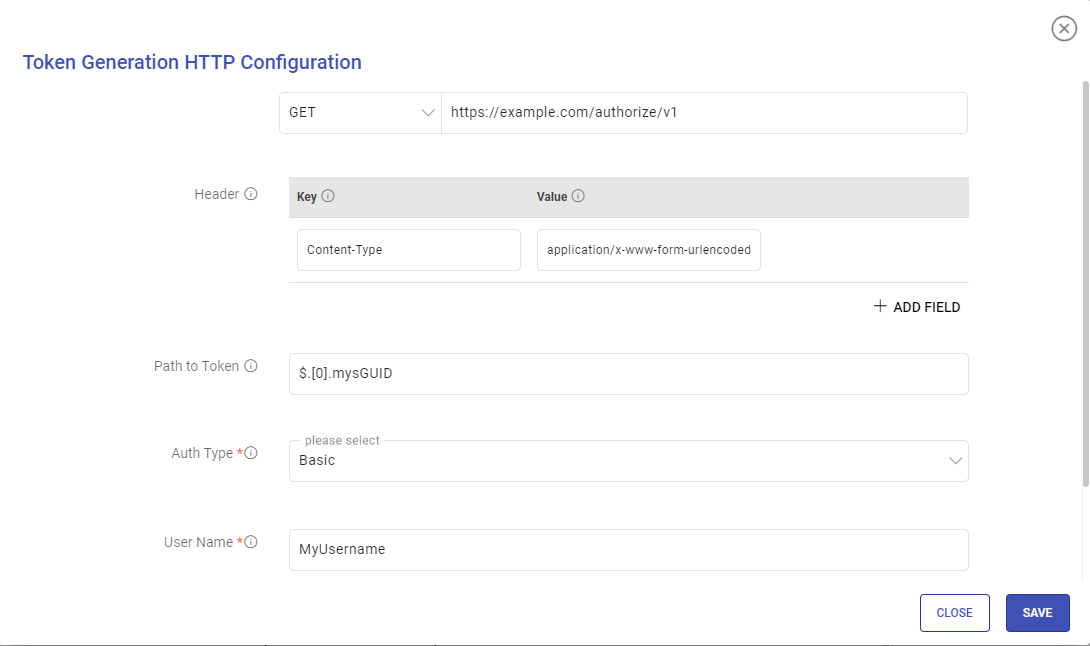
If Auth Type is selected as Custom Token, a modal window Token Generation HTTP Configuration will appear. Proceed after providing the below parameters:
URI: HTTP or HTTPS URI to send a request to a resource.
Request Method: HTTP request method for the URI to be selected out of GET or POST.
Request Body: Request body to send a data payload to an HTTP resource in the body of the request.
Header: Header’s parameter name and value.
Example:
In the below snapshot you can see that the main data API needs a token in the Header with the key as Authorization and value as BEARER ${token} and then ${token}.
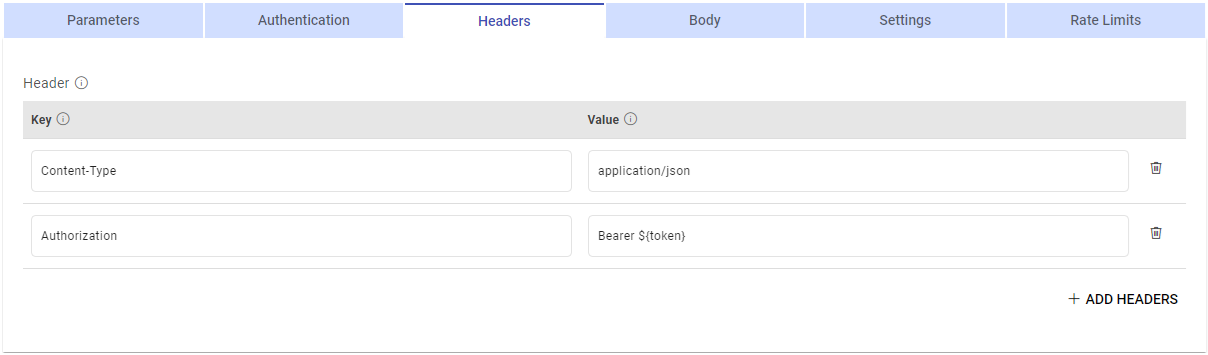
${token} will be replaced with the custom token generated from the custom token API.
${token} can be used in the value of the header key which will be replaced by the token generated from the custom token API.
Path to Token: JSON path expression that points to tokens.
Auth Type: Used to specify the authorization type associated with the URL. The supported auth types for token generation are None, Basic, and Token.
None: This option specifies that the URL can be accessed without any authentication.
Basic: This option specifies that accessing the URL requires Basic Authorization.
Provide a user name and password for accessing the URL.
Token: Token-based authentication is a security technique that authenticates the users who attempt to log in to a server, a network, or other secure systems, using a security token provided by the server.
Headers
Certain URLs may require you to provide a header. You can specify the header details using single quotes in a key-value pair format. Similarly, you can add headers as needed.
To dynamically change headers, such as Authorization headers for each new request, follow these options:
Parameterize Header Values: If header values are derived from a column in a previous processor, you can parameterize the header value. This way, the headers will adapt to each request based on the dynamic data from the previous connector.
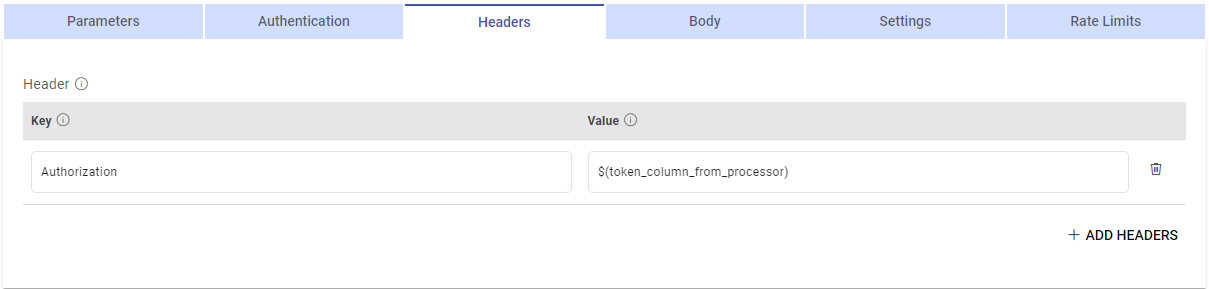
Choose Auth Type: Select the appropriate authentication type, which can be set to Custom Token. If a custom token is generated before each application run and changes for each call, ensure that its value is available in a column from the previous connector.
Pass this dynamic token as a parameter in the HTTP processor header. This approach allows you to send requests with new and updated headers for each application run, ensuring that the requests are properly authenticated without encountering errors.
Body
Request body to be provided for the Request Method selected above.
You can also provide dynamic values for the body and the column value will be replaced with the ${column name}. So, for each row, body is getting generated by replacing column values.
Example 1:
{“firstName”: “${column1}”,“lastName”: “${column2}”}
Example 2:
${column_name_with_entire_body}
Settings
Advanced settings can be configured using this tab.
SSL Configuration
Enable SSL (Optional)
It is set to False by default.
Set this option to True, if the resource that is to be requested using the HTTP data source is SSL-enabled.
If set to True, choose how the SSL-enabled HTTP resource should be verified.
Either a keystore file or a certificate file needs to be uploaded based on the chosen verification method.
The Keystore Password or Certificate Alias should then be provided as per the type of file uploaded for verification.
Retry Configuration
Retry Time
A retry delay interval (in seconds) should be provided.
Retry Count
Runs the URL as many number of times as mentioned, in case of failure to run the URL.
Log Retry Errors
Enable this option to log errors for failed retry attempts while reading records.
Timeout Configuration
Read Timeout (sec)
While a URL is accessing a server and the output generation is taking time, you can provide read timeout (in seconds).
A timeout value of zero is interpreted as an infinite timeout. A negative value is interpreted as undefined (system default). Default value is 60.
Connection Timeout (sec)
In certain scenarios, the connection is not established, you can specify the connection time out (in seconds).
A timeout value of zero is interpreted as an infinite timeout. A negative value is interpreted as undefined (system default). Default value is 60.
Rate Limits
Enable Request Rate
Control the rate at which pagination requests are made.
Example: Make 50 requests in 10 seconds, on throttle exception wait for 60 seconds.
Add Configuration: Additional properties can be added using this option as key-value pairs.
If you have any feedback on Gathr documentation, please email us!