Workflow Configuration
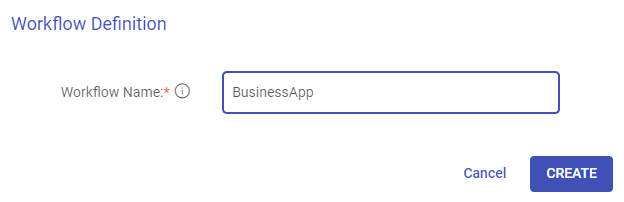
Workflow Definition
Once a workflow is defined, provide a workflow name and click on CREATE button to create the workflow.
Once a workflow is created it will be visible on the Workflows listing page.
A Workflow tile has the following fields:
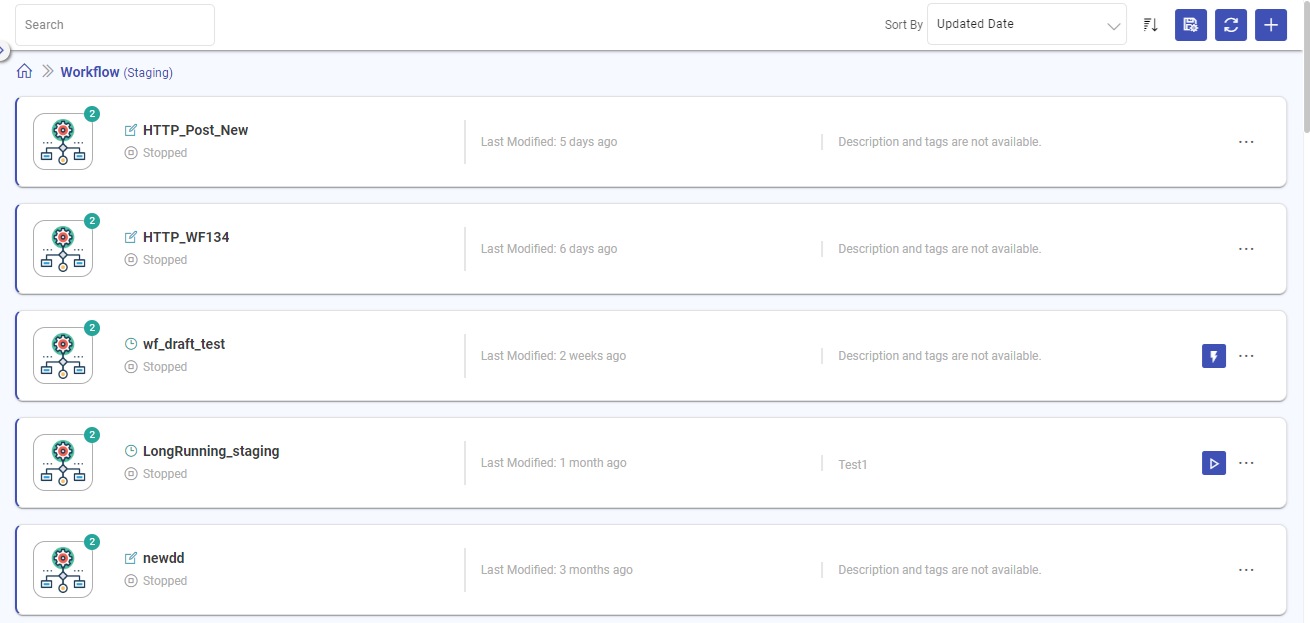
Subworkflow: If a workflow has a subworkflow in it, the icon will show the subworkflow’s count.
This is also called parent-child marker, that shows; if a workflow has zero subworkflows then it is a child subworkflow.
Pipeline: If a pipeline is used in the workflow, the icon shows the number of pipelines used.
Last Modified: The duration since the workflow was last modified.
Next Schedule: The next trigger time for the workflow will be displayed if the workflow is scheduled.
Trigger: Once a workflow is created, deploy the workflow to Airflow by clicking on the Trigger button.
View Summary: Option to view the workflow’s run history.
Schedule: Option to schedule the workflow.
Refresh: Option to refresh the workflow.
Edit: Option to edit the workflow.
Delete: Option to delete the workflow and send it to Gathr’s Recycle Bin.
Once you have defined and created a workflow, user can perform the following operations on workflow:
Edit Workflow
You can edit a Workflow from the Workflows listing page.
A workflow cannot be edited when it is active.
Make sure to update and save the workflow from canvas once the editing is completed.
Subworkflow
A workflow can have another workflow in it. This enables the Parent Child marker in the workflows.
A Parent Marker will be shown with a Parent Workflow marker icon on the workflow, similarly for a Child Workflow marker.
On every workflow listing, a count of number of pipelines and subworkflow is shown.
Schedule Workflow
Once workflow is created, deploy the workflow by clicking on SCHEDULE button. Set your workflow scheduling configuration as defined below:

| Field | Description |
|---|---|
| Start Date | Date from which workflow starts. |
| End Date | Date on which workflow ends. (not mandatory) |
| Time Zone | Time Zone in which workflow should be scheduled. |
| Frequency | Runs workflow after this interval. You can select a predefined interval. If you opt for None option for scheduled interval, you can trigger the workflow. Every - hour(s), week(s), month(s) value can be provided, as per the specified interval of frequency. For Hourly frequency, an additional option Start Time will be available to provide the start time in hours and minutes. |
| Cron Expression | Cron expression is generated based on frequency. |
| Number of Retries | Number of times Airflow restarts workflow (in case of failure) Retry Delay: If number of retries is greater than 1 or above, then provide a value in Retry Delay (in seconds), which enables the workflow to try restarting, after a certain time of delay. Email on Retry: You can send an email if the workflow retry is attempted, by setting its value to True or not by using False. |
| Depends on Past | Set to True, if current run of workflow depends upon its last run. Default is False. |
| Wait For Downstream | In case of True: A scheduled run will only be executed if a previously scheduled downstream task is complete. In case the downstream task has failed the scheduled task will wait unless the downstream task is complete. In case of False: The scheduled task will run irrespective of the downstream task. |
| Max Active Runs | Option to specify the number of instances that can run concurrently for this Workflow. |
| RFC | User can use this property as environment variable in bash operator i.e., $RFC. |
| CheckpointID | User can use this property as environment variable in bash operator i.e., $CheckpointID. |
Un-schedule Workflow
To remove a workflow from a schedule, click on the SCHEDULING option. This option is available on the Workflow tile under the menu button.
A new window will pop up and you can un-schedule the workflow.
You can always Reschedule the workflow, using the same steps.
Start Workflow
After scheduling workflow, status of the workflow will change to SCHEDULED. Now, you can start the workflow by clicking on Trigger button. If the workflow starts successfully, the status will change to ACTIVE.
View Summary
Workflow monitoring feature allows you to:
View the workflow run history.
View the component-level status.
Re-trigger a failed task.
Re-trigger all the failed tasks with a single click.
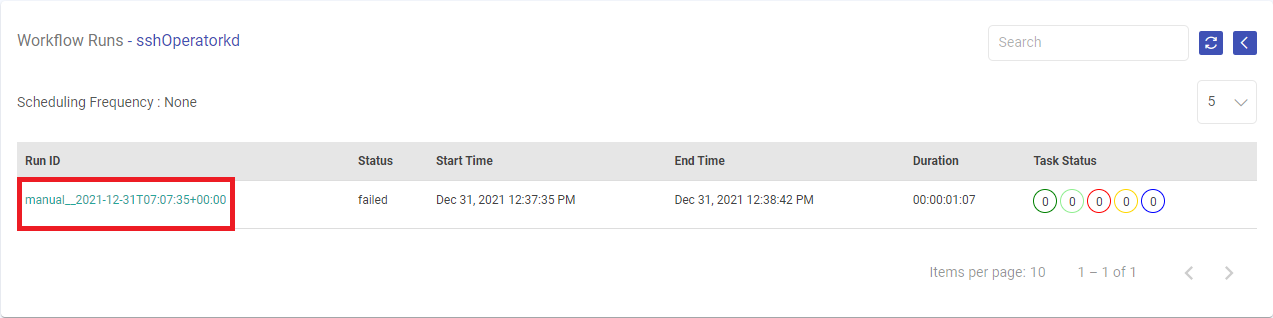
The view summary page will take you to the dashboard of workflow monitoring where you can see the last 5 runs and their details.
| Field | Description |
|---|---|
| Run ID | The run ID defines the current Workflow. |
| Status | The current position of the workflow. |
| Start Time | The planned time for starting the workflow. |
| End Time | The planned time for ending the workflow. |
| Duration | The time duration of the workflow run. |
| Task Status | The status of the workflow run. |
Upon clicking the Run ID, the user can view the workflow summary. If the workflow fails, the monitor window will help you resume and run the workflow from the failed stage.
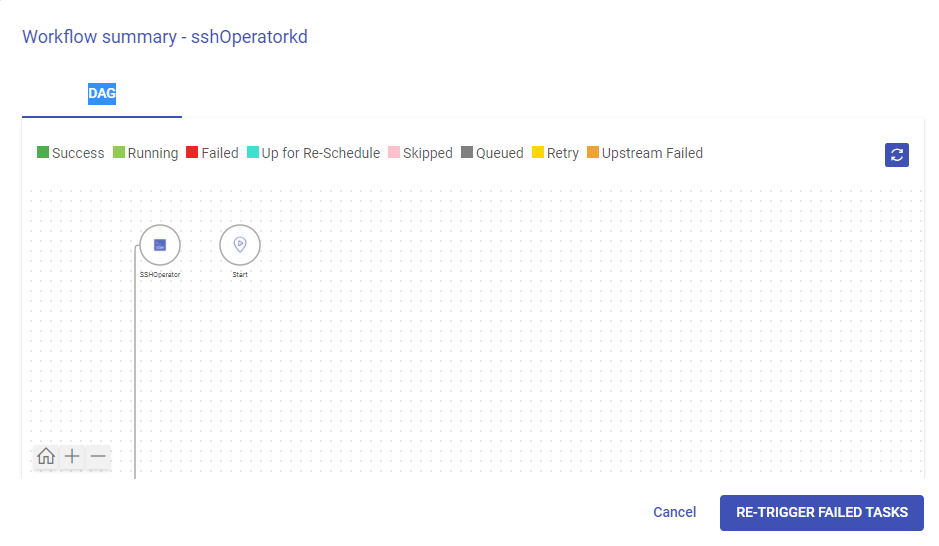
Within the Workflow summary DAG window, you can perform the below functions:
| Field | Description |
|---|---|
| Reload | The reload tab lets the user refresh and reload the status to verify the workflow running stage. |
| Re-Trigger | The user can re-trigger a failed task by clicking on it. |
| Re-Trigger Failed Task | In case of a task failure, the user can re-trigger it all failed tasks by clicking on it. |
Pause Workflow
Once the workflow is in ACTIVE state, you can PAUSE the workflow from the Workflows listing page.
Resume Workflow
You can RESUME a paused workflow.
Delete Workflow
Click on Delete button, to delete a workflow and send it to Gathr’s Recycle Bin.
If you have any feedback on Gathr documentation, please email us!