Gathr Prerequisites
💡 Before beginning with the installation, see Component Versions Supported →
An Apache, CDH, or CDP based cluster with the version described in the respective topics must be available for Gathr to work properly. Local service is required to create pipelines in Gathr.
The prerequisites are listed below, and explained further in the sub-topics must be deployed before proceeding further:
Java
RabbitMQ
PostgreSQL
Zookeeper
Elasticsearch
Couchbase server community
Configure LLAP
Kubernetes
Java
💡 The component versions that are mentioned in this sub-topic are for representational purpose only. For the Gathr supported component version details, see Component Versions Supported →
Verify that you have a /usr/java directory. If not, create one using the command given below:
|$ mkdir /usr/java|Download the Oracle 64-bit JDK (jdk-8u101-linux-x64.tar.gz) from the Oracle downloads site.
Copy the downloaded
jdk.tar.gzfile to the/usr/javadirectory.Navigate to the
/usr/javadirectory and extract thejdk.tar.gzfile using the command given below:$ cd /usr/java tar zxvf jdk-8u101-linux-x64.tar.gzThe JDK files will be extracted into a
/usr/java/jdk-8u101directory.Create a symbolic link (symlink) to the JDK using the command given below:
$ ln -s /usr/java/jdk1.8.0\_101 /usr/java/default</p><p>$ ln –s /usr/java/jdk1.8.0\_101/bin/java /usr/bin/javaSet the
JAVA\_HOMEandPATHenvironment variables using the command given below:$ export JAVA\_HOME=/usr/java/default</p><p>$ export PATH=$JAVA\_HOME/bin:$PATHRun below commands to notify system that new java version is ready for use:
sudo update-alternatives --install "/usr/bin/java" "java" "/usr/java/jdk1.8.0\_101/bin/java" 1

sudo update-alternatives --install "/usr/bin/javac" "javac" "/usr/java/jdk1.8.0\_101/bin/javac" 1

sudo update-alternatives --install "/usr/bin/javaws" "javaws" "/usr/java/jdk1.8.0\_101/bin/javaws" 1
Verify that Java is installed in your environment by running the command given below:
$ java –versionYou should see output similar to following:
java version "1.8.0\_101"
Java(TM) SE Runtime Environment (build 1.8.0\_101-b01)
Java HotSpot(TM) 64-Bit Server VM (build 24.101-b01, mixed mode)
Access Rights to Livy user
Create a directory on HADOOP if it does not exist, using below command:
<HADOOP\_HOME>/bin/hadoop fs -mkdir /hadoop

#Now, give full permission to the directory using below command:
<HADOOP\_HOME>/bin/hadoop fs -chmod -R 777 /hadoop
Permission 777 required on directories configured in below common.yaml properties:
livy.sample.data.hdfs.path
livy.custom.jar.hdfs.path
Run the command:
<HADOOP\_HOME>/bin/hadoop fs -chmod -R 777 /user/hdfs/sax/auto-detection/data/
<HADOOP\_HOME>/bin/hadoop fs -chmod -R 777 /user/hdfs/sax/auto-detection/custom-jar/
Login to Ambari and set following property for ‘Spark-2’ Livy configuration and restart Spark-2 service, as shown below:
livy.server.csrf\_protection.enabled = false

#If the below property is set to 'true', make sure that Hive is installed and running properly.
#Otherwise set this property to 'false'.

livy.repl.enableHiveContext = false
RabbitMQ
💡 The component versions that are mentioned in this sub-topic are for representational purpose only. For the Gathr supported component version details, see Component Versions Supported →
Erlang is required before installing RabbitMQ, use the below commands to do so:
yum -y install epel-release
yum -y install erlang socat
Run the following command to download RMQ RPM file:
wget https://www.rabbitmq.com/releases/rabbitmq-server/v3.6.10/rabbitmq-server-3.6.10-1.el7.noarch.rpmRun the below command to Install RabbitMQ:
rpm --import https://www.rabbitmq.com/rabbitmq-release-signing-key.asc
rpm -Uvh rabbitmq-server-3.6.10-1.el7.noarch.rpm
Start and Enable RabbitMQ using the following command:
systemctl start rabbitmq-server
systemctl enable rabbitmq-server
Check the status using below command:
systemctl status rabbitmq-serverRun the following command to Enable RabbitMQ plugin.
sudo rabbitmq-plugins enable rabbitmq\_managementHit the below URL to access RabbitMQ U
http://IP:15672Run this command for creating RabbitMQ user test with password test:
rabbitmqctl add\_user test test
rabbitmaccqctl set\_user\_tags test administrator
rabbitmqctl set\_permissions -p / test ".\*" ".\*" ".\*"
Login with credentials:
test/test.
1. Create one file with name rabbitmq.config in /etc/rabbitmq.
2. Copy this [{rabbit, [{loopback\_users, []}]}]. in the file.
3. Restart RabbitMQ.
PostgreSQL
💡 The component versions that are mentioned in this sub-topic are for representational purpose only. For the Gathr supported component version details, see Component Versions Supported →
Configure YUM Repository
In order to prevent PostgreSQL to get installed with older version, you need to add the following line in the appropriate repository configuration file.
exclude=postgresql\*
File path for making the above entry differs according to the OS:
File path for CentOS machine: /etc/yum.repos.d/CentOS-Base.repo (in
[base]and[updates]sections both)File path for RHEL machine: /etc/yum/pluginconf.d/rhnplugin.conf (in
[main]section only)
Install PGDG RPM File
A PGDG file is available for each distribution/architecture/database version combination.
Install postgres repository in the system, use one of the below commands as per the system architecture and operating system.
#CentOS/RHEL version 6.x, 64-Bit:
$ rpm -Uvh [](https://download.postgresql.org/pub/repos/yum/10/redhat/rhel-6-x86_64/pgdg-redhat10-10-2.noarch.rpm)https://download.postgresql.org/pub/repos/yum/10/redhat/rhel-6-x86\_64/pgdg-redhat10-10-2.noarch.rpm
#CentOS/RHEL version 7.x, 64-Bit:
$ rpm -Uvh [](https://download.postgresql.org/pub/repos/yum/10/redhat/rhel-7-x86_64/pgdg-redhat10-10-2.noarch.rpm)https://download.postgresql.org/pub/repos/yum/10/redhat/rhel-7-x86\_64/pgdg-redhat10-10-2.noarch.rpm
Install PostgreSQL10 Server
Install the basic PostgreSQL 10 server using below command:
$ yum install postgresql10-server postgresql10
Initialize Database
After installing PostgreSQL server, it is required to initialize it before start using it. To initialize database run the below command.
$ service postgresql-10 initdb
$ /etc/init.d/postgresql-10 initdb</p><p>$ /usr/pgsql-10/bin/postgresql-10-setup initdb</p>
Server Configuration and Startup
To start PostgreSQL server automatically on system boot, run the following command:
Configure Connection
$ chkconfig postgresql-10 on
Replace the following line written in
/var/lib/pqsql/10/data/pg\_hba.conffile:host all all 127.0.0.1/32 identBy the following line:
host all all all md5Replace the following line written in
/var/lib/pqsql/9.3/data/postgresql.conffile:#listen\_addresses = 'localhost'By the following line:
listen\_addresses = '\*'
Start Server
Start PostgreSQL service using following command:
$ service postgresql-10 start
Verify PostgreSQL Installation
After completing PostgreSQL 10 installation on server, perform a basic sanity to verify whether installation has been completed successfully or not. To verify the same, switch to the postgreSQL user from root user (first time only) by the following command:
$ su postgres
Use psql command to access PostgreSQL console.
bash-4.3$ psql
PostgreSQL User Configuration
Change password of PostgreSQL user by the following command (default password is postgres):
postgres=# alter user <<username>> with password <<newpassword>>;
postgres=# alter user postgres with password ‘scott’;
Create New User (Optional):
In PostgreSQL, the default root user is postgres, if you want to create a new user with login permission, use the following command:
$ sudo -u postgres psql postgres
postgres=# create role <<new\_user\_name>> login password '<<new\_-password>>';
Zookeeper
💡 The component versions that are mentioned in this sub-topic are for representational purpose only. For the Gathr supported component version details, see Component Versions Supported →
Steps to Install Zookeeper
Download the
apache-zookeeper-3.5.7-bin.tar.gzpackage.Copy it in
<installation_dir>(e.g: /opt/gathr/).Run the below commands as a root or sudo user to provide permissions to the respective service ID.
chown -R serviceId:serviceId apache-zookeeper-3.5.7-bin
su <serviceId>
In zookeeper folder, create a folder with the name
datadir.Create a copy of
<installation\_dir>/apache-zookeeper-3.5.7-bin/conf/zoo\_sample.cfgand rename it tozoo.cfg.Update the IP address in
zoo.cfgfile and add below property:server.1=<ip of machine where zk is being installed>:2888:3888Update
dataDirpath inzoo.cfg:dataDir=<installation_dir>/apache-zookeeper-3.5.7-bin/datadirExecute command to start
zk.<installation_dir>/apache-zookeeper-3.5.7-bin/bin/zkServer.sh startTo check the zookeeper status run the below command:
<installation_dir>/apache-zookeeper-3.5.7-bin/bin/zkServer.sh status
Elasticsearch
💡 The component versions that are mentioned in this sub-topic are for representational purpose only. For the Gathr supported component version details, see Component Versions Supported →
To install Elasticsearch, follow the steps mentioned below:
Download Elasticsearch binary
(.tar.gz)version 6.4.1 from here.Extract the
tar.gzusing below command:$ tar -xvf elasticsearch-6.4.1.tar.gz -C <<installationDir>> $ cd <<installationDir>>/<<extractedDir>>Open
config/elasticsearch.ymlcluster.name: ES641 node.name: IP of the machine path.data: /home/sax/elasticsearch-6.4.1/data2 path.logs: /home/sax/elasticsearch-6.4.1/logs2 network.host: IP of the machine http.port: 9200 discovery.zen.ping.unicast.hosts: ["IP"] #Place this at the end of the file: action.auto\_create\_index: .security,.monitoring\*,.watches,.trig-gered\_watches,.watcher-history\*,.ml\*,sax-meter\*,sax\_audit\_\*,\*-sax-model-index,sax\_error\_\*,true
sudo sysctl -w vm.max\_map\_count=262144
Run below command to start Elasticsearch in background:
nohup ./bin/elasticsearch &
Enable SSL in Elasticsearch
To enable SSL, perform the following steps on each node in the cluster:
Manually download the X-Pack zip file from here.
Run
$ES\_HOME/bin/elasticsearch-plugininstall on each node in your cluster.$ $ES\_HOME/bin/elasticsearch-plugin install file:///path/to/file/x-pack-6.2.4.zipConfirm that you want to grant X-Pack additional permissions.
X-Pack will try to automatically create several indices within Elasticsearch. By default, Elasticsearch is configured to allow automatic index creation and no additional steps are required. However, if you have disabled automatic index creation in Elasticsearch, you must configure action.auto_create_index in elasticsearch.yml to allow X-Pack to create the following indices:
<<installationDir>>/<<extractedDir>>/config/elasticsearch.yml:action.auto\_create\_index: .security,.monitor-ing\*,.watches,.triggered\_watches,.watcher-history\*,.ml\*
Generating Node Certificates
Create a certificate authority for your Elasticsearch cluster. Substitute
<DOMAIN\_NAME>with your machine’s domain name and<node1>and<node2>with the node name or IP address of machines which would be a part of Elasticsearch Cluster:$ keytool -genkeypair -keystore es-certificate.p12 -store¬type PKCS12 -storepass elastic -alias esSSL1 -keyalg RSA -keysize 2048 -validity 99999 -dname "CN=DOMAIN\_NAME, OU=My Team, O=My Company, L=My City, ST=My State, C=SA" -ext san=dns:DOMAIN\_NAME,dns:local-host,ip:127.0.0.1,ip:node1,ip:node2Copy the node certificate to the appropriate locations. Copy the generated
.p12file in a Elasticsearch configuration directory on each node. For example../home/es/config/certs.:Add the Elasticsearch certificate in the JAVA cacerts of the machine from where we are trying to connect to the Elasticsearch (i.e. Yarn and Gathr nodes) using below command:
$ keytool -importkeystore -srckeystore /path-to-p12-file/es-cer.p12 -destkeystore $JAVA\_HOME/jre/lib/security/cacerts -srcstoretype pkcs12Above command must be run with root or sudo account. It will prompt for destination keystore password if it has been set earlier and source keystore password which is ‘elastic’ in our case.
Enable SSL Between Nodes in a Cluster
Enable TLS and specify the information required to access the node’s certificate. Add the following information to the
<<installationDir>>/<<extractedDir>>/config/elasticsearch.ymlfile on each node:xpack.security.transport.ssl.enabled: true xpack.security.transport.ssl.verification\_mode: certificate xpack.security.transport.ssl.keystore.path: certs/es-certificate.p12 xpack.security.transport.ssl.truststore.path: certs/es-certificate.p12If you have secured the node’s certificate with a password, add the password to your Elasticsearch keystore: The password is set as
elastic. Enter the same when prompted.$ bin/elasticsearch-keystore add xpack.security.transport.ssl.keystore.secure\_password $ bin/elasticsearch-keystore add xpack.security.transport.ssl.truststore.secure\_password
Encrypting HTTP Client Communication
- Enable TLS and specify the information required to access the node’s certificate.
Add the following information to the <<installationDir>>/<<extractedDir>>/config/elasticsearch.yml file on each node:
```
xpack.security.http.ssl.enabled: true
xpack.security.http.ssl.keystore.path: certs/es-certificate.p12
xpack.security.http.ssl.truststore.path: certs/es-certifi-cate.p12
```
If you have secured the node’s certificate with a password, add the password to your Elasticsearch keystore. The password is set as
elastic. Enter the same when prompted.$ bin/elasticsearch-keystore add xpack.security.http.ssl.key-store.secure\_password $ bin/elasticsearch-keystore add xpack.security.http.ssl.trust-store.secure\_passwordConfigure additional properties in
<<installationDir>>/<<extractedDir>>/config/elasticsearch.ymlfile under the extracted folder.
```
<space before>
cluster.name
node.name
path.data
path.logs
```
Elasticsearch nodes join a cluster based on just one property named cluster.name.
For example: If you want to add the node to cluster mass_deployment, change the value of property cluster.name to mass_deployment as follows:
```
cluster.name: mass\_deployment
```
This should be same across all nodes of the cluster. This value will be required while configuring Elasticsearch in Gathr.
The node name should be unique for each ES node in a cluster. This is defined by the node.name property.
For example: If user wants to deploy three nodes for the cluster, the names can be ‘node0’, ‘node1’ and ‘node2’.
node.name: ‘node0’
This should be unique for each node in the cluster
node.tag: ‘node0’
This should be unique for each node and same as node.name. Also, use the convention node0, node1, nodeN.
path.data: /path/to/data/dir
This property perform discovery when new node is started. The default list of hosts is [“127.0.0.1”, “[::1]”]
discovery.zen.ping.unicast.hosts: ["<hostname/ip>" ]
Set this property to create a dedicated master-eligible node.
node.master: true
This property defines Data nodes and it holds data and perform data related operations.
node.data: true
Locks the memory for better performance of Elasticsearch.
transport.tcp.port: 9300
transport.bind_host: <hostname/IP>
transport.host:<hostname/IP>
network.host: hostname/IP>
http.port:9200
```
action.auto\_create\_index: .security,.monitoring\*,.watches,.trig-gered\_watches,.watcher-history\*,.ml\*, sax-meter\*
```
Specify heap size for Elasticsearch by adding the below line to the file
<<installationDir>>/<<extractedDir>>/config/jvm.options:-Xms4g</p><p>-Xmx4gMake sure to increase the limit on the number of open files descriptors for the user running Elasticsearch to 65,536 or higher. Run below command as root before starting Elasticsearch, or set nofile to 65536 in
/etc/security/limits.conf.$ ulimit -n 65536Set the passwords of the built in elastic user. You must explicitly set a bootstrap.password setting in the keystore before you start Elasticsearch.
For example: the following command prompts you to enter a new bootstrap password.
```
$ bin/elasticsearch-keystore add "bootstrap.password"
```
The above password you set will be required to login to Elasticsearch cluster URL using elastic as superuser.
Change ownership of Elasticsearch installation directory and start the Elasticsearch node by logging in as non-root user. This is done to enable memory locking as follows:
$ chown -R <<non-root\_user>> <<installationDir>>$<<installationDir>>/<<extractedDir>>/bin/elasticsearch -dTo enable Elasticsearch plugin, open Google Chrome browser and install extension elasticsearch-head.
To access Elasticsearch cluster, click on the elasticsearch-head plugin icon on your browser and enter the cluster details as below and hit ‘connect’:
http://<es\_http\_node>:<es\_http\_port>
Couchbase Server Community
💡 The component versions that are mentioned in this sub-topic are for representational purpose only. For the Gathr supported component version details, see Component Versions Supported →
To install Couchbase, follow the steps mentioned below:
Download the rpm file from here.
To install Couchbase, run the below command:
rpm --install couchbase-server-community-5.1.1-centos7.x86\_64.rpm
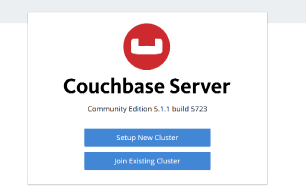
The command will install the Couchbase DB and start the service. After running the command above, you will receive the following URL in output:
http://<<HOSTNAME>>:8091/
Open the URL in browser then follow the steps given below to create the cluster.
Click on the Setup New Cluster
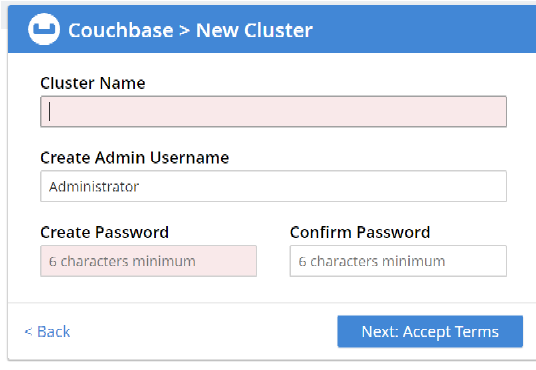
Provide the Cluster Name, Username and Password, then click on Next
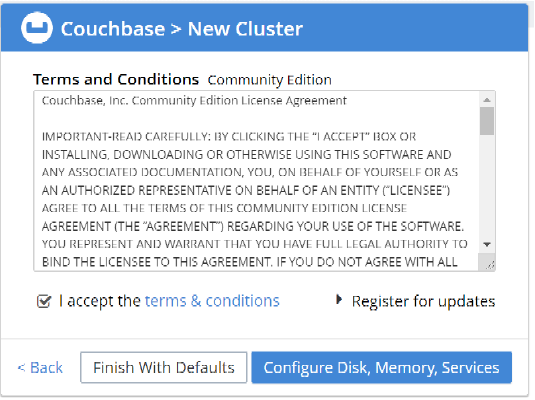
Accept the terms and conditions, and click on Finish with Defaults. You can also configure Disk, Memory and Service, as per your requirements.
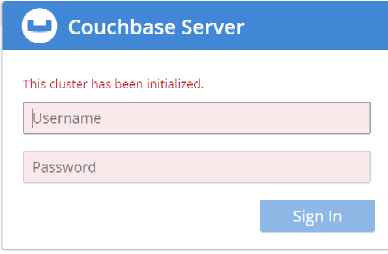
Cluster setup has been completed. Now, login with the username and password set up in previous step.
Configure LLAP
Follow the link given below to enable LLAP on Hive.
Kubernetes
💡 The component versions that are mentioned in this sub-topic are for representational purpose only. For the Gathr supported component version details, see Component Versions Supported →
Kubernetes is required to register container images in Gathr application and connect integrated development environments such as, Jupyter Lab or Visual Studio Code on the sandbox.
Below are the setup details for Kubernetes cluster:
Requirements
A Kubernetes cluster with access to the kube-apiserver endpoint.
https://kube-apiserver:kube-apiserver_port_number)
Default API port is 443
Connectivity between the access node and the API server endpoint URL.
To check accessibility, run the following command on the access node:
curl https://kube-apiserver:kube-apiserver\_port\_number/version --insecure
- A Kubernetes service account, an account to access Kubernetes, or a kubeconfig file that is created by using the service account and a token.
Kubernetes cluster should be available, which typically comprises of master node and multiple worker nodes.
The cluster and its nodes are managed from the master node using ‘kubeadm’ and ‘kubectl’ command.
To install and deploy Kubernetes, it is recommend to have Kubeadm (Multi Node Cluster).
On the Master Node following components will be installed:
API Server
Scheduler
Controller Manager
etcd
Kubectl utility
On the Worker Nodes following components will be installed:
Kubelet
Kube-Proxy
Pod
For the detailed setup information about setting up Kubernetes cluster, please refer:
or:
Verify Kubernetes Installation:
On Kubernetes master and worker nodes, check Start/Stop/Restart services:
systemctl status kubelet
systemctl status docker
systemctl status nfs-server
Run below commands on Kubernetes master to get status of cluster and pods:
kubectl get nodes
kubectl get pods --all-namespaces
Debugging Kubernetes Pods:
Run below commands on Kubernetes master:
Try to get pod info and verify the events, volume mounts, environment variables, endpoints etc.
kubectl describe pod <pod-name>You can also watch logs of pod using:
kubectl logs -f <pod-name>|Try entering bash/sh terminal of the pod and look at the configurations, volume map etc.
kubectl exec -it <pod-name> bashIf a pod is evicted, try to look at nodes, CPU/Memory/Disk pressure. Describe a node:
kubectl describe node <node-name>If disk pressure is True, which evicts the pod, also see the events listed at bottom while you describe node. You can also watch logs of kube-scheduler for more details.
Troubleshooting Cluster
Run below commands on Kubernetes master:
Listing cluster:
kubectl get nodes
To get detailed information about the overall health of the cluster:
kubectl cluster-info dump
To check logs on Master Node:
- API Server, responsible for serving the API
/var/log/kube-apiserver.log
- Scheduler, responsible for making scheduling decisions:
/var/log/kube-scheduler.log
- Controller that manages replication controllers:
/var/log/kube-controller-manager.log
To check logs on Worker Nodes:
- Kubelet, responsible for running containers on the node:
/var/log/kubelet.log
- Kube Proxy, responsible for service load balancing:
/var/log/kube-proxy.log
Firewall Settings
Check whether firewall is stopped:
firewall-cmd --state
systemctl status firewalld
If you have any feedback on Gathr documentation, please email us!