Create CDC Application
To create a new application, click the plus icon on the top right side of the screen.
Select Template
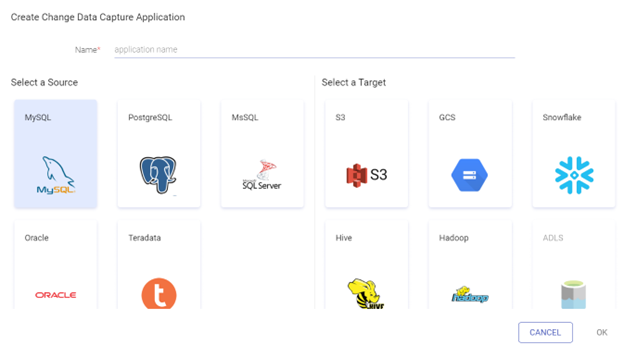
In the Create Change Data Capture Application window, provide the name of the application.
Using Gathr, organizations can now ensure that high volumes of data are not just moved but processed before it is delivered.
You can easily create the CDC applications using one of the various templates available with Gathr platform. These are:
MySQL to S3/ GCS/ Snowflake/ Hive/ Hadoop/ MySQL/ PostgreSQL/ MsSQL/ Oracle
PostgreSQL to S3/ GCS/ Snowflake/ Hive/ Hadoop/ MySQL/ PostgreSQL/ MsSQL/ Oracle
MsSQL to S3/ GCS/ Snowflake/ Hive/ Hadoop/ ADLS/ Delta/ MySQL/ PostgreSQL/ MsSQL/ Oracle
Oracle to S3/ GCS/ Snowflake/ Hive/ Hadoop/ ADLS/ Delta/ MySQL/ PostgreSQL/ MsSQL/ Oracle
Teradata to S3
In MySQL to Hive, you capture data from the MySQL database in batch as well as in streaming modes and replicate the captured data in Hive. Once the application is completed the source and target have consistent data. Likewise, using S3 and Hadoop to capture data provides you with a highly efficient data-driven approach with security, management efficiency, and storage optimization.
Select the Template and click OK
Once the template is selected, you will be configuring the properties of the above-mentioned template.
As you begin to create the application, you will be required to complete a few stages of creating the application including the source configuration, select source where you choose various database tables, select target and do column mapping to map the source and target table columns. There are also some optional configuration options including advance level configuration, job grouping, scheduling and jobs configuration that needs to be mentioned to create a CDC application.
Select Source
In Source configuration you will be required to configure the source database connection and the method to capture change data.
Configure Source Connection
You are required to choose the connection details of the SOURCE that you have selected.
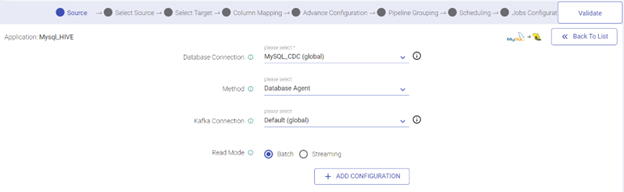
In this step, select a Connection and a Method
| Field | Description |
|---|---|
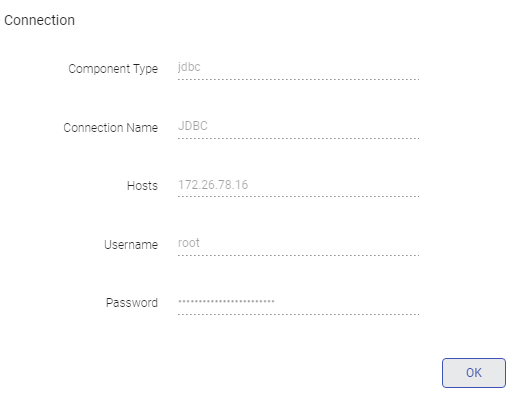
| Database Connection | Choose connection in which your table exists, for which you want to capture CDC. This tab has an info Icon, which shows the connection details. Shown in the figure below. |
| Method | Method of capturing CDC. Agent: Debezium is a service that captures change data from database in real-time and publish those changes to the Kafka topic, so that downstream applications can consume that data and perform the operations on it. Incremental Read: Captures all the records in an incremental fashion and will capture only insert and update records. LogMiner: In this method, the application directly accesses Oracle redo logs, which comprises of the entire set of records of all the activities performed on the database. |
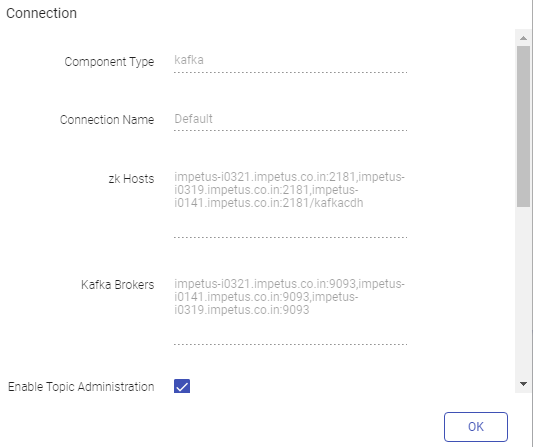
| Kafka Connection | Choose the Kafka connection where your database agent is writing data. |
| Read Mode | Choose whether you want to create application in batch or streaming mode. |
Database Connection Detail
Kafka Connection Detail:
Validate Configuration
Next, validate the required access by clicking on the Validate icon on the top right corner of the Source configuration Window.
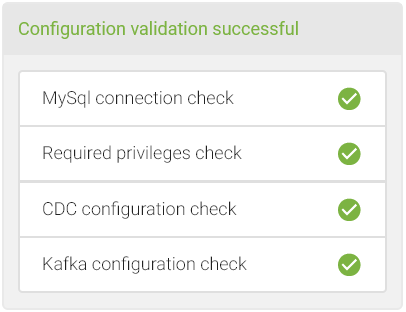
Here, you request to validate the connection, required privileges, ensure enabling the CDC and the Kafka connection.
Once the validation is successful, click the Next icon to configure the source table.
Select Source
In the Select Source Panel, you will have an accordion view of different databases of the source.
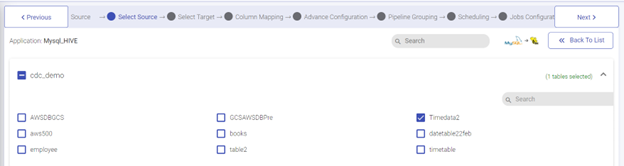
As you expand the accordion you can see the database tables. Click on a specific database and from within the database and choose specific tables. Once the selection is made, click Next
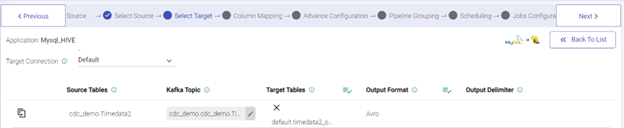
Select Target
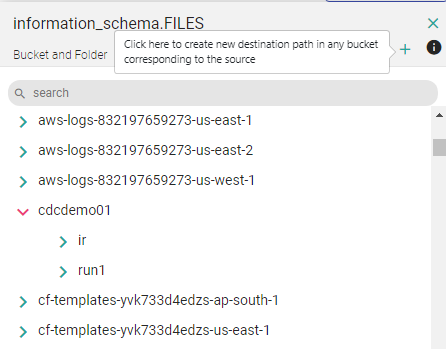
In the Select Target configuration, choose the target connection where you need to write the data. You may view the details of the connection by clicking on the View Details icon (i) option next to Connection.
Select Target will be prompted to select the connection for the target and select target path in case of HDFS and S3 and table in case of Hive.
Also, if you select Agent as a source method, then you will also be asked for a Kafka Topic from where you read the data. You will have to identify the topic name for the individual table name from the debezium agent configuration.
This wizard gives you an option to choose the Target Table where you want to write the data that is captured from the Source Table.
As you click on one of the Source Tables you can see the schema and the table view where you may choose a specific table within the schema.
| Field | Description |
|---|---|
| Connection | It is the connection of the target where you want to write data of source table. |
| Source Tables | It is the table of source database from where you want to read the data. |
| Kafka Topic | It is the drop-down of Kafka topics. Here user have to choose one of the topics where Debezium database agent is configured to write the changed data. This will be visible only for Agent method. |
| Target Tables | It is the table from target connection. User will configure this table by clicking on the row. |
| Output Format | It is the format in of the selected target table. |
| Output Delimiter | It is the field delimiter for the target table data. |
Select Target Table
Now you can map the source table to the target table.
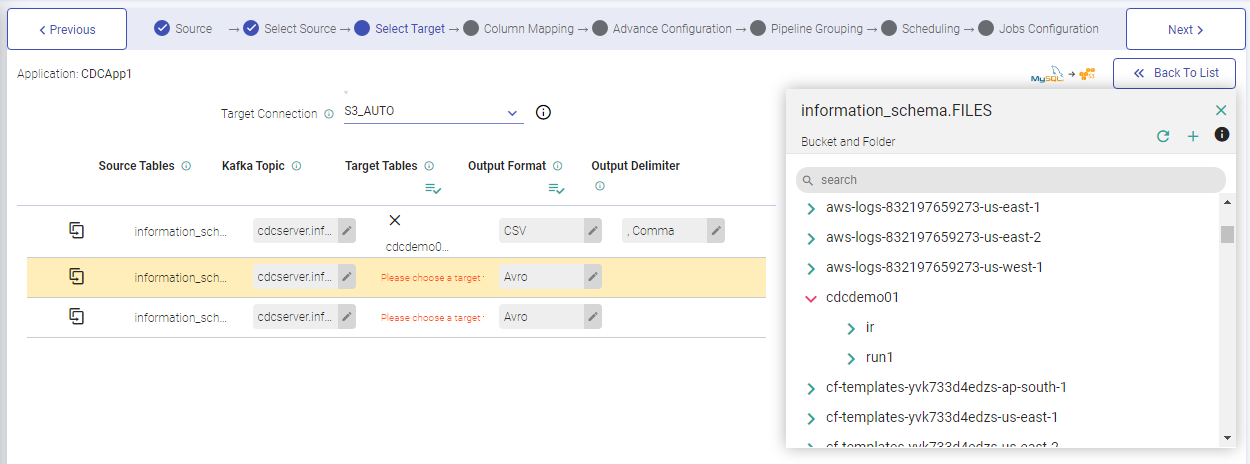
In the Target Table window, you can also create new tables, by clicking on the plus icon.
You will be required to Add Column for Version and Delete Flag for SCD Type 2 in the Create New Table window.
CREATE TABLE BOMBAY13234456 (USER_ID timestamp null default NULL ,FIRST_NAME timestamp null default NULL ,LAST_NAME varchar(100) ,EMAIL varchar(100) ,MODIFIED_DATE timestamp null default NULL)
Close the right navigation pane and click the Next button to configure the Column Mapping.
Column Mapping
After configuring the target, you will be navigated to the Column Mapping section, where the columns of both the source and target will be mapped.
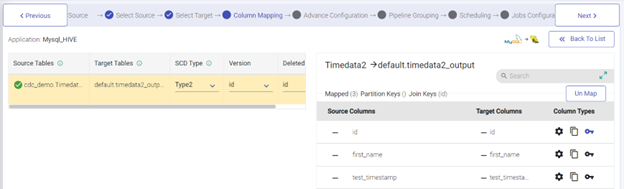
The column mapping window has two major sections, one is list of Source Table, their corresponding Target Table, SCD Type, version column and deleted flag column, and the other is where the Target table columns will open for you to map.
| Field | Description |
|---|---|
| Source Table | Source Table takes the table for which you want to capture CDC. |
| Target Table | Target Table takes the table for which you want to capture Source table CDC. |
| SCD Type | Select type you want to use to capture CDC. Type 1 will contain only the updated records while selecting. Type 2 will maintain the whole history. Explained below in detail. |
SCD Type, Version Column and Deleted Flag Column
| Field | Description |
|---|---|
| SCD Type | Under SCD Type there are two types, i.e., Slowly Changing Dimension type to streamline your data-flow, Type 1 and Type 2. Enter SCD Type for each source and target table mapping. In case of Type 1, your target table will only contain updated records and in Type 2, the target table will maintain the entire history of the source. Thus, you need to have two additional columns in case of Type2. One of the columns will maintain version of the record and the other will maintain DELETED_FLAG. Here, the deleted flag identifies if the record is deleted or not. For SCD Type 2, select the Version and Delete Flag option from the drop down. Note: The Version and Delete Flag options will be available once the user has create them in the column mapping window as described above. In case of Snowflake, the Current Flag option needs to be provided under SCD Type 2. For the Insert and Update operations on records the deleted flag value will be false and for the delete operation the value will be true. |
| Version Key | Target Column is the corresponding column to Source column for which you want to capture Source table CDC. |
| Deleted Flag Key | Choose the Deleted Flag key from the ‘Column Type’ column by clicking on the fourth Deleted Flag key icon. Here, the deleted flag represents the current state of record. It identifies if the record is deleted or not. |
Map Source and Target Table Columns
In the Column Mapping Section, the columns of both the source and target can be mapped by you. The source can be mapped with the corresponding columns of the target table.
There could be a case when you have multiple columns in your source table but you require to select a few columns and map them to the target table. In this wizard you can do that easily.
There could be a scenario when the source table column names are not like that of the target table names. To map those, you can simply drag and drop the columns against each other and map them. You will have to choose the destination connection on which you want to store the changed data captured from source. And choose the Schema name for the target table that will store the changed data captured from the source.
You may also click on the auto map button to map similar name source column with the target column.
| Field | Description |
|---|---|
| Source Column | Source Columns is the specific column from the source table for which you want to capture CDC. |
| Column to Check | Select an integer, long, date, timestamp or decimal type column on which incremental read will work. It is recommended that this column should have sequential, unique, and sorted (in increasing order) values. |
| Target Column | Target Column is the corresponding column to Source column for which you want to capture Source table CDC. |
| Column Types | Partitioning Key: Choose the Partition key from the ‘Column Type’ column by clicking on the first Partition key icon. The Partition key is the prime factor for determining how the data is stored in the table. The key helps you to organize the tables into partitions by dividing them into different parts. Join Key: Choose the Join key from the ‘Column Type’ column by clicking on the second Join key icon. Here, the Join key helps in incrementing the version of record by identifying the availability of similar record in the target table. |
Advanced Configuration
Once you click on the Next button, you are ready for the Advanced Configuration. This is an optional high-level configuration for the data flow created in your application needed for performance optimization and monitoring.
Source Configuration
The source configuration is different for different CDC Methods. Explained below are all four methods; Agent, Incremental Read and LogMiner.
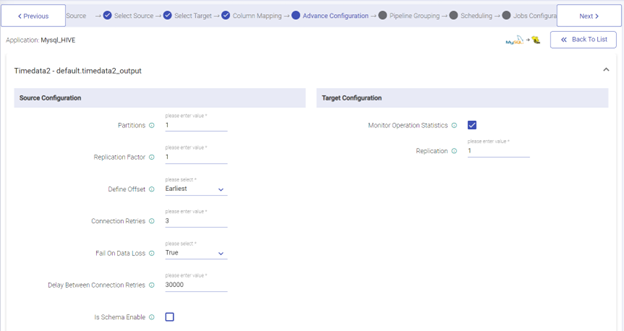
Configuration for Database Agent Method
| Field | Description |
|---|---|
| Partitions | Number of partitions. Each partition is an ordered unchangeable sequence of message that is repeatedly added to a commit log. |
| Replication Factor | Number of replications. Replication provides stronger durability and higher availability. For example, a topic with replication factor N can tolerate up to N-1 server failures without losing any messages committed to the log. |
| Define Offset | Following configurations are used for Kafka offset. Latest: The starting point of the query is just from the latest offset. Earliest: The starting point of the query is from the starting /first offset. Custom: A json string specifying a starting and ending offset for each partition. startingOffsets: A JSON string specifying a starting offset for each partition i.e. {“topicA”:{“0”:23,“1”:-1},“topicB”:{“0”:-1}} endingOffsets: A JSON string specifying a ending offset for each partition. This is an optional property with default value “latest”.i.e. {“topicA”:{“0”:23,“1”:-1},“topicB”:{“0”:-1 |
| Connection Retries | The number of retries for component connection. Possible values are -1, 0 or any positive number. If the value is -1 then there would be infinite retries for infinite connection. |
| Fail on Data Loss | Provides option of query failure in case of data loss. (For example, topics are deleted, or offsets are out of range). This may be a false alarm. You can disable it when it doesn’t work as you expected. Batch queries will always fail, if it fails to read any data from the provided offsets due to data loss. |
| Delay Between Connection Retries | Retry delay interval for component connection (in milliseconds). |
| Is Schema Enabled | While running the Debezium connector, you have to set the schema.enable property as true, then the checkbox isSchemaEnable must be check marked. |
Configuration for Incremental Read Method
| Field | Description |
|---|---|
| Column To Check | Select a column on which incremental read will work. Displays the list of columns that has integer, long, date, timestamp, decimal type of values. It is recommended that this column should have sequential, unique, and sorted (in increasing order) values. |
| Start Value | You can specify the value from where you want to begin reading data from the source table. |
| Read Control Type | You can control the reading of data from database by utilizing three different approaches. Limit by Count: Here, you can specify the number of records that you want to read in a single request. Limit by Value: Here, you can specify the value for configured column till the point where you want to read the data. None: Here, you can read the data without specifying any limit. From what value of columnToCheck, the data to be read. |
| Enable Partitioning | Read parallel data from the running query. |
| No. of Partitions | Specifies no of parallel threads to be invoked to read from JDBC in spark. |
| Partition on Column | Partitioning column can be any column of type Integer, on which spark will perform partitioning to read data in parallel. |
| Lower Bound/Upper Bound | Value of the lower bound for partitioning column/ Value of the upper bound for partitioning column. |
Configuration For LogMiner Method
| Field | Description |
|---|---|
| Use Pluggable Database | Select the option for 12c multi-tenant databases. |
| Pluggable Database Name | Name of the pluggable database that contains the schema you want to use. Use only when the schema was created in a pluggable database. |
| Operations | Operations for creating records. INSERT DELETE UPDATE |
| Database Time Zone | Time zone of the database. When the database operates in a different time zone from Data Collector. |
| Maximum Transaction Time | Time in seconds to wait for changes for a transaction. Enter the longest period that you expect a transaction to require. Default is 60 seconds. |
| Log Miner Session Window | Time in seconds to keep a LogMiner session open. Set to larger than the maximum transaction length. Reduce when not using local buffering to reduce LogMiner resource use. Default is 7200 seconds. |
| Max Batch Size (records) | Maximum number of records processed at one time. Keep values up to the Data Collector maximum batch size. Default is 1000. |
| LogMiner Fetch Size | Minimum number of records to fetch before passing a batch to the pipeline. Keep this value low to allow the origin to pass records to the pipeline as soon as possible, rather than waiting for a larger number of records to become available. Lower values can increase throughput when writes to the destination system are slow. Default is 1. |
| Query Timeout | Time to wait before timing out a LogMiner query. Default is 300 seconds. |
| Start From | Start from is the point in the LogMiner redo logs where you want to start processing. When you start the pipeline, Oracle CDC Client starts processing from the specified initial change and continues until you stop the pipeline. 1. From the latest change The origin processes all change that occur after you start the pipeline. 2. From a specified datetime: The origin processes all change that occurred at the specified datetime and later. Use the following format: DD-MM-YYYY HH:mm:ss. 3. From a specified system change number (SCN) The origin processes all change that occurred in the specified SCN and later. When using the specified SCN, the origin starts processing with the timestamps associated with the SCN. If the SCN cannot be found in the redo logs, the origin continues reading from the next higher SCN that is available in the redo logs. |
Target Configuration
Target Configuration varies for Hadoop, S3 and Hive.
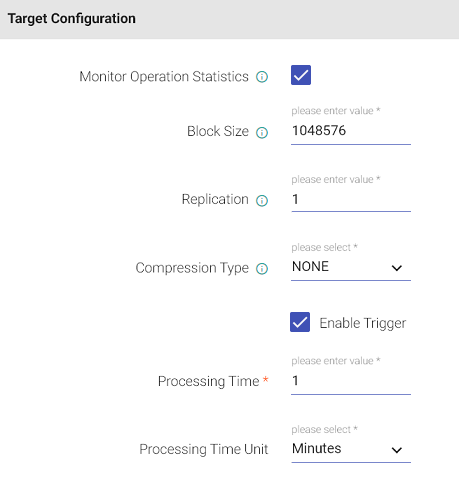
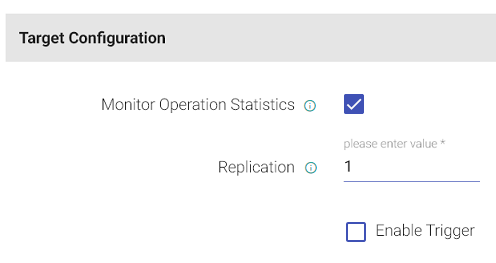
Configuration for Hadoop
| Field | Description |
|---|---|
| Monitor Operation Statistics | Select this box to monitor each run statistics. |
| Block Size | Size of each block (in Bytes) allocated in HDFS. |
| Replication | Enables to make additional copies of data. |
| Compression Type | Algorithm used to compress the data. |
| Enable Trigger | Trigger defines how frequently a streaming query should be executed. |
| Processing Time | It will appear only when Enable Trigger checkbox is selected. Processing Time is the trigger time interval. |
| Processing Time Unit | Processing Time Unit is in minutes or seconds. |
Configuration for Hive
| Field | Description |
|---|---|
| Replication | Enables to copy your data on underlying Hadoop file system. For example, if you specify “2” as Replication, then two copies will be created on HDFS. |
Configuration for S3
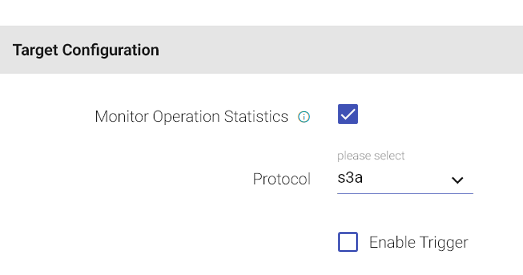
| Field | Description |
|---|---|
| Monitor Operation Statistics | Monitor Data Manipulation operations such as insert, update and delete functions performed on data of the source tables. |
| S3 protocol | S3 protocol to be used while writing on S3. |
Pipeline Grouping Section
In the jobs grouping page, you can group the jobs into a single unit. To create group, specify the group name and click Create. This means the dataflow that you have created can be grouped into a single pipeline or into multiple pipelines.
In certain cases, you may want to combine multiple ‘source to target’ jobs into one group. You can do this easily by assigning a group name to multiple jobs.
Here, a group means a ‘single pipeline’. In Gathr, the unit which performs the operations is called a pipeline. Thus, having two separate groups means having two different pipelines.
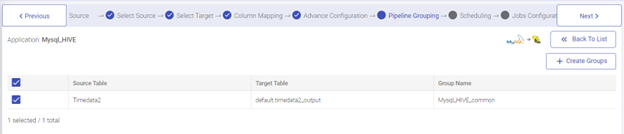
After creating group, click next.
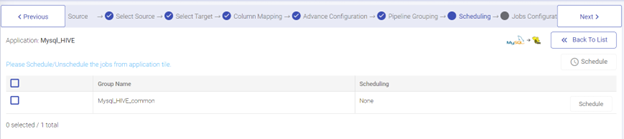
Scheduling
In the scheduling page, you can schedule the batch jobs. In certain business requirements, where you need to run your job at mid night, you may do that easily in this wizard.
Jobs Configuration
Next, in the jobs configuration page, you can allocate the resources to the jobs. You may configure the parameters at which you would want to run this application. Once you finish doing the configuration, click done to create application.

| Field | Description |
|---|---|
| Log Level | Control the logs generated by the pipeline based on the selected log level. Trace: View information of trace log level. Debug: View information of debug and trace log levels. Info: View information of trace, debug and info log levels. Warn: View information of trace, debug, warn and info log levels. Error: View information of trace, debug, warn, info and error log levels. |
| Deployment Mode | Specifies the deployment mode of the pipeline. Cluster: In cluster mode, driver runs on any of the worker nodes. Client: In client mode, driver runs on the Gathr admin node. Local: In local mode, driver and the executors run on the Gathr admin container. |
| Driver Cores | Number of cores to use for the driver process. |
| Driver Memory | Amount of memory to use for the driver process |
| Executor Cores | Number of cores to use on each executor. |
| Executor Instances | Number of executors to use for pipeline. |
| Executor Memory | Amount of memory to use per executor process |
| Yarn Queue(for Yarn deployment mode) | Name of the queue to use within pipeline for execution. |
| HDFS User(for Yarn deployment mode) | Name of the HDFS user to use within pipeline for accessing the hadoop services. |
| Error Handler | You can enable/disable error handling in job using this configuration. |
| Error Log Target | Select the target where you want to move the data that failed to process in the pipeline. If you select RabbitMQ, or Kafka, then you will have to specify the error target connection. |
| Connection | Select the connection where failed data would be pushed. |
| KeyTab Option | It signifies the mode of providing the Keytab file for authentication. There are two way through which user can supply the keytab file, either by specifying the key tab file path(file should present on each node) or by uploading it. |
| KeyTab File Path | It allow users to specify the key tab file path. |
| Upload keytab file | It allow users to upload the key tab file. |
| Dynamic Allocation Enabled | When a pipeline is in running mode, the spark pipeline scale and scale down the number of executors at the runtime. (Only in case of CDH enabled environment). |
| Extra Driver Java Options | A string of extra JVM options to pass to the driver. For instance, GC settings or other logging. For example: -XX:+PrintGCDetails -XX:+PrintGCTimeStamps |
| Extra Executor Java Options | A string of extra JVM options to pass to executors. For instance, GC settings or other logging. For example: -XX:+PrintGCDetails -XX:+PrintGCTimeStamps |
| Extra Spark Submit Options | A string with –conf option for passing all the above configuration to a spark application. For example: –conf ‘spark.executor.extraJavaOptions=-Dcon-fig.resource=app’ –conf ‘spark.driver.extraJavaOptions=-Dconfig.resource=app’ |
Click Done to create the application.
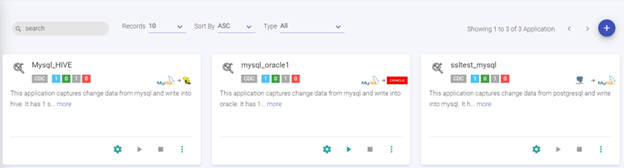
You can view the created application on the dashboard.
The created application tile displays the name of the CDC application, application type, total number of pipelines, total active, stopped and error pipelines running within the CDC application.
If you have any feedback on Gathr documentation, please email us!