Create Connections
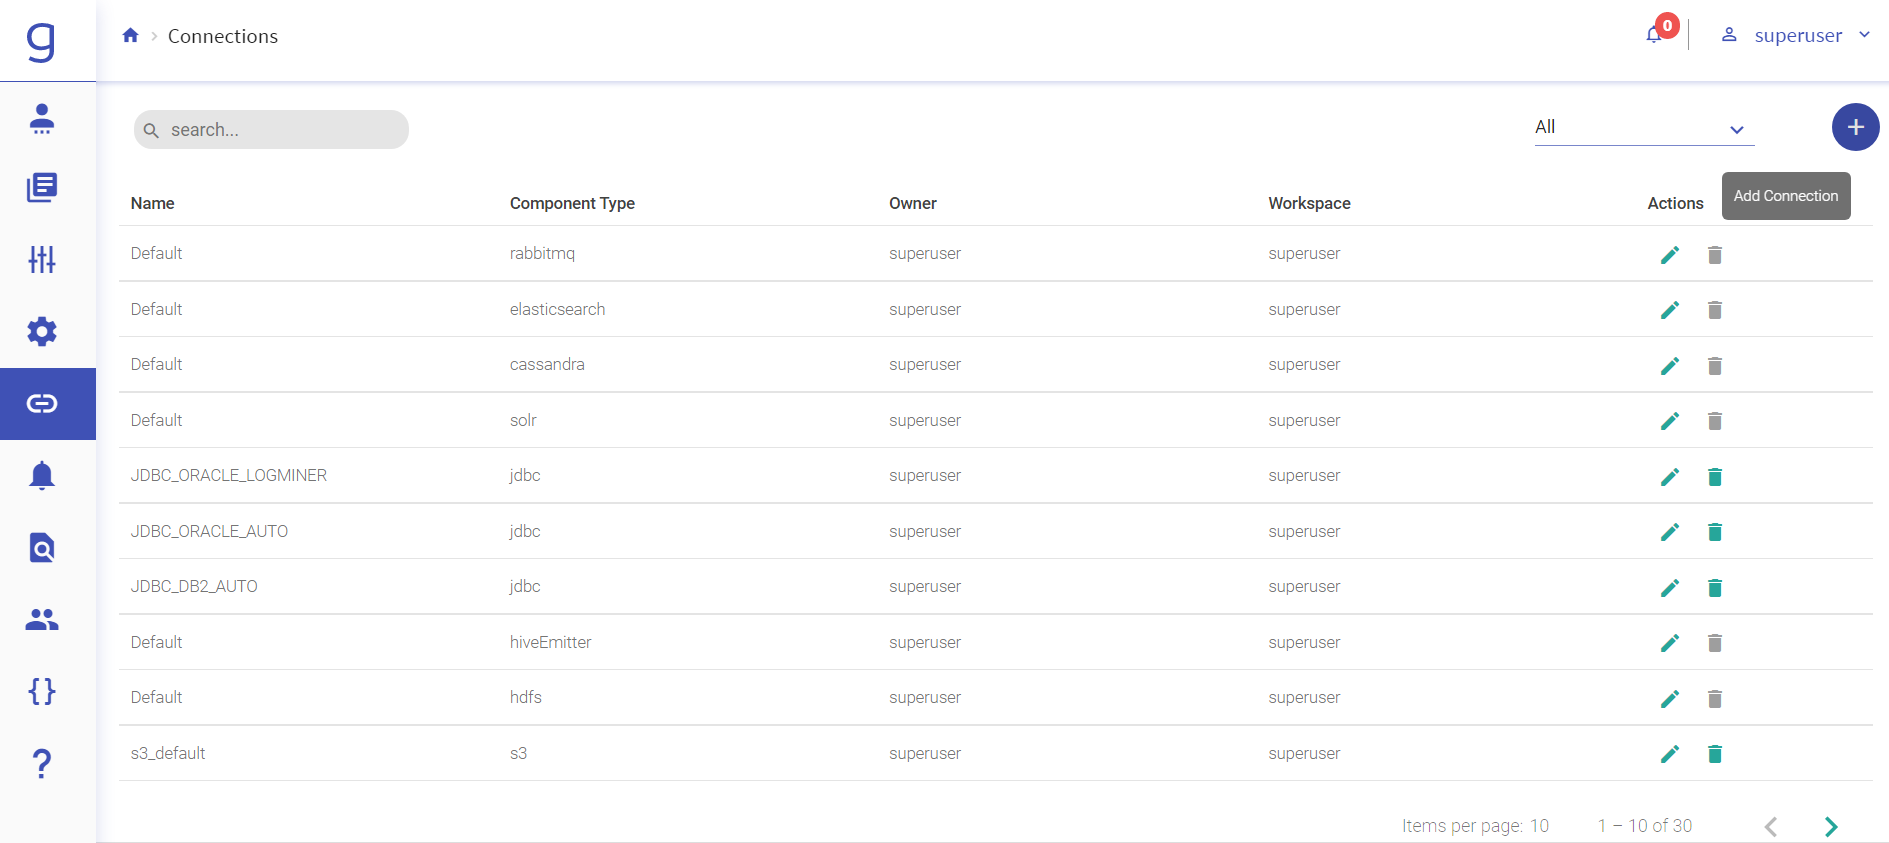
A superuser can create new connections using the Connections tab. To add a new connection, follow the below steps:
Login as a Superuser.
Go to Connections page.
Click on Add Connection.
Select the component from the drop-down list for which you wish to create a connection.
ADLS
For creating an ADLS connection, select ADLS from the Component Type drop-down list and provide connection details as explained below:
| Field | Description |
|---|---|
| Component Type | Shows all the available connections. Select ADLS from the drop-down list. |
| Connection Name | Provide a connection name to create the connection. |
| Account Name | Provide the valid storage account name. |
| Authentication Type | Select authentication type. The available options are mentioned below: - Azure AD - Access Key - Credential Passthrough |
Upon selecting Azure AD, provide the below fields:
| Client ID | Provide a valid client ID. |
| Secret Client | Provide a valid client secret password. |
| Directory ID | Provide a valid directory ID. |
Upon selecting Access Key, provide the below fields:
| Account Key | Provide a valid storage account key. |
The Credential Passthrough option allows you to authenticate automatically to Azure Data Lake Storage from Azure Databricks clusters using the identity that you use to log in to Azure Databricks.
AWSIoT
For creating a AWS IoT connection, select AWS IoT from the Component Type drop-down list and provide connection details as explained below.
| Field | Description |
|---|---|
| Component Type | Shows all the available connections. Select AWS IoT Component type from the list. |
| Connection Name | Name of the connection. For example, AWSIoT. |
| AWS KeyId | This is the AWS Key i.e. the credential to connect to AWS console. |
| Secret Access Key | This is AWS secret access key, to access AWS services. |
| Client EndPoint | AWS IoT Client End Point, which is unique for IoT. |
| Role ARN | User role ARN. It is used to create rules. |
| Region | AWS Region. |
| Connection ClientId | Any stream name. |
Azure Blob
For creating a Azure Blob connection, select Aure Blob from the Component Type drop-down list and provide connection details as explained below:
| Field | Description |
|---|---|
| Component Type | Shows available connections. |
| Connection Name | Name of the connection. For example, Cassandra. |
| Azure Blob Connection String | Azure Blob connection String. |
Cassandra
For creating a Cassandra connection, select Cassandra from the Component Type drop-down list and provide connection details as explained below:
| Field | Description |
|---|---|
| Component Type | Shows available connections. |
| Connection Name | Name of the connection. For example, Cassandra |
| Hosts | Hosts name and ports of Cassandra machine (comma separated). |
| Connection Retries | Number of retries for component connection. |
| Authentication Enabled | Enable if authentication is enabled in Cassandra. |
| Username | Username for Cassandra data store authentication |
| Password | Password for Cassandra data store authentication |
| Test Connection | After entering all the details, click on the Test Connection button. If credentials are correct, a successful connection message is generated. If you enter wrong credentials or server is down, you will get the a Connection unavailable message. |
Cosmos
For creating a Cosmos connection, select Cosmos from the Component Type drop-down list and provide connection details as explained below:
| Field | Description |
|---|---|
| Component Type | Shows all the available connections. |
| Connection Name | Name of the connection. |
| Cosmos Endpoint URI | End point URI of Azure Cosmos DB Account. |
| Key | Provide the Azure Cosmos DB Key. |
| Consistency Level | Consistency levek in Azure Cosmos DB. If the user selects Default option then the Cosmos DB account level consistency will be used as configured on the azure portal of Cosmos DB. User can alternately select the Eventual consistency option for read operations instead of using the default account level consistency. |
| TEST CONNECTION | After entering all the details, click on the Test Connection button. If credentials are correct, a successful connection message is generated. If you enter wrong credentials or server is down, you will get the a Connection unavailable message. |
Couchbase
For creating a Couchbase connection, select Couchbase from the Component Type drop-down list and provide connection details as explained below:
| Field | Description |
|---|---|
| Component Type | Shows available connections. |
| Connection Name | Name of the connection. |
| Hosts | Hosts name and ports of Couchbase machine (comma separated). |
| Username | Username for Couchbase datastore authentication. |
| Password | Password for Couchbase datastore authentication. |
| Test Connection | After entering all the details, click on the Test Connection button. If credentials are correct, a successful connection message is generated. If you enter wrong credentials or server is down, you will get the a Connection unavailable message. |
EFS
For creating an Elasticsearch connection, select Elasticsearch from the Component Type drop-down list and provide connections details as explained below.
| Field | Description |
|---|---|
| Component Type | Shows available connections. Select EFS Component type from the list. |
| Connection Name | Connection name to create. |
| Directory Path | Enter mounted root directory EFS. |
ElasticSearch
For creating an Elasticsearch connection, select Elasticsearch from the Component Type drop-down list and provide connections details as explained below.
| Field | Description |
|---|---|
| Component Type | Shows available connections. Select Elasticsearch Component type from the list. |
| Connection Name | Name of the connection. For example, Elasticsearch |
| Hosts | Hosts name and ports of Elasticsearch machine. |
| http Port | Port number where elastic search is running. |
| Zone | Defines the zone of Elastic Search cluster. |
| Cluster Name | The name of the cluster to which elastic search will connect. |
| Connection Timeout secs | Maximum time taken by the client to connect to the Elasticsearch server (unit seconds). |
| Socket Timeout secs | If the continuous incoming data flow did not occur for a specified period of time, socket timeout connection occurs (unit seconds). |
| Request Retry Timeout secs | Sets the maximum timeout in case of multiple retries of same request. |
| Enable Security | Enable X-Pack security plugin for Elasticsearch authentication. |
| Enable SSL | If security is enabled on Elasticsearch, set this to true. |
| Keystore select option | Specify keystore path: Specify the Elasticsearch keystore file (.p12) path. Upload keystore path: Upload the Elasticsearch keystore file (.p12) path. |
| Keystore file path | Mention the Elasticsearch keystore file (.p12) path. |
| Keystore password | Keystore password. |
| Enable Authentication | Select the checkbox if Authentication is enabled on Elasticsearch. |
| Username | Elasticsearch authentication username. |
| Password | Elasticsearch authentication password. |
GCP
To access GCP services, it is mandatory to Generate Service Account Key with below permission for read and write.
Big query:
For the BigQuery Data Sources and Emitters to run successfully in Gathr applications, the following permissions/policy actions should be assigned in Google Cloud:
bigquery.datasets.get
bigquery.jobs.create
bigquery.jobs.delete
bigquery.jobs.get
bigquery.jobs.list
bigquery.jobs.listAll
bigquery.jobs.listExecutionMetadata
bigquery.jobs.update
bigquery.tables.create
bigquery.tables.create
bigquery.tables.getData
bigquery.tables.list
bigquery.tables.update
bigquery.tables.updateData
storage.buckets.get
storage.buckets.create
storage.buckets.list
storage.objects.create
storage.objects.delete
storage.objects.get
storage.objects.list
GCS:
For the GCS Data Sources and Emitters to run successfully in Gathr applications, the following permissions/policy actions should be assigned in Google Cloud:
storage.buckets.get
storage.buckets.create
storage.buckets.list
storage.objects.create
storage.objects.delete
storage.objects.get
storage.objects.list
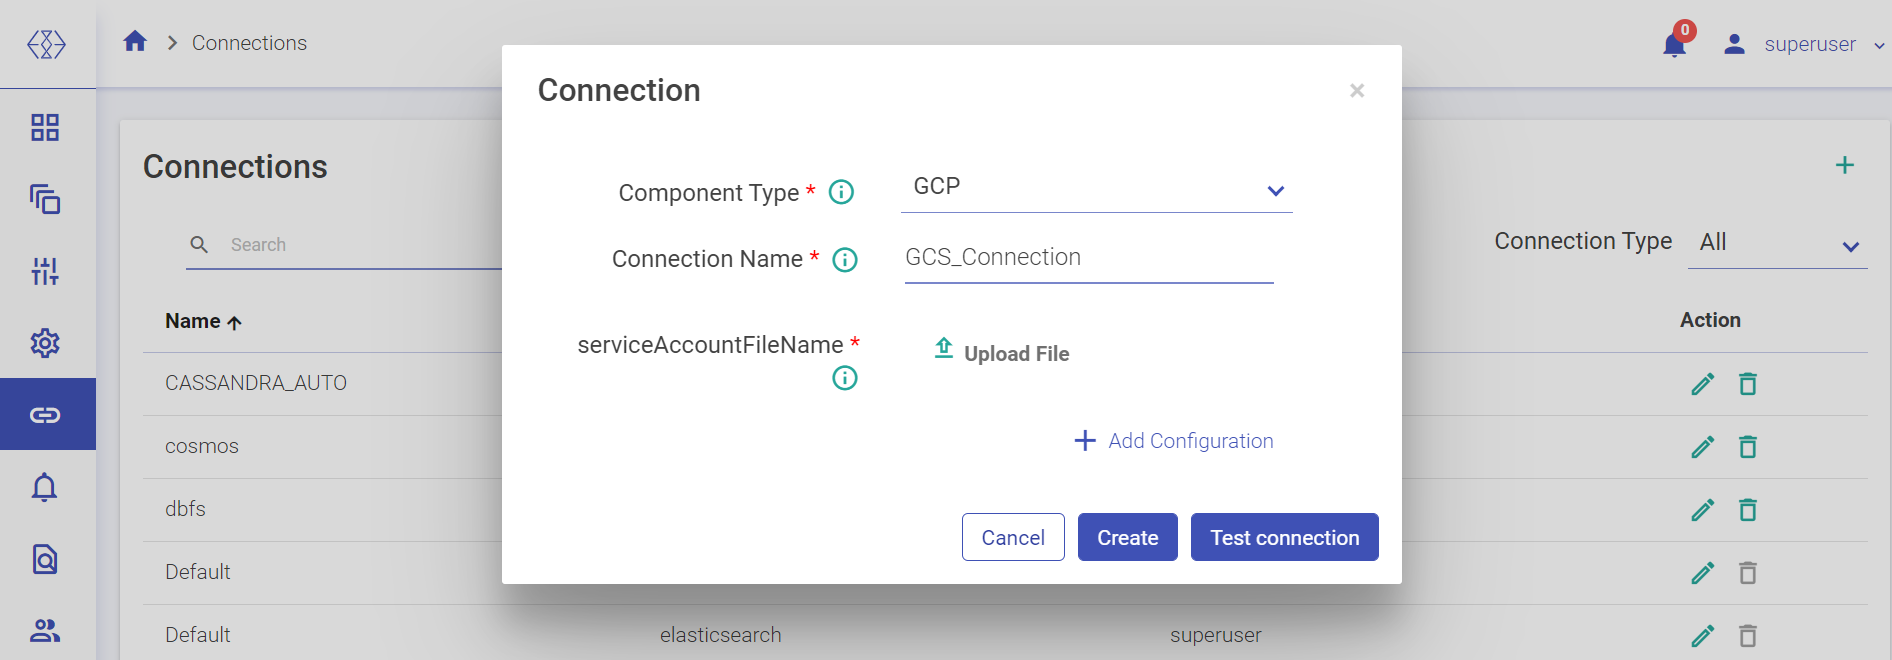
| Field | Description |
|---|---|
| Component Type | The selected component type is reflected here which is GCP in this case. |
| Connection Name | Mention the connection name. |
| Service Account Key | Upload the service account key. |
After entering all the details, click on the Test Connection button to validate if the connection is running properly.
Click on Create button to save the changes.
For using GCP Connection in gathr, generate service account key.
See the sub-topic Generate Service Account Key to know the steps required for generating Service Account ID and Service Account Key for upload.
Generate Service Account Key
Prerequisite
You must have a Google account to access the GCP services.
Steps required to generate service account key
Follow these steps in GCP to allow Gathr the access to your GCP Component:
Create a Service Account and key
Enable the required APIs
Each of these steps are explained below:
Steps to generate Service Account ID and Key:
Use the below link to access/create Google account.
Sign in to GCP.
Create a new project to proceed further. Else, use any existing project to continue.
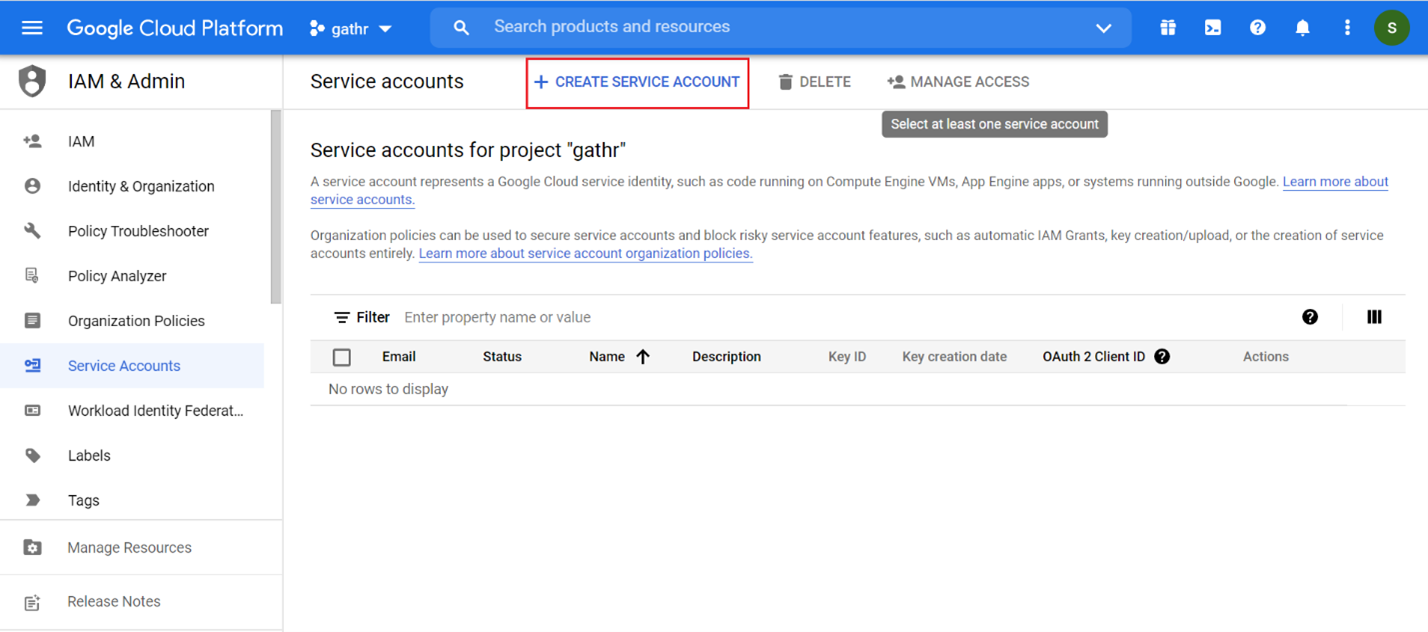
Navigate to IAM & Admin section and click on the Service Accounts option.
On the Service Accounts page, click on the CREATE SERVICE ACCOUNT option as shown below:
Provide the service account details and click CREATE AND CONTINUE.
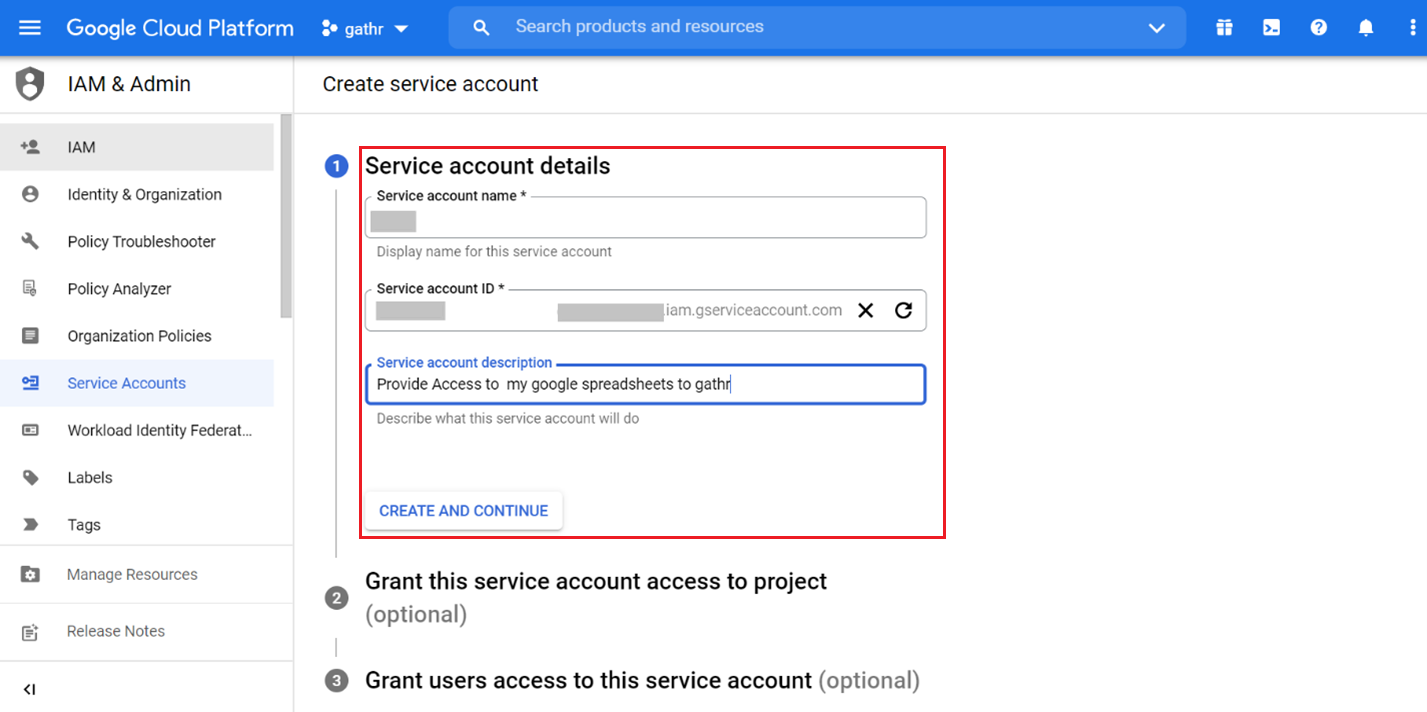
(Optional steps) Grant the service account access to project and users.
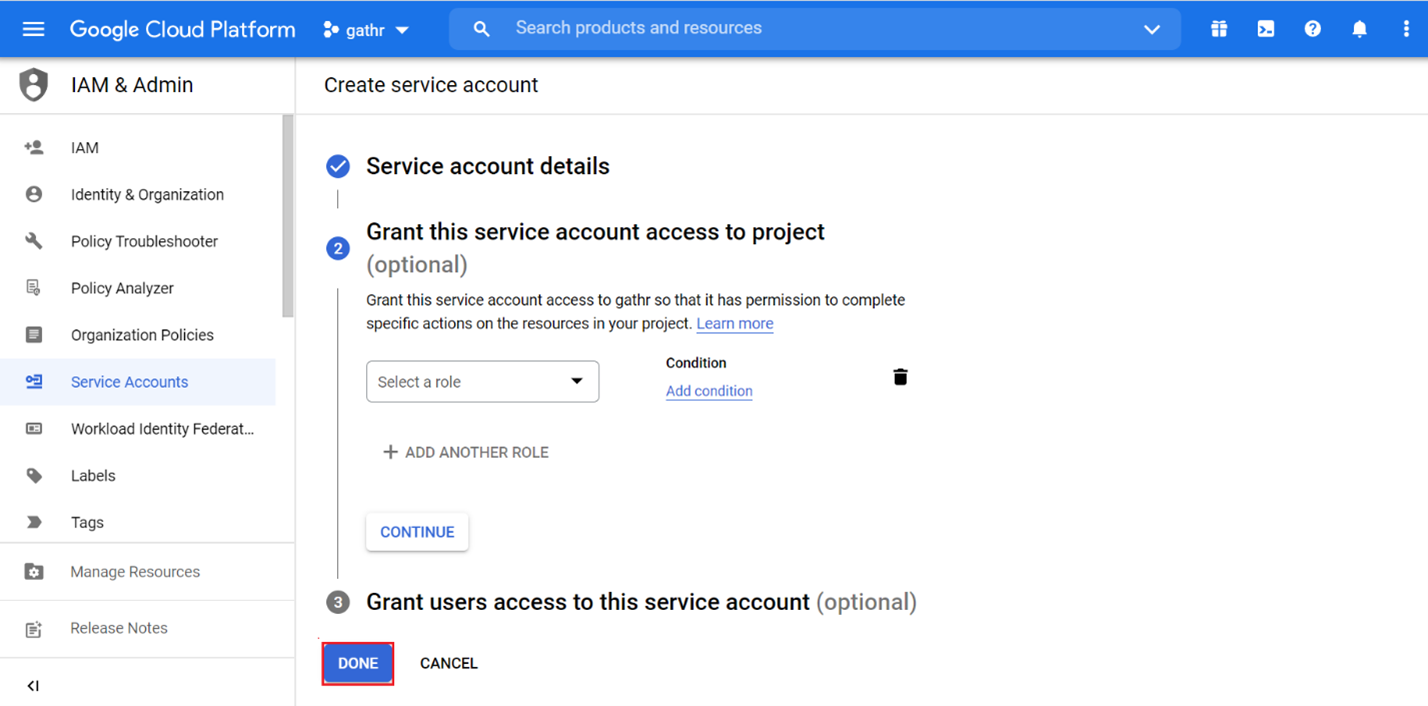
Click Done.
The created service account will be listed on the Service accounts page along with the available ones (if any).
This Service Account ID should be provided in Gathr during the GCP connection configuration.
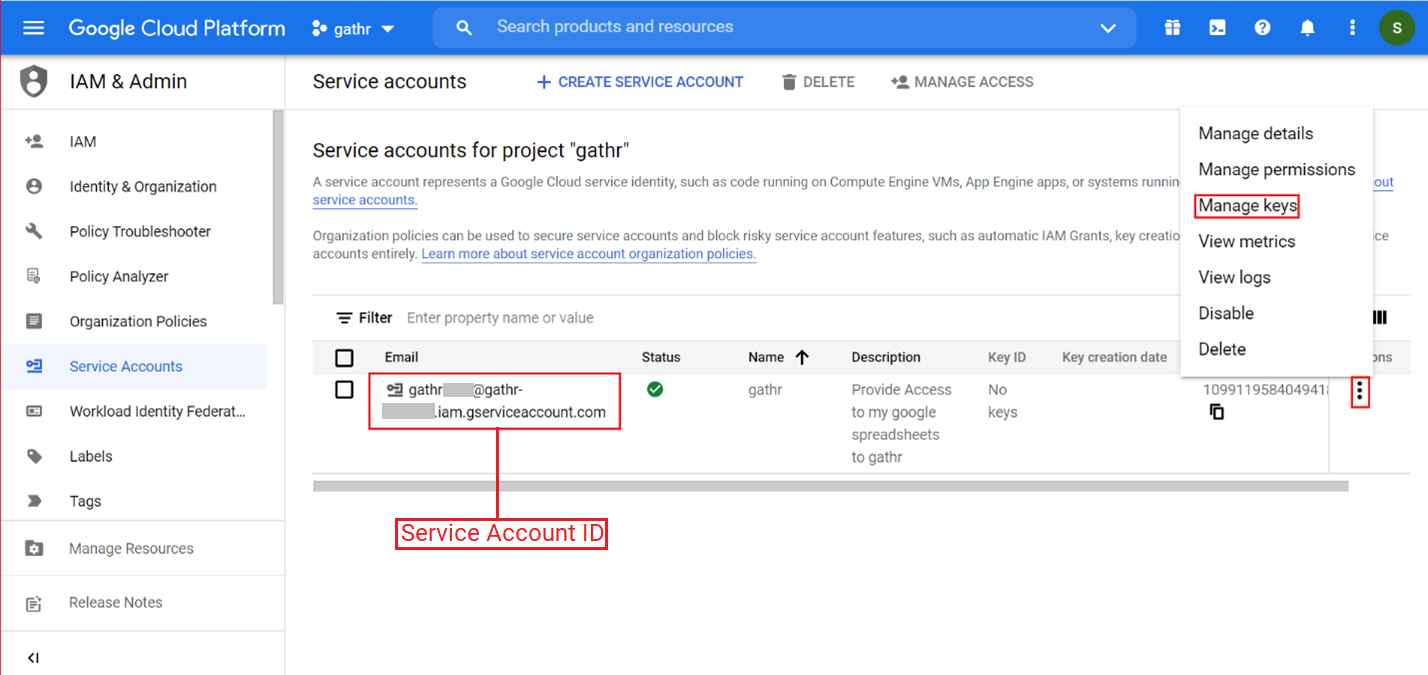
Click on the ellipses under Actions and select Manage Keys.
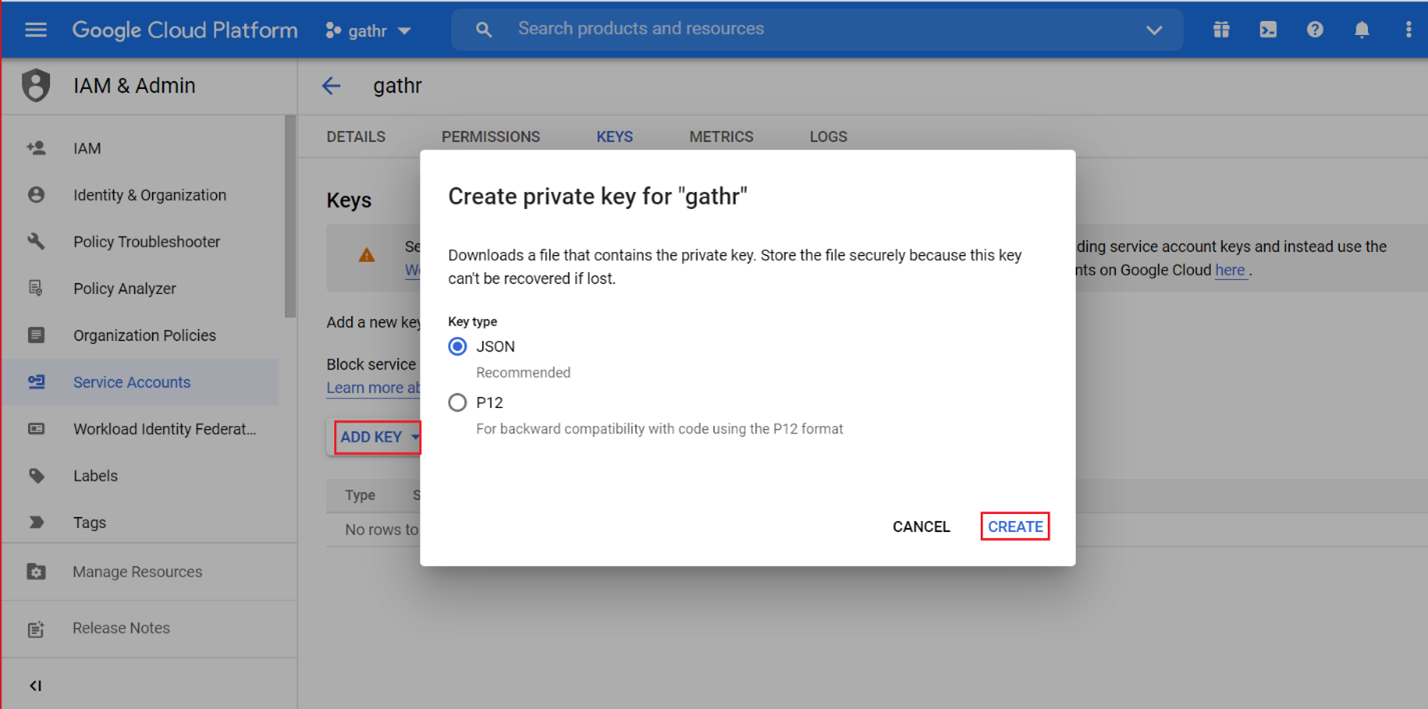
Click on ADD KEY to create a new key or download an existing key.
Choose a key type from the available options, JSON or P12, and click CREATE.
The created Private key will be downloaded and saved locally.
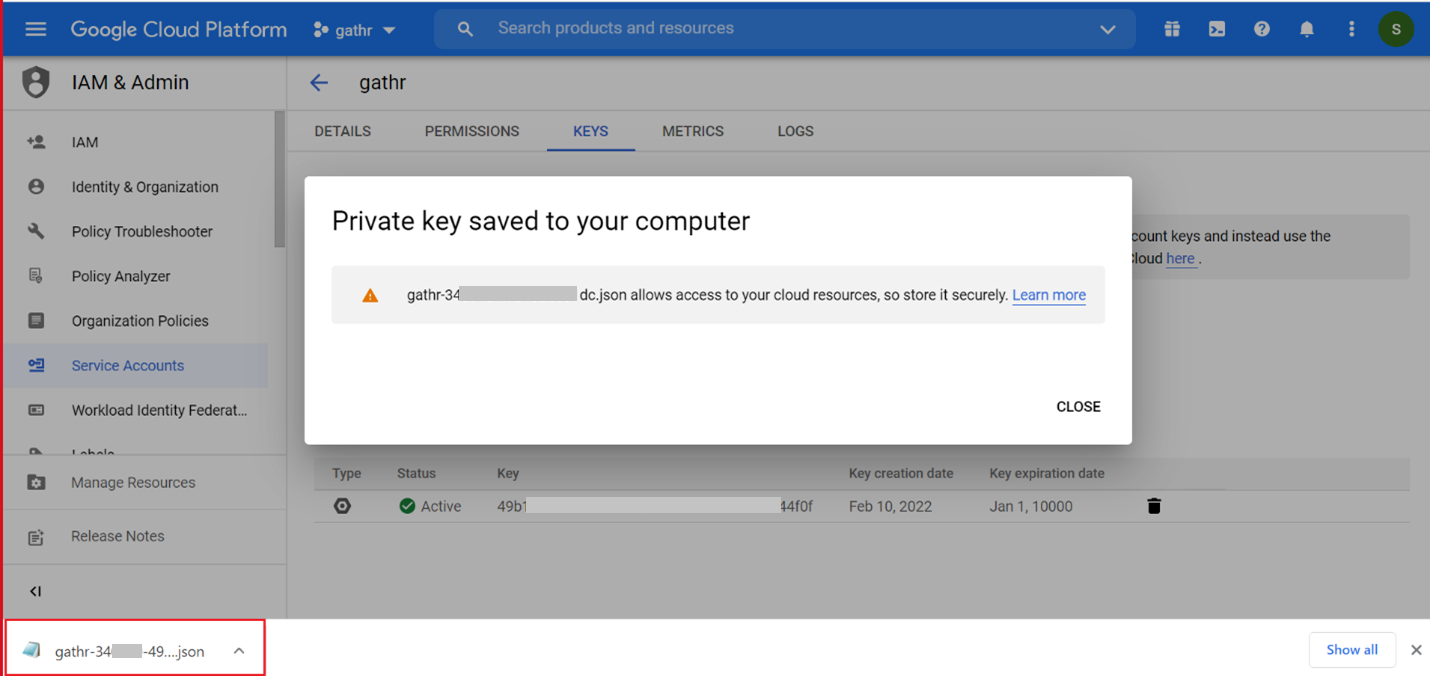
This Private Key file should be uploaded in Gathr during the GCP connection configuration.
Enable Google Sheets API and Drive API
Search for APIs & Services on Google console or follow the link given below:
Click on ENABLE APIS AND SERVICES option.
On the API Library page, search and open google sheets api.

On the Google Sheets API page, click on ENABLE.
A confirmation will appear once the Google Sheets API is enabled.
On the API Library page, search and open google drive api.
On the Google Drive API page, click on ENABLE.
A confirmation will appear once the Google Drive API is enabled.
Share Spreadsheet with Service Account ID
Navigate to Google Sheets and open a spreadsheet.
Share you Google Spreadsheet with the created Service Account.
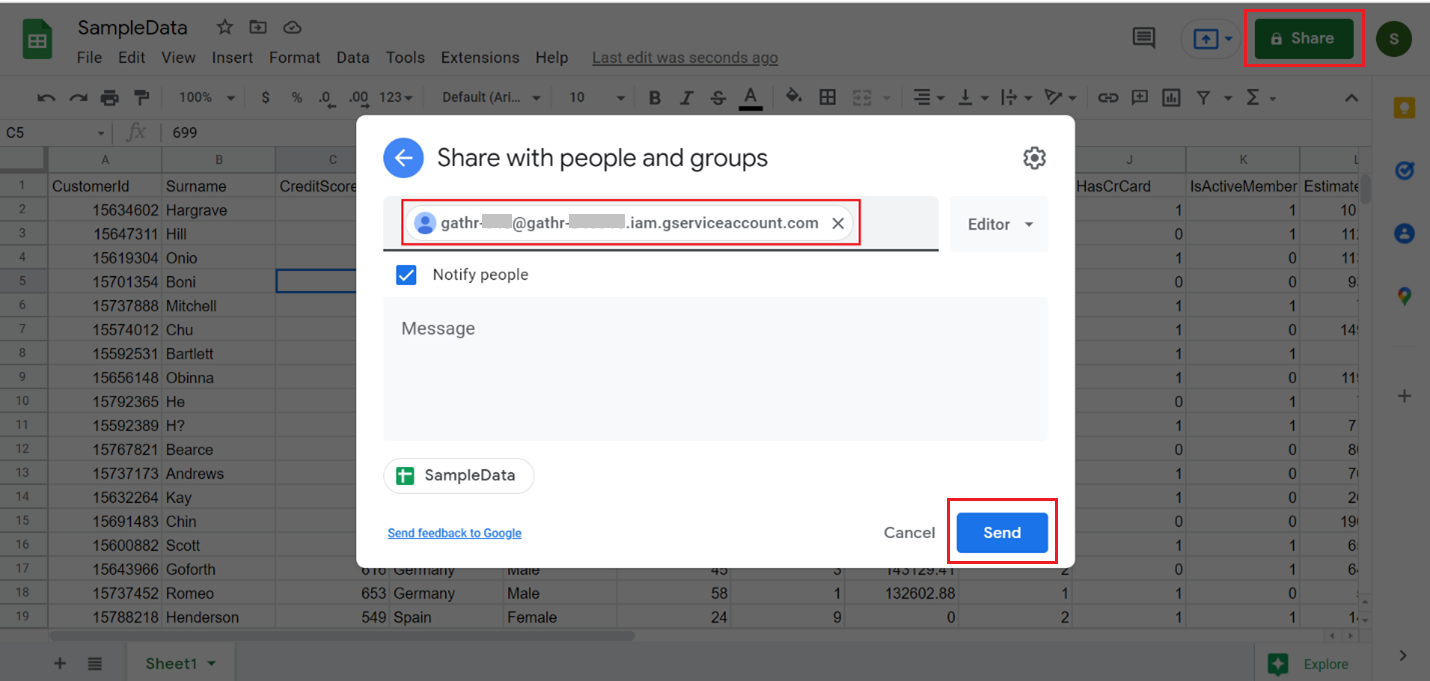 Make sure to share a google sheet and not any other file type.
After completing all the required steps navigate to Gathr console and provide the necessary details to create the connection.
Click below link to know more about how to create and manage service account keys using the Google Cloud Console.
https://cloud.google.com/iam/docs/creating-managing-service-account-keys
Google Spreadsheet
For creating Google Spreadsheet connection, select Google Spreadsheet option from the Component Type drop-down list and provide connection details as explained below:
| Field | Description |
|---|---|
| Component Type | Select the component type from the drop-down list. i.e., Google Spreadsheet in this case. |
| Connection Name | Unique name of the connection to be created. |
| Service Account ID | Provide the google service account ID. |
| Service Account Key Type | Preferred service account key type should be selected for authentication. |
| Upload File | Upload file with service account credentials as per the service account key type selected above. |
See the topic Generate Service Account Key to know the steps required for generating Service Account ID and Service Account Key for upload.
Enable Google Sheets API and Drive API
Search for APIs & Services on Google console or follow the link given below:
Click on ENABLE APIS AND SERVICES option.
On the API Library page, search and open google sheets api.
On the Google Sheets API page, click on ENABLE.
A confirmation will appear once the Google Sheets API is enabled.
On the API Library page, search and open google drive api.
On the Google Drive API page, click on ENABLE.
A confirmation will appear once the Google Drive API is enabled.
Share Spreadsheet with Service Account ID
Navigate to Google Sheets and open a spreadsheet.
Share you Google Spreadsheet with the created Service Account.
Make sure to share a google sheet and not any other file type.After completing all the required steps navigate to Gathr console and provide the necessary details to create the connection.
Click below link to know more about how to create and manage service account keys using the Google Cloud Console.
https://cloud.google.com/iam/docs/creating-managing-service-account-keys
Hbase
For creating an Hbase connection, select Hbase from the Component Type drop-down list and provide connections details as explained below.
| Field | Description |
|---|---|
| Component Type | Shows all different types of available connections. Select HBase Component type from the list. |
| Connection Name | Name of the connection. For example, HBase |
| HDFS User | HDFS user name. |
| zK Host | Zookeeper host name for Hbase cluster. |
| zK Port | Zookeeper port for Hbase cluster. |
| Client Retries Number | Number of retries for the Hbase Client. For example, 2. |
| zk Recovery Retry | Number of retries to reconnect to HBase Zookeeper. |
| zk Parent Node | Parent node in Zookeeper for Hbase service metadata. |
| Table Administration | Enable this if you want to create table in Hbase. |
| Create | Click on the Create button to create the connection. |
| Test Connection | After entering all the details, click on the Test Connection button, if credentials provided are correct, services are up, and running, you will get the message Connection is available. If you enter wrong credentials or server is down and you click on Test Connection, you will get the message Connection unavailable. |
HDFS
For creating a HDFS connection, select HDFS from the Component Type drop-down list and provide connections details as explained below.
| Field | Description |
|---|---|
| Component Type | Shows all different types of available connections. Select HDFS Component type from the list. |
| Connection Name | Name of the connection. For example, HDFS. |
| File System URI | File System URI of the machine where HDFS installed. |
| Username | The name of the user through which Hadoop user is running. |
| HA Enabled | Hadoop cluster is HA Enabled or not. |
| Name Node1 Name | NameNode1 identifier/label. |
| Name Node1 RPC Address | RPC Address of the Name Node1. |
| Name Node2 Name | NameNode2 identifier/label. |
| Name Services | Name service id of Hadoop cluster. |
| Create | Click on the Create button to create the connection. |
| Test Connection | After entering all the details, click on the Test Connection button, if credentials provided are correct, services are up, and running, you will get the message Connection is available. If you enter wrong credentials or server is down and you click on Test Connection, you will get the message Connection unavailable. |
HIVE Emitter
For creating a HIVE Emitter connection, Select HIVE Emitter from the Component Type drop-down list and provide connections details as explained below.
| Field | Description |
|---|---|
| Component Type | Shows all the available connections. Select HIVE Emitter Component type from the list. |
| Connection Name | Name of the connection. |
| MetaStore URI | Thrift URI to connect to HIVE Metastore service. |
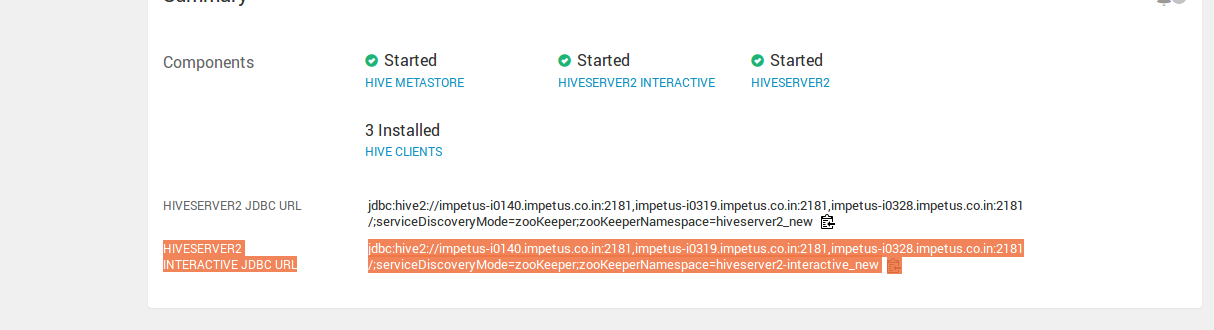
| Hive Server2 URL | Defines the Hive server 2 JDBC URL. i.e. jdbc:hive2:// Please view the note below the table. |
| HiveServer2 Password | Password for HiveServer2 JDBC connection. If there is no password, leave it blank. |
| FileSystem URI | HDFS File System URI |
| UserName | HDFS User name authorized to access the services. |
| HA Enabled | Check this option, if Name Node of HDFS is HA enabled. |
| KeyTab Select Option | You can add extra Java options for any Spark Superuser pipeline in following way: 1. Login as Superuser and click on Data Pipeline and edit any pipeline. Upload key tab file: Enables to upload Key tab file for authentication. Depending on the option selected. |
| Specify keytab file path | If the option selected is Specify** Keytab File Path,** system will display the field** KeyTab File Path where you will specify the keytab file location. |
| Upload key tab file | If the option selected is Upload** Keytab File**,** system will display the** field** Upload Keytab File that will enable you to upload the keytab file. |
| Hive Zookeeper Quorum** | Zookeeper hosts used by LLAP. For example: host1:2181;host2:2181;host3:2181 |
| Hive Daemon Service Hosts** | Application name for LLAP service. For example @llap0 |
| Hive Warehouse Load Staging Directory** | Temp directory for batch writes to Hive. For e.g /tmp |
| Table Administration | Enable this if you want to create table in Hive Emitter. |
| Create | Click on the Create button to create the connection. |
| Test Connection | After entering all the details, click on the Test Connection button. If credentials are correct, a successful connection message is generated. If you enter wrong credentials or server is down, you will get the a Connection unavailable message. |
The value of Hive Server2 URL will be the value of HiveServer2 Interactive JDBC url (given the in the screenshot). In the HDP 3.1.0 deployment, this is an additional property:
HiveServer2 Interactive JDBC URL: The value is as mentioned below:
IBM-MQ
For creating an IBM MQ connection, select IBM MQ from the Component Type drop-down list and provide connections details as explained below:
| Field | Description |
|---|---|
| Component Type | Shows all different types of available connections. Select IBM MQ Component type from the list. |
| Hosts | Host or IP address of IBM MQ to create connection. |
| Queue Manager Name | IBM MQ queue manager name. |
| sax.label.comp.channelName | IBM MQ channel name. |
| sax.label.comp.applicationName | IBM MQ application name. |
| Port | The port of the database where database is deployed. IBM MQ communication port. |
| UserName | The username of IBM MQ to create a connection. |
| Password | The password of IBM MQ to create a connection. |
JDBC
For creating a JDBC connection, select JDBC from the Component Type drop-down list and provide connections details as explained below:
| Field | Description |
|---|---|
| Component Type | Shows all different types of available connections. Select JDBC Component type from the list. |
| Connection Name | Name of the connection. |
| Database Type | Type of database in which data needs to be dumped. The databases available are: MySQL, POSTGRESQL, ORACLE, MS SQL, DB2, HSQL, TERADATA, Redshift, Delta SQL, Custom.Note: Upon selecting Custom as Database Type, provide details including the Driver Class Name to be used, driver connection URL, query to list tables, column list query, query to inspect tables and upload a connection jar. Once selected, the custom component will be available in the JDBC emitter as connection name on the pipeline canvas. |
| Database Name | The name of the database to be used. |
| Host | The host of the machine where database is deployed. |
| Port | The port of the database where database is deployed. |
| UserName | The username of the database. |
| Password | The password of the database. |
| Create | Click on the Create button to create the connection. |
| Test Connection | After entering all the details, click on the Test Connection button. If credentials are correct, a successful connection message is generated. If you enter wrong credentials or server is down, you will get the a Connection unavailable message.. |
Jira
For creating a Jira connection, select Jira from the Component Type drop-down list and provide connections details as explained below:
Connection Name: Name of the connection to be created.
Host: The hostname of your JIRA application should be provided.
Example: gathr.atlassian.net/
Email: The email ID registered with your JIRA account should be provided.
Api ID: Token created in JIRA account should be provided to authenticate the connection.
See the sub-topic Generate API Token for JIRA to know the steps required for generating API tokens in JIRA.
After entering all the details, click on the TEST button.
If the connection service identification and authentication details are provided correctly, a success message stating “connection available” is generated. Click on the CREATE button to save the changes.
If the details are incorrect or the server is down, you will get a message “Connection unavailable”.
Generate API Token for JIRA
To authenticate the connection between Gathr and JIRA, you need to create an API token in your JIRA account and provide it in Gathr.
Steps to create an API token in JIRA
Login to your JIRA account and navigate to Account Settings:
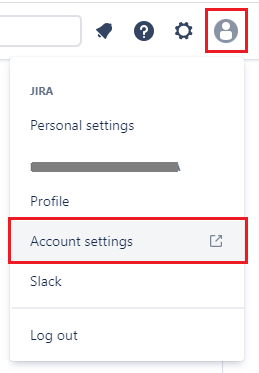
Go to Security > Create and manage API tokens.
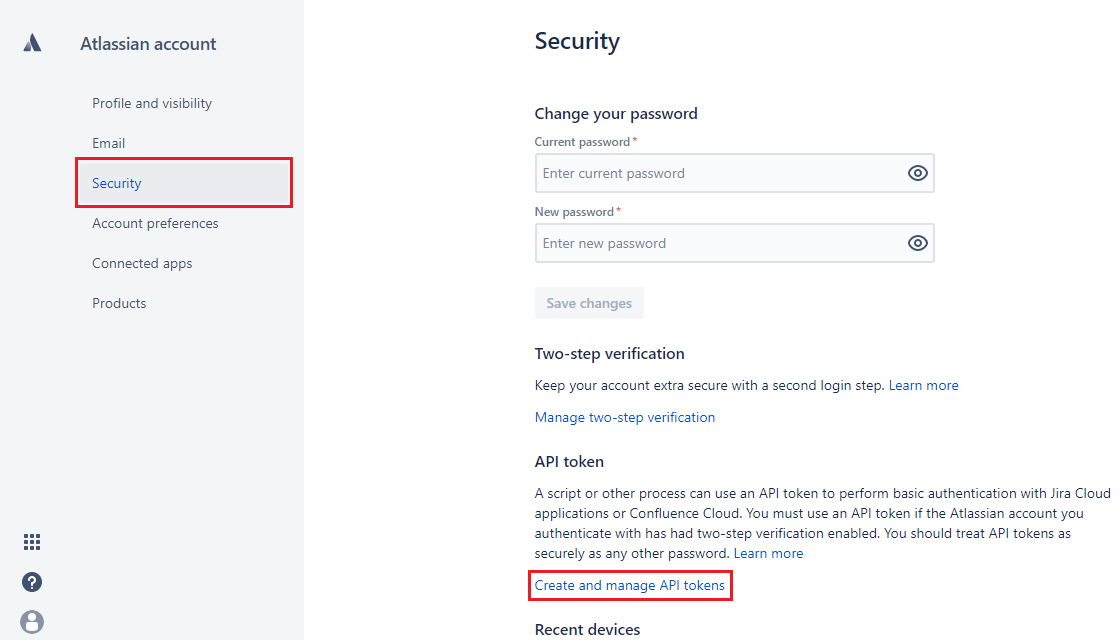
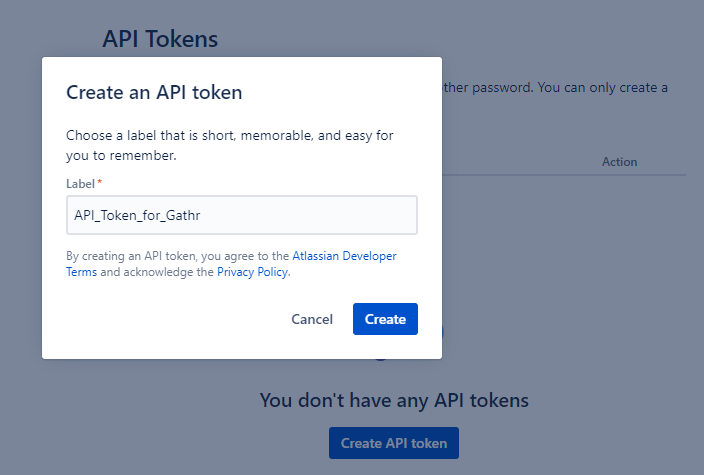
On the API Tokens page, create an API token.
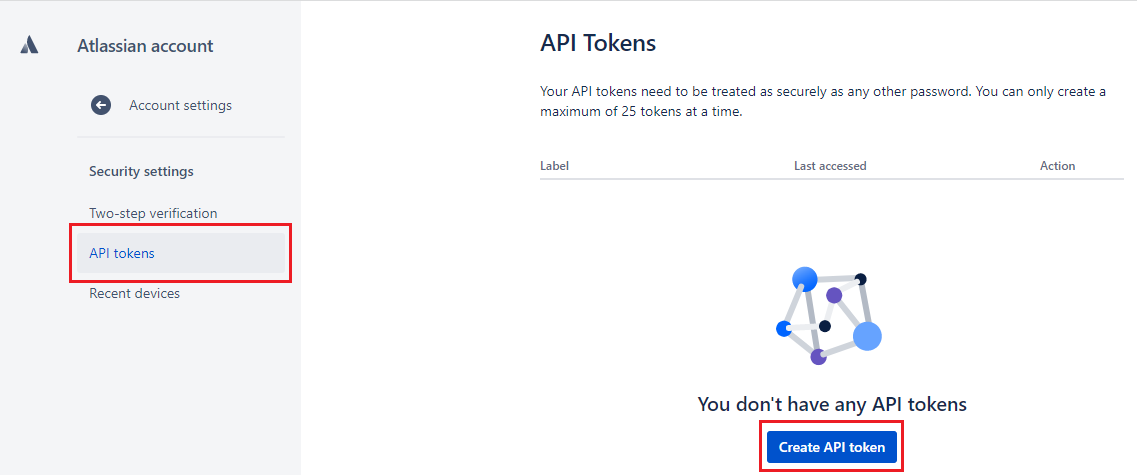
Provide a label name and proceed to create the API token.
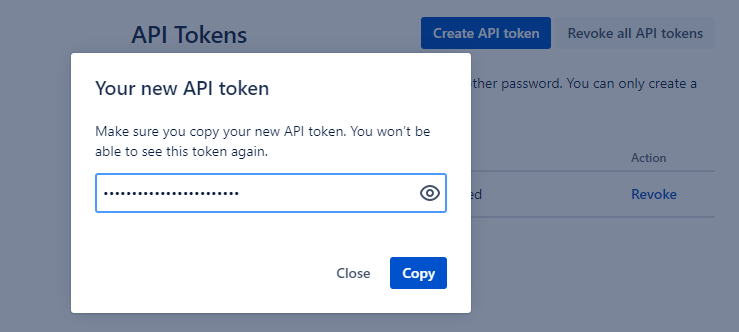
Copy the API token and use it to create the connection in Gathr.
Kafka
For creating a Kafka connection, select Kafka from the Component Type drop-down list and provide connections details as explained below.
| Field | Description |
|---|---|
| Component Type | Shows all the available connections. Select Kafka Component type from the list. |
| Connection Name | Name of the connection to be created. |
| zK Hosts | Defines the list of comma separated IP port of Zookeeper for creating Kafka topic from gathr UI. |
| Kafka Brokers | List of Kafka nodes against which connections need to be created. |
| Enable Topic Administration | Enabling topic administration will allow creation, updation and deletion of a topic. |
| Enable SSL | Select the check box if connection is to be created with SSL enabled Kafka. |
| Enable Truststore | Specify Truststore file path or upload Truststore file (in JKS Format). If option selected is Specify Truststore Path, you will view two additional fields: Truststore Path and Truststore Password. If option selected is Upload Truststore Path, you will view two additional fields: Upload Truststore File and Truststore Password. |
| Upload Truststore File | Upload Truststore file by clicking on UPLOAD FILE button. |
| Truststore Path | Location of the Truststore file. |
| Truststore Password | Password of the Truststore file. |
| Enable Authentication | Select the checkbox if client authentication is enabled. if selected, you will view four additional fields: Keystore Select Option, Upload keystore File, Keystore Password and Password. |
| Keystore Select Option | Either specify keystore file path or upload keystore file (in JKS Format) |
| Upload Keystore File | Enables to upload keystore file by clicking on UPLOAD FILE button. |
| Keystore File Path | Location of the keystore file. |
| Keystore Password | Keystore password for the Keystore file. |
| Password | Password of the private key in the keystore file. |
| Create | Click on the Create button to create the connection. |
| Test Connection | After entering all the details, click on the Test Connection button. If credentials are correct, a successful connection message is generated. If you enter wrong credentials or server is down, you will get the a Connection unavailable message. |
Kinesis
For creating a Kinesis connection, select Kinesis from the Component Type drop-down list and provide other details required for creating the connection.
| Field | Description |
|---|---|
| Component Type | Shows all the available connections. Select Kinesis component type from the list. |
| Connection Name | Name of the connection to be created. |
| Connect Using | User has the option to authenticate the Kinesis connection with either AWS Keys or Instance Profile. |
| Access Key Id | AWS account access key ID. |
| Secret Key | AWS account secret key. |
| Instance Profile | AWS Instance will be used to authenticate the connection, if user selects this option to create connection. |
| Create | Click on the Create** button to create the connection. |
| Test Connection | After entering all the details, click on the Test Connection button. If credentials are correct, a successful connection message is generated. If you enter wrong credentials or server is down, you will get the a Connection unavailable message. |
Users can also choose to authenticate Kinesis connections using Instance Profile option.
KUDU
For creating a KUDU connection, select KUDU from the Component Type drop-down list and provide other details required for creating the connection.
| Field | Description |
|---|---|
| Component Type | Shows all the available connections. Select KUDU component type from the list. |
| Access Key Id | Name of the connection to be created. |
| HOSTS | IP address and port of the machine where KUDU is running. |
| Test Connection | After entering all the details, click on the Test Connection button. If credentials are correct, a successful connection message is generated. If you enter wrong credentials or server is down, you will get the a Connection unavailable message. |
Mongo DB
For creating Mongo DB connection, select Mongo DB from the Component Type drop-down list and provide details required for creation the connection.
| Field | Description |
|---|---|
| Component Type | Shows different types of available connections. Select Mongo DB from the drop down. |
| Connection Name | Name of the connection to be created. |
| URI Format | Select URI Format from the drop down for defining connection between Gathr and Mongo DB instance. Use DNS seed to connect with any Mongo DB instance seed list member or else select the Standard option. |
| Connection URL | Provide the driver URL to be used. |
| Authentication Options | Option to choose the authentication method. Select either None or Basic AUTH option from the drop-down. If you select Basic AUTH, then provide the below fields: |
| User Name | Provide the database user name with available access. |
| Password | Provide the database password. |
| Add Configuration | Option to add further configuration is available. |
MQTT
For creating an MQTT connection, select MQTT from the Component Type drop-down list and provide other details required for creating the connection.
| Field | Description |
|---|---|
| Component Type | Shows all different types of available connections. |
| Connection Name | Name of the connection to be created. |
| Host | IP address of the machine where Socket is running. |
| Port | Port of the machine where Socket is running. |
| Test Connection | After entering all the details, click on the Test Connection button. If credentials are correct, a successful connection message is generated. If you enter wrong credentials or server is down, you will get the a Connection unavailable message. |
OpenJMS
For creating an OpenJMS connection, select OpenJMS from the Component Type drop-down list and provide other details required for creating the connection.
| Field | Description |
|---|---|
| Component Type | Shows all the available connections. |
| Connection Name | Name of the connection to be created. |
| Connection Factory | A connection factory is an object that a JMS client uses to create a connection with OpenJMS. |
| Host | IP address of the machine where Socket is running. |
| Port | Port of the machine where Socket is running. |
| Test Connection | After entering all the details, click on the Test Connection button. If credentials are correct, a successfull connection message is generated. If you enter wrong credentials or server is down, you will get the a Connection unavailable message. |
RedShift
For creating a RedShift connection, select RedShift from the Component Type drop-down list and provide other details required for creating the connection.
| Field | Description |
|---|---|
| Component Type | Shows all different types of available connections.Select RedShift** Component type from the list. |
| Connection Name | Name of the connection to be created. |
| Driver Type | Define Driver version for Redshift. |
| Database Name | Name of the Database to be used. |
| Host | Hostname of the machine where Redshift cluster is running. |
| Port | Port number on which redshift cluster is listening. |
| UserName | Redshift Username. |
| Password | Redshift Password. |
| Test Connection | After entering all the details, click on the Test Connection button. If credentials are correct, a successful connection message is generated. If you enter wrong credentials or server is down, you will get the a Connection unavailable message. |
RabbitMQ
For creating a RabbitMQ connection, Select RabbitMQ from the Component Type drop-down list and provide connections details as explained below.
| Field | Description |
|---|---|
| Component Type | Shows all the available connections.Select RMQ Component type from the list. |
| Connection Name | Name of the connection to be created. For example, RabbitMQ, |
| Host | IP address and port of the machine where RabbitMQ is running. |
| UserName | Username of RabbitMQ to create connection. |
| Password | Password of RabbitMQ to create connection. |
| Create | Click on the create** button to create the connection. |
| Test Connection | After entering all the details, click on the Test Connection button, if credentials provided are correct, services are up, and running, you will get the message** Connection is available. If you enter wrong credentials or server is down and you click on Test Connection, you will get the message Connection unavailable. |
DBFS
For creating a DBFS connection, select DBFS from the Component Type drop-down list and provide other details required for creating the connection.
| Field | Description |
|---|---|
| Component Type | Shows all the available connections. Select S3 Component type from the list. |
| Connection Name | Name of the connection to be created. |
| Directory Path | Enter DBFS Parent Path for checkpointing. |
| Test Connection | After entering all the details, click on the Test Connection button. If credentials are correct, a successful connection message is generated. If you enter wrong credentials or server is down, you will get the a Connection unavailable message. |
RDS
For creating a RDS connection, select RDS from the Component Type drop-down list and provide other details required for creating the connection.
| Field | Description |
|---|---|
| Component Type | Shows all the available connections. Select S3 Component type from the list. |
| Connection Name | Name of the connection to be created. For example, RabbitMQ. |
| Database Type | Database Type (mysql, postgresql, oracle, mssql, Amazon Aurora-Mysql, Amazon Aurora-PSSQL) |
| Enable SSL | Select the checkbox if SSL is enabled on RDS. |
| Keystore Select Option | Specify keystore path: Specify the Elasticsearch keystore file (.p12) path. Upload keystore path: Upload the Elasticsearch keystore file (.p12) path. |
| Upload Keystore File | Enables to upload keystore file by clicking on UPLOAD FILE button. |
| Database Name | Name of the database. |
| Host | Hostname of RDS. |
| Port | Portname of RDS. |
| Username | Username of the account. |
| Password | Password of the account. |
| Create | Click on the Create** button to create the connection. |
| Test Connection | After entering all the details, click on the Test Connection button. If credentials are correct, a successful connection message is generated. If you enter wrong credentials or server is down, you will get the a Connection unavailable message. |
S3
For creating a S3 connection, select S3 from the Component Type drop-down list and provide other details required for creating the connection.
| Field | Description |
|---|---|
| Component Type | Shows all the available connections. Select S3 Component type from the list. |
| Connection Name | Name of the connection to be created. For example, RabbitMQ. |
| Connect Using | User has the option to authenticate the S3 connection with either AWS Keys or Instance Profile. |
| Access Key Id | AWS account access key ID. |
| Secret Key | AWS account secret key. |
| Instance Profile | AWS Instance will be used to authenticate the connection, if user selects this option to create connection. |
| Create Connection | Click on the Create** button to create the connection. |
| Test Connection | After entering all the details, click on the Test Connection button. If credentials are correct, a successful connection message is generated. If you enter wrong credentials or server is down, you will get the a Connection unavailable message. |
SQS
For creating an SQS connection, select SQS from the Component Type drop-down list and provide other details required for creating the connection.
| Field | Description |
|---|---|
| Component Type | Shows all the available connections. Select Component type from the list. |
| Connection Name | Name of the connection to be created. |
| AWS Key id | S3 account access key. |
| Secret Access Key | S3 account secret key. |
| Region | AWS IOT Region. |
| Test Connection | After entering all the details, click on the Test Connection button. If credentials are correct, a successful connection message is generated. If you enter wrong credentials or server is down, you will get the a Connection unavailable message. |
Salesforce
For creating a Salesforce connection, select Salesforce from the Component Type drop-down list and provide other details required for creating the connection.
| Field | Description |
|---|---|
| Component Type | Shows all the available connections. Select Salesforce Component type from the list. |
| Connection Name | Name of the connection to be created. |
| Username | Username of Salesforce to create connection. |
| Password | Password of Salesforce to create connection. |
| securityToken | Security token is a case-sensitive alphanumeric key that is used in combination with a password to access Salesforce via API. |
| Test Connection | After entering all the details, click on the Test Connection button. If credentials are correct, a successful connection message is generated. If you enter wrong credentials or server is down, you will get the a Connection unavailable message. |
Snowflake
For creating a Snowflake connection, select Snowflake from the Component Type drop-down list and provide connections details as explained below.
| Field | Description |
|---|---|
| Component Type | Shows all the available connections. Select Snowflake** component type from the list. |
| Connection Name | Name of the connection to be created. |
| Account Name | Option to enter the Snowflake account name. After entering the account name, the connection URL will get formed on its own. |
| Connection URL | Provide the driver URL to be used. |
| Database Name | Database name should be provided to access the data. |
| Username | Username of the Snowflake account should be provided. |
| Password | Password of the Snowflake account should be provided. |
| Keystore Select Option | Option to upload the keystore file is selected by default. |
| Upload Keystore File | Option to upload the keystore file. |
| Keystore Password | Option to provide the password to access the uploaded keystore file. |
After entering all the details, click on the TEST button.
If the connection service identification and authentication details are provided correctly, a success message stating “connection available” is generated. Click on the CREATE button to save the changes.
If the details are incorrect or the server is down, you will get a message “Connection unavailable”.
Socket
For creating a Socket connection, select Socket from the Component Type drop-down list and provide connections details as explained below.
| Field | Description |
|---|---|
| Component Type | Shows all the available connections. Select Socket** component type from the list. |
| Connection Name | Name of the connection to be created. |
| Host | IP address of the machine where Socket is running. |
| Port | Port of the machine where Socket is running. |
| Create | Click on the Create** button to create the connection. |
| Test Connection | After entering all the details, click on the Test Connection button. If credentials are correct, a successful connection message is generated. If you enter wrong credentials or server is down, you will get the a Connection unavailable message. |
Solr
For creating a Solr connection, Select Solr from the Component Type drop-down list and provide connections details as explained below.
| Field | Description |
|---|---|
| Component Type | Shows all different types of available connections. Select SOLR** component type from the list. |
| Connection Name | Name of the connection to be created. |
| zkHost | The Zookeeper host for Solr sever. |
| Create | Click on the Create** button to create the connection. |
| Test Connection | After entering all the details, click on the Test Connection button. If credentials are correct, a successful connection message is generated. If you enter wrong credentials or server is down, you will get the a Connection unavailable message. |
Tibco
For creating a Tibco connection, select Tibco from the Component Type drop-down list and provide connections details as explained below.
| Field | Description |
|---|---|
| Component Type | Shows all the available connections. Select Tibco Component type from the list. |
| Connection Name | Name of the connection to be created. |
| Connection URL | For Tibco connection the driver URL should be provided. |
| User Name | Tibco account username should be provided. |
| Password | Tibco account password should be provided. |
| JNDI Naming | Unchecked by default, the user can check-mark this option to provide the JNDI naming context. Upon selecting this option, provide the below details: |
| Initial Context Factory | Provide the initial context factory to be used for JNDI lookup. |
| Factory Name | Provide the Factory name which is the name of the connection factory. |
| Enable SSL | Unchecked by default, the user has an option to enable the SSL. Upon check-marking the Enable SSL option, provide the below details: |
| Identity Certificate | Option to choose the Identity Certificate. Choose one of the below options: - Specify Identity Certificate Path - Upload Identity Certificate Note: Provide the Identity Certificate Path or Upload the Identity Certificate based on the selected Identity Certificate type. |
| Private Key File | Option to choose the Private Key File type. Choose one of the below options: - Specify the Private Key File path - Upload Private Key File Note: Provide the Private Key File either by specifying the Private Key File path or by uploading the Private Key File based on the selected Private Key File options available in the drop down list. |
| Password for Private Key | Provide the password for Private Key. |
| Verify Host | Option to enable verification of Tibco server certificate. If enabled the client will verify the server certificate. If disabled, the client will establish secure communication with the server but will not verify the server’s identity. Upon checking this option, provide below details: |
| Server Root Certificate | Select the Server Root Certificate: - Specify Server Root Certificate Path - Upload Server Root Certificate |
| Verify Hostname | Option for client to enable verification of hostname in the CN field of the server’s certificate. If enabled the client will verify the name specified in the “Expected Hostname” against the server’s certificate. Else, it will take the server’s hostname as default. If disabled, the client establishes secure communication with the server but does not verify the server’s name. |
| Expected Hostname | Option to specify expected hostname which will be used while hostname verification. |
| Auth Only | This option specifies whether SSL should be used to encrypt all server-client communications or only for client authentication. Upon check marking this option, the client request SSL will be used only for authentication. |
| Create | Click on the Create** button to create the connection. |
| Test Connection | After entering all the details, click on the Test Connection button. If credentials are correct, a successful connection message is generated. If you enter wrong credentials or server is down, you will get the a Connection unavailable message. |
For creating a Twitter connection, select Twitter from the Component Type drop-down list and provide connections details as explained below.
| Field | Description |
|---|---|
| Component Type | Shows all the available connections. Select Twitter Component type from the list. |
| Connection Name | Name of the connection to be created. |
| Consumer Key | Twitter User consumer key. |
| Consumer Secret Key | Twitter User consumer secret key. Consumer keys are the identity of an application owner. |
| Access Token | Application owners need to generate Authorization-access tokens that are used to call the Twitter API without sharing their passwords. This is a twitter user access token. |
| Access Token Secret | This is a twitter user access token secret |
Vertica
For creating a Vertica connection, select Vertica from the Component Type drop-down list and provide connections details as explained below.
| Field | Description |
|---|---|
| Component Type | Shows all different types of available connections. Select VERTICA Component type from the list. |
| Connection Name | Name of the connection. For example, HDFS. |
| Database Name | Database name to access data. |
| Host | Database host name or IP address. |
| Port | Database port name. |
| Username | The username of database user. |
| Password | The password of database user. |
| Test Connection | After entering all the details, click on the Test Connection button, if credentials provided are correct, services are up, and running, you will get the message Connection is available. If you enter wrong credentials or server is down and you click on Test Connection, you will get the message Connection unavailable. |
If you have any feedback on Gathr documentation, please email us!