Continuous Integration Continuous Delivery
Gathr supports continuous integration and continuous delivery of pipeline, in form of test suites and by deploying pipelines on destination.
Continuous Integration
Continuous integration is done by executing test cases (as part of a test-suite) on the incremental state of a pipeline that ensures the pipeline is not impacted by new changes
Test Suite is a collection of Test Cases associated with a pipeline.
You may want to create a test case to verify multiple permutations on continuous data which will then be deployed as soon as they pass the tests.
How to create a test case?
A test case comprises of a set of source data files (one data file for each Data Source) and inspection outputs of each component in the pipeline. These inspection outputs of each component can be thought as the expected data for the component
Every test case will have its source data associated with each Data Source. When a test suite is executed, all its associated test cases are executed too. A test suite run is uniquely identified by a run id. When a test case is executed as part of a run id, each component is inspected again, and the output data can be referred as the actual data.
How a test case is evaluated to pass or fail?
A test case is passed if both the conditions mentioned below are fulfilled:
Number of records are the same for actual and expected data.
Every field value of each record in actual data matches with the expected data.
Let’s take an example to understand this.
Your source data may have integers, or some blank values and you may want to perform certain tests to make sure that the invalid or null values are omitted. These test cases can be created with different source data files to test.
To create a test case, you need to configure, save and inspect the pipeline.
Create Test Case
Once the pipeline is saved and inspected, a test case can be created. Go to the menu on the data pipeline canvas, as shown below:
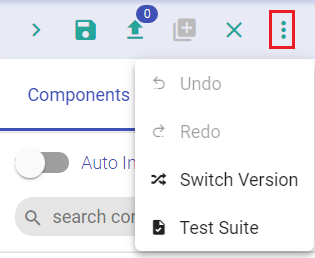
When you click on Test Suite, it opens a New Test Case windo. Click CREATE button.
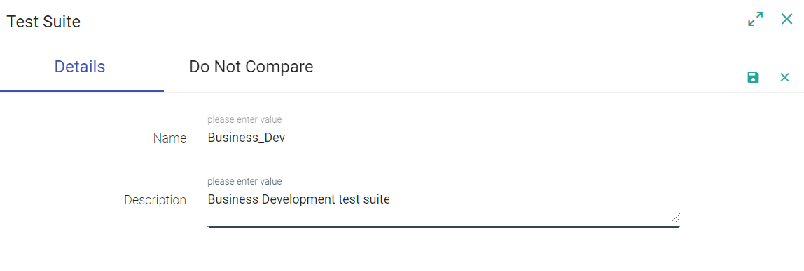
To create a new test case, enter details in the New Test Case window fields, as shown below:
| Property | Description |
|---|---|
| Details | Details about the Test case, which is: Name: Name of the test case. Two test cases cannot have the same name, within a pipeline that names must be unique. Description: Enter a description for the test case (optional) |
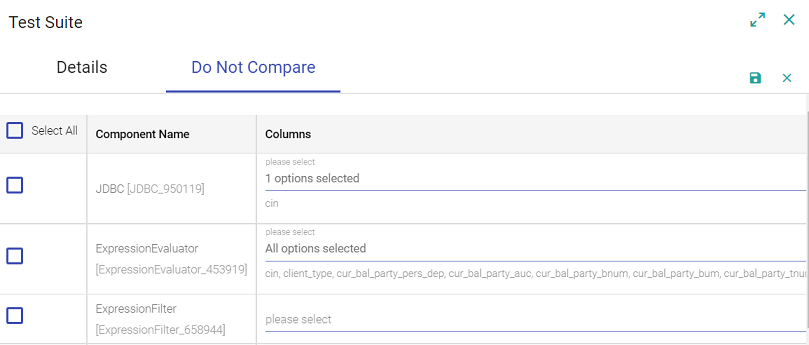
| Do Not Compare | Select the columns of either component or the component itself, which will not be compared and tested during inspection. The test case execution will skip data comparison of these component field(s) and component(s). Components, the test case will run on, will save the output file (schema) of the component and compare or not compare a column for the script that runs on the component. For example: The test case is to check the entries of employees, where a field of Random User ID is generated every time an action happens. This random UID will be different in every field. Therefore, it will fail the test. Here you can use to not compare either the output field or the component itself. Only the output fields configured in the Emitter will be populated under fields of a component. |
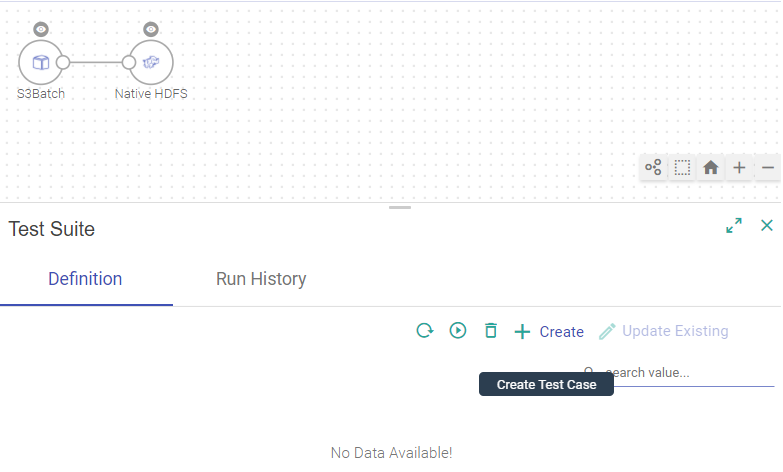
Click on Create, and the success notification message will be shown, with a new entry in the table, as shown below:
Test Suite Properties
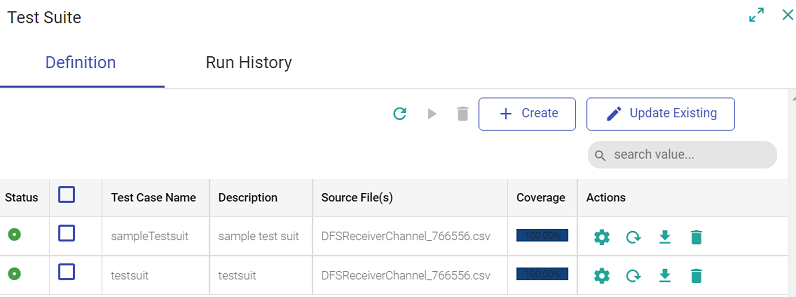
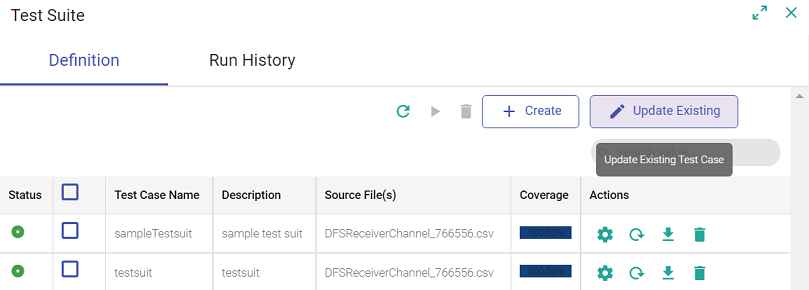
Every test case is listed in a tabular form under the components of Data pipeline canvas.
This table has two windows (shown above), Definition and Run History with properties defined below
Definition
The definition tab will show all the details and enables you to create a test case, execute it, run multiple at the same time, and other actions as defined below:
| Property | Description |
|---|---|
| Status | Status signifies the last execution status of a test case. To view the Status of the of test case, i.e., last run status, hover the mouse over the status icon. This shows the status of the test case with a RUN ID and the duration of execution. Possible values are ‘never executed’, ‘In progress’, ‘Success’, ‘Failure’, and ‘Error. When the Test case are running, In Progress is denoted by yellow status icon. In case of completion, Success is notified by green status icon and Failure/Error is notified via a Red Exclamation. |
| Test Case Name | Name of the test case. |
| Description | A description of the test case. This is an optional property. |
| Source File(s) | The source file used for test creation. |
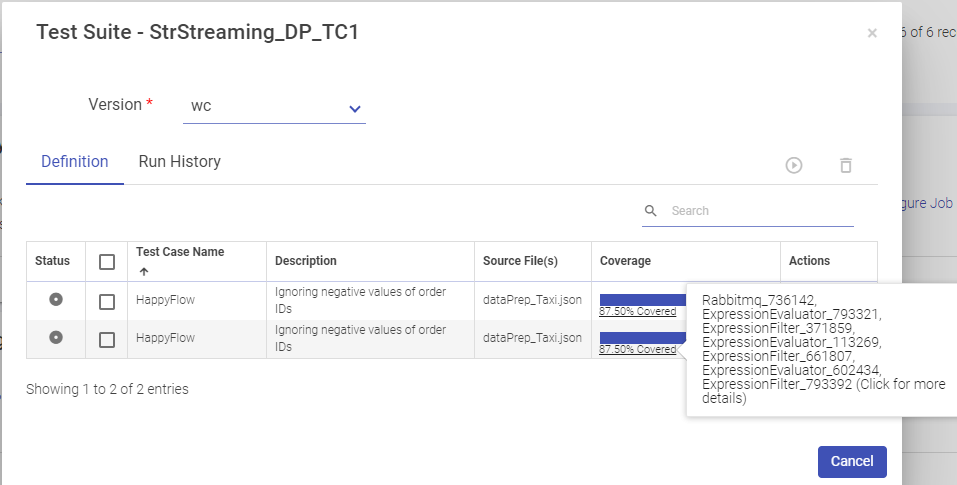
| Coverage | The percentage of the covered components under the test case configuration. (Shown below the table with image and more detail) |
| Actions | The actions that can be defined on the test case. (Click for more details) |
| Refresh Table | Refresh Test case list allows you to refresh the test case list. |
| Run selected test cases | Once all the test case are created you can run the selected ones or all with just one click. |
| Create new | To create new test cases. |
| Update existing | Edit the existing selected test case and re configure the fields. The same can be done by using Configure under Actions. |
| Search | Search for any test case suing the search column. |
Under the Coverage tab, hover to see complete configuration of the test case.
Actions on use case
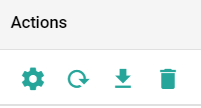
| Property | Description |
|---|---|
| Configure | Edit the configuration by clicking on Configure button of test case. |
| Load Data | It allows you to load pipeline’s Data Source(s) data and run inspection. Any inconsistency caused due to changes in existing pipeline design will be shown by alert icon in Status column. You need to Load Data again and update existing test-case to sync that test case with latest configuration of pipeline. |
| Download | Download the uploaded sample data file(s) via clicking on Download icon. Click on test case Download button and a new window opens with every component’s output data, which can be downloaded. |
| Delete | Delete any test case via Delete button |
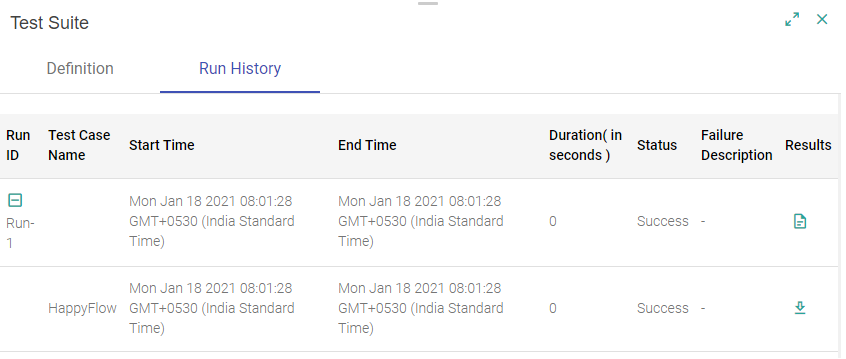
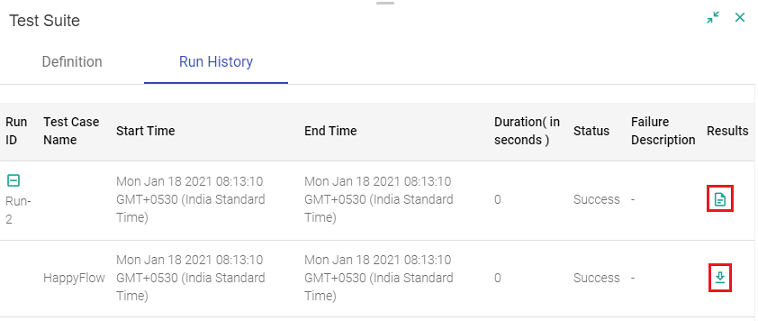
Run History
You can view the test case Run History. The table will show the run statistics along with test case outputs. View the reason of failed test cases.
Stale Test Case
Multiple test cases can be configured and re-configured from the same window. Now, there may be cases when you have re-configured the pipeline and a few components have been removed.
On removing any component from existing pipeline and then creating new test case may lead to some inconsistencies to the test cases created earlier.
In case of Stale Test Cases, such inconsistencies are shown as a warning or error under the Status of the test case.
Click on Load Data again and update existing test-case to sync that test case with latest configuration of pipeline.
Each entry corresponds to a single Test Suite run. Single test suite run may contain one or more test cases.
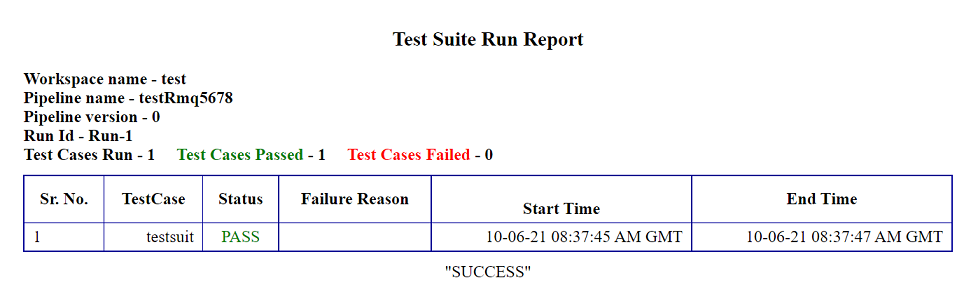
Download Test Results
Complete test suite results can be downloaded via Download Test Results, under Results < Run History. The Test Report is a HTML file with the run Id and test run details (shown below):
Individual test case result can be downloaded via Download Output Results, corresponding to Duplicate Ids. The output result is in the JSON file format.
Updated Test Cases
If you want to update or the source file of expected result, update test case enables the same. Updating existing test case data will overwrite previous captured inspection data with new inspection data. You can also update the Do Not Compare section, while editing the existing pipeline.
Version Control
Version control allows you to create a version of the Test Suite. Gathr supports two types of version control system:
GIT
Gathr Metastore
Before understanding how version control works, we need to understand what a Working Copy is.
A Working Copy is the current version of the copy or the first (0) version of the copy.
The pipeline editing is performed on the working copy, always.
To create a version:
First way is when you re-save an edited pipeline, you get an option to Create Version.
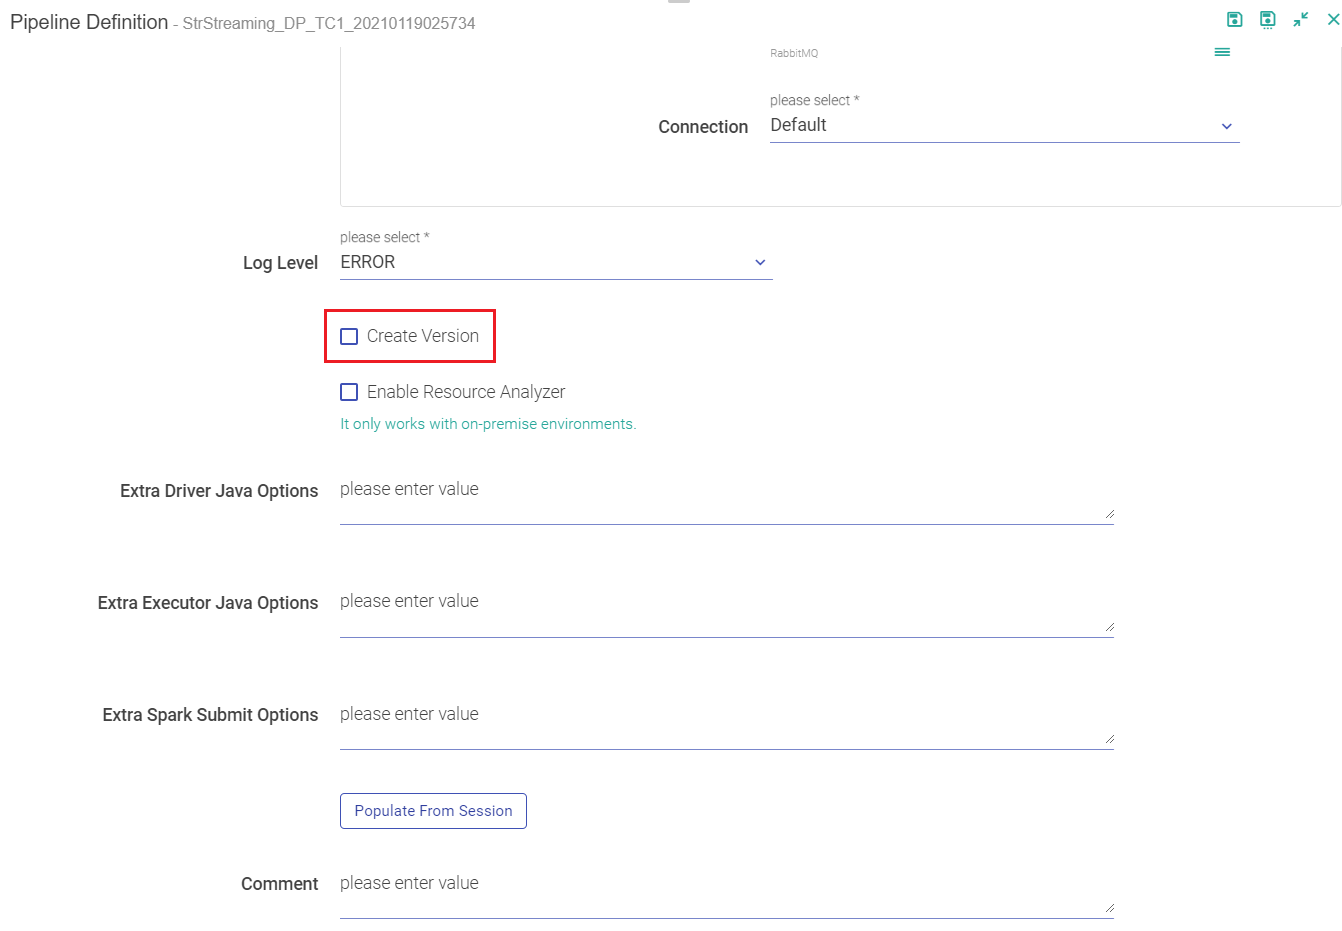
Second way to enable version on your pipelines is when you edit and save the pipeline. Amongst the option of saving the pipeline is Create Version and Switch version button.
Third option to create a version is by the pipeline tile.
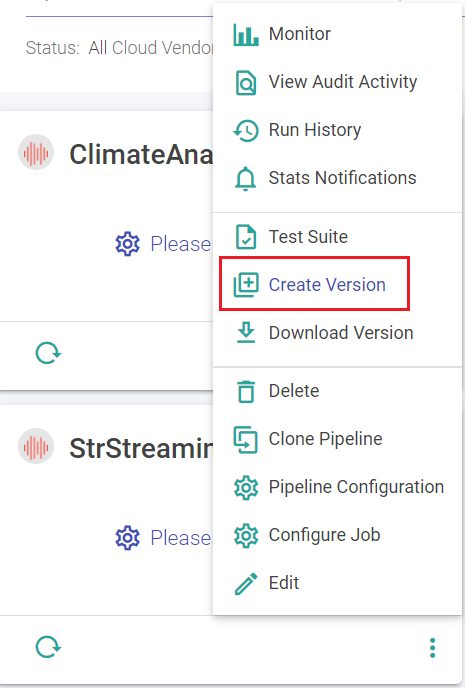
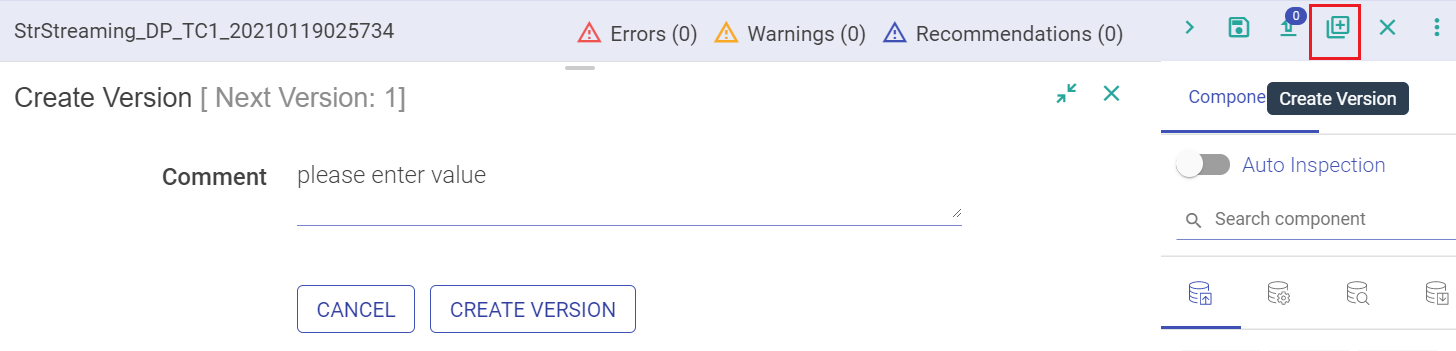
For option 2nd and 3rd, the window show below opens.

Mention a description or a comment for the version and click on Create. Once you save the version, the last version on the pipeline changes from ‘Working Copy’ to Version 1.
A pipeline remains a working copy as long as no other version is created. Once you save a version, next to the title ‘Create Subsystem version’, is the notification of the next version that will be created.
When a new superuser logs in, they will have to configure the Version Control properties under Version Control Setup →.
Switch Version
If you want to switch the version of a pipeline, click on Switch Version on the pipeline editor page and choose a version. It will change the pipeline as per the selected version.
It is the Working Copy that is loaded to a newer version. Editing is always performed on the Working Copy of the pipeline.
Download Version
Download Version from pipeline tile allows you to download a version of the pipeline.
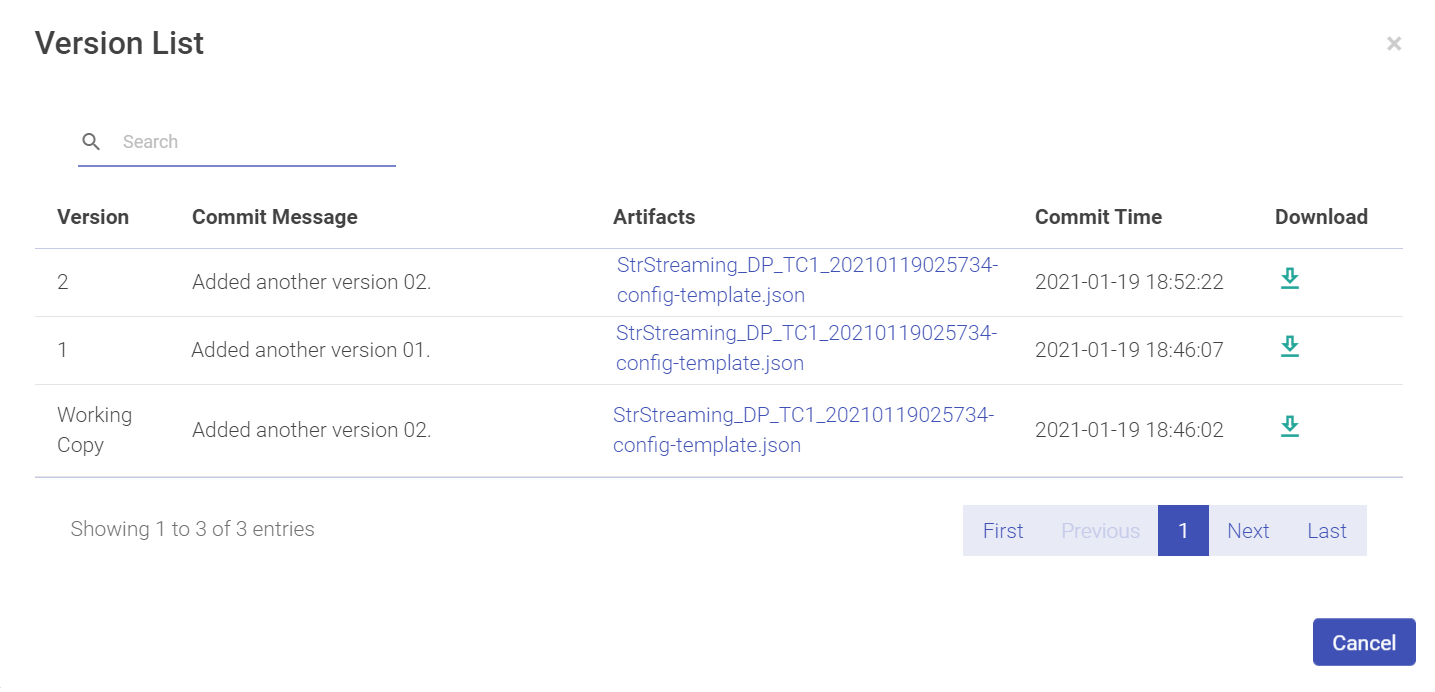
Click on the Download arrow to download the pipeline.
| Property | Description |
|---|---|
| Version | Version number of the pipeline. |
| Commit Message | Commit message description. |
| Artifacts | The artifact uploaded. |
| Commit Time | The commit time that the pipeline was committed as a version. |
| Download | Download the pipeline. |
Continuous Delivery
While you continuously integrate data in the pipelines, you can also deliver the same.
Continuous delivery requires configuration of three environments:
Source Environment
Test Environment
Destination Environment
Source environment is where the pipeline is incrementally developed.
The CD scripts download the pipeline from source environment and upload it on the Test Environment.
Then on the Test environment, test suite for the pipeline is executed. Based on user selection, a inspect session is created and then on test environment the test suite of the pipeline is executed.
If the test suite passes the execution, the pipeline is then promoted to the Destination environment*.*
Prerequisites
Prerequisites for CD script
Installation of jq
SMTP server configured
Open the folder <gathr_home>/bin/CD_script and run StartCD.sh to run the pipeline on the destination environment. Integration is done by creating Test Suites and delivery is performed by running the StartCD.sh on Gathr metastore.
Configure the below mentioned properties to deliver the test cases on the environment:
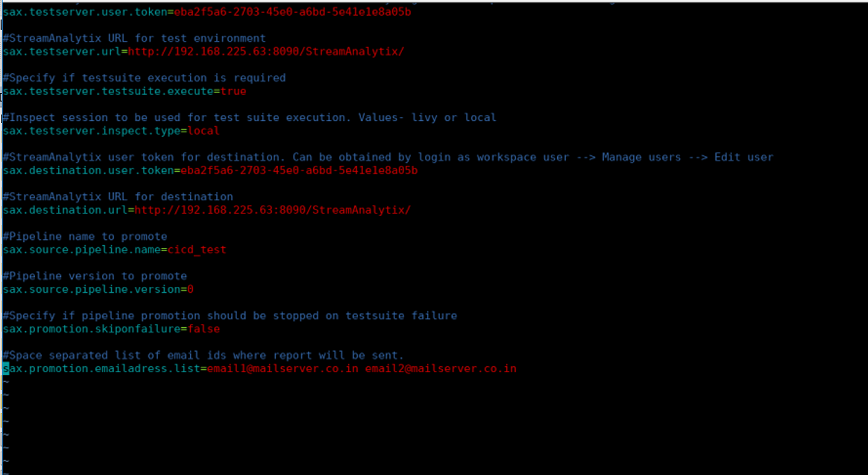
Property Description sax.testserver.user.token The token of workspace where the pipeline is uploaded. sax.testserver.url Gathr URl for test environment. sax.testserver.testsuite.execute Possible values are 1 or 0. If test suite execution is required or not. sax.testserver.inspect.type Inspect session to be used for test suite execution. Possible values- local. sax.destination.user.token Gathr user token for destination. It can be obtained by log in as workspace user> Manage user> Edit User. sax.destination.url Gathr URL for destination. sax.source.pipeline.name Pipeline name to promote. sax.source.pipelline.version Pipeline version to promote. sax.promotion.skiponfailure Specify if pipeline promotion should be stopped on test suite failure. sax.promotion.emailadress.list Space separated list of email ids where report will be sent.
If you have any feedback on Gathr documentation, please email us!