Apache Airflow Installation
This section explains the Apache Airflow installation in gathr.
Gathr supports Airflow Version 2.6.1 respectively.
Airflow Installation/Upgrade
Given below are the steps to do a fresh installation of Airflow (Version: 2.6.1) and also to upgrade from Airflow 2.1.2 to Airflow 2.6.1.
Prerequisites
Default Python must be 2.7.
Python and Python2 must point to Python 2.7.
Python 3.8.8 must be installed. Python3 must point to Python 3.8.8.
pip and pip2 must point to pip2.7.
pip3 must point to pip3.8.8
PostgreSQL version should be greater than 14.8
Airflow2 Installation/Upgrade Steps
Create a folder, that will be used as Airflow home with sax user using the below command:
sax> mkdir /home/sax/airflow_homeCreate a folder
dagsusing the below command:sax > mkdir /home/sax/airflow_home/dagsLogin with root user creds, open
.bashrcfile and append the below statement in the same.export SLUGIFY_USES_TEXT_UNIDECODE=yesLogin with sax user, open .bashrc file, add airflow home as environment
export AIRFLOW_HOME=/home/sax/airflow_homeGo to AIRFLOW_HOME, take backup of airflow.cfg file
sax> cd $AIRFLOW_HOME
sax> mv airflow.cfg airflow.cfg.bck
Install airflow using following command (with root user)
root > pip3 install apache-airflow==2.6.1Initialize airflow database (with sax user). To configure different database please refer section Configuration > Database Configuration
sax> airflow db init
To configure a different database, please see Database Configuration.
To know more about how to get started with Apache Airflow, refer to the link below:
Airflow Providers Installation
The next step is to install the Airflow providers.
Use the below commands to install the Airflow providers:
root> yum install mariadb-devel (for ubuntu run sudo apt-get install libmysqlclient-dev
sudo apt-get install libmariadbclient-dev)
root>pip3 install apache-airflow-providers-apache-hdfs== 3.2.1
root>pip3 install apache-airflow-providers-postgres== 5.4.0
root>pip3 install apache-airflow-providers-mysql== 5.0.0
root>pip3 install apache-airflow-providers-microsoft-mssql== 3.3.2
root>pip3 install apache-airflow-providers-sftp== 4.2.4
root>pip3 install apache-airflow-providers-ssh== 3.6.0
root>pip3 install apache-airflow-providers-vertica== 3.3.1
root>pip3 install kafka-python==1.4.6
root>pip 3install holidays==0.9.10
To know more about Apache Airflow installation, refer to the link below:
Kerberos Support
Use the below commands to install the Kerberos-related system packages.
root>yum install cyrus-sasl-devel.x86_64
root>pip3 install apache-airflow[kerberos]==2.6.1
Config File Updates <Configuration>
Go to $AIRFLOW_HOME and open airflow.cfg file.
Change the following properties in the file:
| Properties | Values |
|---|---|
| base_url | = http://ipaddress:port |
| web_server_host | = ipaddress |
| web_server_port | = port (i.e. 9292) |
Add SMTP details for email under section [smtp] in config file.
Uncomment and provide values for the following properties:
- smtp_host
- smtp_user
- smtp_password
- smtp_port
- smtp_mail_from
| catchup_by_default | = False |
| dag_dir_list_interval | = 5 |
| executor | = LocalExecutor |
Generate the new fernet key for fresh installation and update this value in airflow. Open the python3 terminal and import the fernet module by executing the below command:
>>>from cryptography.fernet import Fernet
>>>fernet_key= Fernet.generate_key()
>>>print(fernet_key.decode())
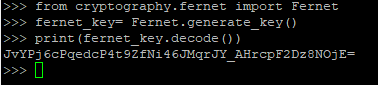
Copy this fernet key in airflow.cfg file which is present in the following path: /home/sax/airflow_home/
If the environment is Kerberos Security enabled, then add the following configurations:
| security [kerberos] | = Kerberos |
| ccache | = cache file path |
| principal | = user principal |
| reinit_frequency | = 3600 |
| kinit_path | = path to kinit command (i.e. kinit) |
| keytab | = keytab file file (i.e. /etc/security/keytabs/service.keytab) |
Database Configuration
Steps for Airflow Upgrade
Copy the value of property sql_alchemy_conn from
airflow.cfg.bckfile.Provide the copied value in
airflow.cfgfile for property sql_alchemy_conn.Run the below command:
sax>airflow db upgrade
Steps for Fresh Installation
By default, Airflow uses SQL Light as database. It also allows user to change database. Following are steps to configure Postgres as database.
Steps to configure Postgres as the preferred database are given below:
Create
airflowuser using below command:sudo -u postgres createuser --interactiveEnter the name of role to add: airflow
Shall the new role be a superuser? (y/n) n
Shall the new role be allowed to create databases? (y/n) n
Shall the new role be allowed to create more new roles? (y/n) n
Set the password for
airflowuser using the below command:postgres=# ALTER USER airflow WITH PASSWORD 'airflow';Create Airflow database using below command:
postgres=# CREATE DATABASE airflow;Grant permission to Airflow database using below command:
Postgres=# GRANT ALL PRIVILEGES ON DATABASE airflow to airflow;Open
airflow.cnffile and provide Postgres details (i.e username, password, ipaddress:port and databasename).sql\_alchemy\_conn = postgresql://username:password@ipaddress/databasenameNow run command to setup database
sax> airflow db init
Create Admin User
Run the below command to create an admin user in airflow:
sax> airflow users create --firstname <firstname> --lastname <lastname> --password <password> --role Admin --username <username> --email <user’s email ID>
You can use same command to generate multiple users for Airflow with different roles.
Gathr supports default authentication method which is Airflow DB authentication.
Plugin Installation
Steps to add Gathr Airflow Plugin in Airflow:
- Create plugins folder in airflow home (if not exits) i.e. $AIRFLOW_HOME/plugins
- Go to folder <sax_home>/ conf/common/airflow-plugin/airflow2/
- Copy files and folders from this folder to airflow plugin folder
Start Services
Start Airflow webserver and scheduler with sax user using following commands.
sax> nohup airflow webserver &
sax> nohup airflow scheduler &
- Create plugins folder in Airflow home (if it does not exist) i.e. $AIRFLOW_HOME/plugins.
Gathr Configuration
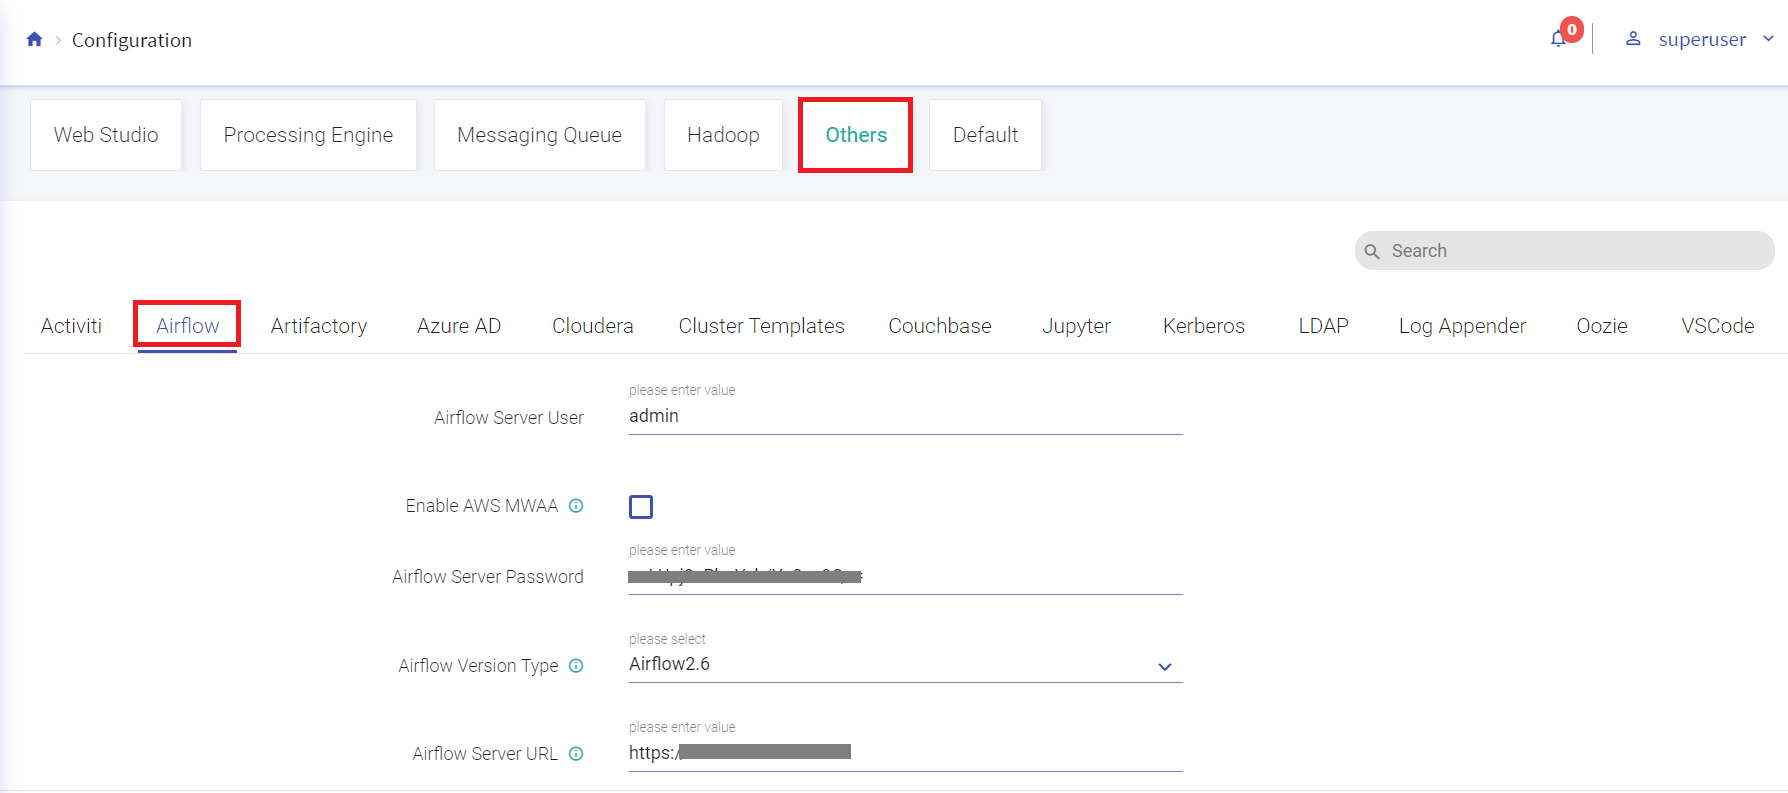
Steps to configure Airflow 2.6.1 in Gathr.
- Login into Gathr as a Superuser.
- Click on the Configuration section.
- Go to Others.
- Click on Airflow tab.
- Select Airflow Version Type as “Airflow2.6”
- Provide username, password, and Airflow server URL
Airflow Connection
Every user will need to create a connection that will be used for WF operations. Only one connection is allowed per user.
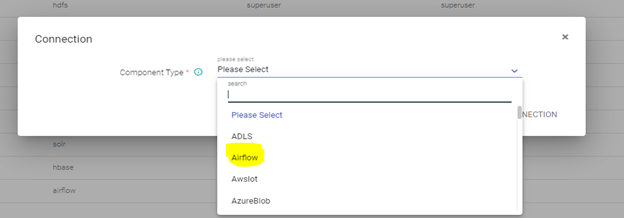
Following are steps to create Airflow Connection in Gathr
- Login into Gathr with workspace user.
- Go to the Connection page.
- Click on the plus icon.
- Select “Airflow”.
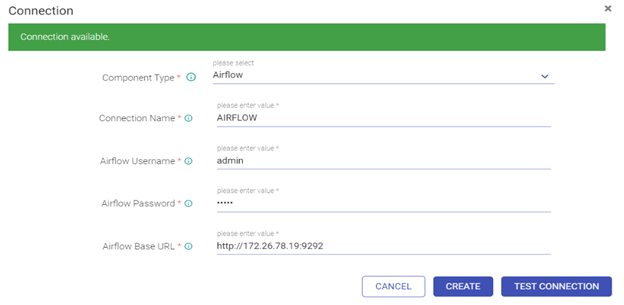
- Add required details.
- Test and save the connection.
If you have any feedback on Gathr documentation, please email us!