Gathr Manual Deployment on IBM
Prerequisites
OS Supported: Centos7.x/RHEL7.x or Centos8.x/RHEL8.x.
Gathr latest build should be downloaded from https://arrival.gathr.one
Above URL should be accessible from the client network
Minimum Hardware configurations needed for deployment:
| VM’s | Cores/RAM(GB’s) | Storage | OS |
|---|---|---|---|
| 1 | 16/32 | 200GB | CentOS/RHEL 7.x/8.x |
Firewall and SELINUX should be disabled.
Zookeeper & Potgres should be up and running. RabbitMQ and ElasticSearch are optional Components. If already Installed, we can use that connections but if it is not then we can deploy using below docs/links. Also, the component version may vary in the documents/links.
For Zookeeper follow the below steps:
Zookeeper-3.5.1 Installation
Step 1: Download Zookeeper binary from below URL:
https://archive.apache.org/dist/zookeeper/zookeeper-3.5.10/apache-zookeeper-3.5.10-bin.tar.gz
Step 2: Extract the ‘tar.gz’ at location ‘«installationDir»’:
tar -xvzf apache-zookeeper-3.5.10-bin.tar.gz -c <installation_dir>
cd <installationDir>/apache-zookeeper-3.5.10-bin
Step 3: Create a ‘datadir’ directory under the Zookeeper installation directory. The path should look like:
<installationDir>/apache-zookeeper-3.5.10-bin/datadir
Step 4: Create a file ‘zoo.cfg’ under ‘~/apache-zookeeper-3.5.10-bin/conf’ folder. Add the following properties in the newly created file ‘zoo.cfg’ and save:
tickTime=2000
dataDir=<<installationDir>>/apache-zookeeper-3.5.10-bin/datadir
clientPort=2181
initLimit=10
syncLimit=5
server.1=<<HOSTNAME>>:2888:3888
Step 5: For distributed/cluster mode Zookeeper setup, follow Step 6 and 7 otherwise directly move to Step 8.
Step 6: Create a file with name ‘myid’ in directory «installationDir»/apache-zookeeper-3.5.10-bin/datadir:
The myid file of ‘server.1’ would contain ‘1’ and nothing else and similarly for ‘server.2’ and ‘server.3’.
The id must be unique within the ensemble and should have a value between 1 and 255. The ‘myid’ file consists of a single line i.e. only the text of that machine’s id.
Step 7: Add the following properties in ‘zoo.cfg’ file of all the Zookeeper machines in cluster:
tickTime=2000
dataDir=<<installationDir>>/apache-zookeeper-3.5.10-bin/datadir
clientPort=2181
initLimit=10
syncLimit=5
server.1=<<HOSTNAME>>:2888:3888
server.2=<<HOSTNAME>>:2888:3888
server.3=<<HOSTNAME>>:2888:3888
Step 8: From the path ‘«installationDir»/«extractedDir»’ execute the following command to start Zookeeper:
sudo bin/zkServer.sh start
Step 9: If successful, see the following lines on console:
JMX enabled by default Using config: <<installationDir>>/<<extractedDir>>/bin/../conf/zoo.cfg
Starting zookeeper ... STARTED
Step 10: Verify that Zookeeper is running, use the command seen below:
sudo bin/zkServer.sh status
Example Output:
JMX enabled by default Using config: <<installationDir>>/apache-zookeeper-3.5.10-bin/bin/../conf/zoo.cfg Mode: standalone
For Postgres follow the below steps:
Postgresql 14 Installation
Prerequisites:
Let’s first confirm, you have all the necessary things to follow this tutorial:
- At least 1GB of free Hard disk space, 2GB of RAM, and a single-core CPU.
- To install packages we need sudo or root user access.
- An active internet connection to download the PostgreSQL packages. Alternatively, you can download the package from the below location:
<a href="https://arrival.gathr.one" target="_blank"> https://arrival.gathr.one</a>
Step 1: Download and Install Updates (Optional)
sudo yum update
Step 2: Adding Postgresql 14 Yum repository
sudo tee /etc/yum.repos.d/pgdg.repo<<EOF
[pgdg14]
name=PostgreSQL 14 for RHEL/CentOS 7 - x86_64
baseurl=https://download.postgresql.org/pub/repos/yum/14/redhat/rhel-7-x86_64
enabled=1
gpgcheck=0
EOF
Step 3: Installing Postgresql 14
# sudo yum install postgresql14 postgresql14-server
Step 4: Initialize the Database
sudo /usr/pgsql-14/bin/postgresql-14-setup initdb
sudo /usr/pgsql-14/bin/postgresql-14-setup initdb
Initializing database...ok
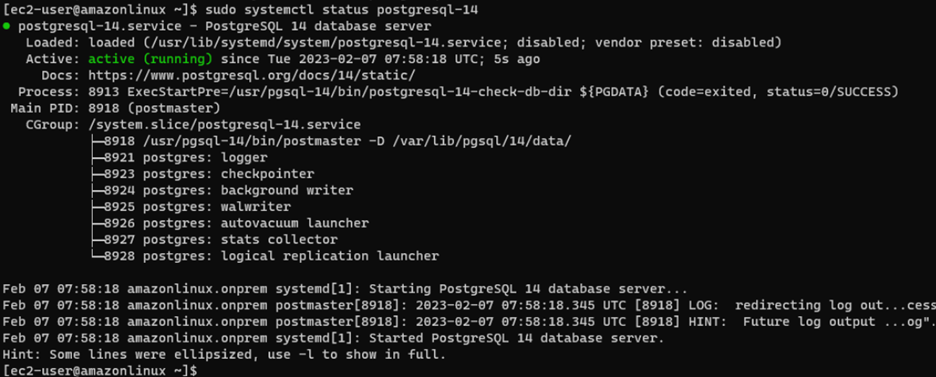
Step 5: Start and Enable the PostgreSQL Service
sudo systemctl start postgresql-14
sudo systemctl enable postgresql-14
sudo systemctl status postgresql-14
Step 6: Configure PostgreSQL
Login to Postgres:
su - postgres -c psql
Change the postgres DB password
ALTER USER postgres WITH PASSWORD ‘your-password’;
Edit the pg_hba.conf
sudo nano /var/lib/pgsql/14/data/pg_hba.conf
By default; PostgreSQL allows all DB users and hosts locally to connect to the database with a peer or scram-sha-256 method. If you want to change that, we can edit the pg_hba.conf file and set the authentication method to md5.

Edit the postgresql.conf file.
sudo nano /var/lib/pgsql/14/data/postgresql.conf
and replace listen_address from localhost to ‘*’
Restart the postgres-14 server:
systemctl restart postgresql-14.service
Script for installing RabbitMQ on Centos 7 with SSL
- Enable the Extra Packages for Enterprise Linux (EPEL) repository because it has packages required by Erlang:
$ yum -y install epel-release
- Install the Server
$ yum update -y
For Erlang and RabbitMQ check the supported versions from below link:
https://www.rabbitmq.com/which-erlang.html
- Here, I have installed Erlang Package 24.3
$ wget http://packages.erlang-solutions.com/erlang/rpm/centos/7/x86_64/esl-erlang_24.3-1~centos~7_amd64.rpm

   $ yum -y localinstall esl-erlang_24.3-1~centos~7_amd64.rpm
- Install Other Dependencies.
$ yum -y install socat logrotate
- Install RabbitMQ (Version 3.9.16)
$ wget https://github.com/rabbitmq/rabbitmq-server/releases/download/v3.9.16/rabbitmq-server-3.9.16-1.el7.noarch.rpm
Add signing key
   $ rpm --import https://www.rabbitmq.com/rabbitmq-signing-key-public.asc
   $ yum -y localinstall rabbitmq-server-3.9.16-1.el7.noarch.rpm
   $ sudo systemctl start rabbitmq-server.service
   $ sudo systemctl enable rabbitmq-server.service
   $ sudo rabbitmqctl status
Enabling SSL on Rabbit MQ
Prerequisites:
The following certificates are needed to enabl SSL on RabbitMQ:
my_key_store.crt
my_store.key
Steps to Enable SSL on RabbitMQ:
- Create a rabbitmq.config file in /etc/rabbitmq/
$ touch /etc/rabbitmq/rabbitmq.config
- Copy the my_key_store.crt and my_store.key files (which you created while creating SSL certificate) to /var/lib/rabbitmq/cacerts/
$ cd /datadrive/ssl-certs
$ cp my_key_store.crt my_store.key /var/lib/rabbitmq/cacerts/
if /var/lib/rabbitmq/cacerts/ directory does not exists then create one using below command:
$ mkdir -p /var/lib/rabbitmq/cacerts/
- Paste below configurations in the rabbitmq.config file
[
  {rabbit, [
     {ssl_listeners, [5671]},
     {ssl_options, [{cacertfile," <paste_java_home>/jre/lib/security/cacerts"},
                    {certfile,"/var/lib/rabbitmq/cacerts/my_key_store.crt"},
                    {keyfile,"/var/lib/rabbitmq/cacerts/my_store.key"},
                    {verify,verify_peer},
                    {password, "Impetus1!"},
                    {fail_if_no_peer_cert,false}]},
                    {versions, ['tlsv1.2', 'tlsv1.1']}
  ]},
  {rabbitmq_management, [
      {listener, [
               {port,15671},
               {ssl,true},
               {ssl_opts, [{cacertfile, "<paste_java_home>/jre/lib/security/cacerts"},
                           {certfile, "/var/lib/rabbitmq/cacerts/my_key_store.crt"},
                           {keyfile, "/var/lib/rabbitmq/cacerts/my_store.key"},
                           {verify,verify_peer},
                           {password, "Impetus1!"},
                           {fail_if_no_peer_cert,false}
                           ]}
              ]}
  ]}
].

:wq!
- Restart the rabbitmq-server
$ systemctl stop rabbitmq-server
$ systemctl start rabbitmq-server
$ systemctl status rabbitmq-server
- Check if RabbitMQ is running on 15671 port
https://<machine_ip>:15671/
ElasticSearch 6.8.1 Installation
Step 1: Download the tar Bundle
wget https://artifacts.elastic.co/downloads/elasticsearch/elasticsearch-6.8.1.tar.gz
Step 2: Untar the TAR package
tar -xvzf elasticsearch-6.8.1.tar.gz
Step 3: Configure elasticsearch
vi <installation_path>/elasticsearch-6.8.1/conf/elasticsearch.yml
The below parameters needs to be updated:
cluster.name: <Cluster_Name>
node.name: <any_name>
network.host: <machine_ip>
http.port: <any_free_port>                                                         …..(default 9200)
discovery.zen.ping.unicast.hosts: ["<machine_ip>"]
action.auto_create_index: .security,.monitoring*,.watches,.triggered_watches,.watcher-history*,.ml*,sax-meter*,sax_audit_*,*-sax-model-index,true,sax_error_*,ns*,gathr_*
Step 4: Start ElasticSearch
cd <installation_path>/elasticsearch-6.8.1/bin
./elasticsearch -d
Step 5: Check if ElasticSearch is Running by below command:
curl -X GET 'http://<machine_ip>:9200'
You should see the following Output of curl Command:
{
  "status" : 200,
  "name" : "CentOS Node",
  "cluster_name" : "mysqluster",
  "version" : {
    "number" : "6.8.1",
    "build_hash" : "05d4530971ef0ea46d0f4fa6ee64dbc8df659682",
    "build_timestamp" : "2015-10-15T09:14:17Z",
    "build_snapshot" : false,
    "lucene_version" : "4.10.4"
  },
  "tagline" : "You Know, for Search"
}
If you face any error starting ES you can refer to logs on below directory for troubleshooting:
Cd /var/log/elasticsearch/
For Enabling SSL:
The following certificates are required for enabling SSL:
- es-certificate.p12
- truststore.jks
Copy below SSL certs to
<installation_path>/elasticsearch-6.8.1/sslcerts
Configure elasticsearch.yml file with below parameters:

Restart ES service:
Ps -ef | grep elasticsearch

Kill -9 <es_pid>

cd <installation_path>/elasticsearch-6.8.1/bin

./elasticsearch -d
Check if ES is running with SSL or not:
curl --cacert <installation_path>/elasticsearch-6.8.1/sslcerts/gathr_impetus_com.pem -XGET 'https://<machine_ip>:9200/_cluster/health?pretty=true'
You should get below output:

If ElasticSerach is not running then need to update below configuration:
Step 1: add the variable to /etc/sysctl.conf
sudo sh -c "echo 'vm.max_map_count=262144' >> /etc/sysctl.conf

or

sysctl -w vm.max_map_count=262144
Step 2: Edit /etc/security/limits.conf and add following lines:
* soft nofile 65536
* hard nofile 65536
root soft nofile 65536
root hard nofile 65536
Step 3: Reload session and check for ulimit -n, it would be 65536.
Step 4: Then restart the elastsearch using above command.
Below ports should be open for dependent services: 2181,2888,3888,5432,8090,8009,8005,9200,9300,15671,5672
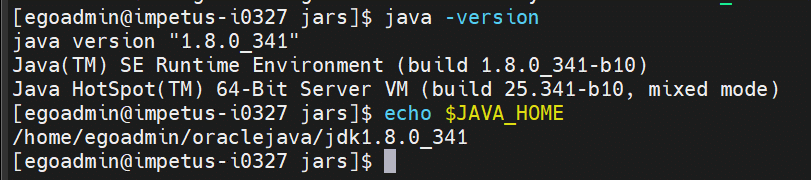
JAVA_HOME should be set properly as Gathr may give some issues on IBM JAVA. Here we have used Oracle Java:
- Python-3.8.8 should be configured on the machines.

We need an NFS shared location for all the IBM Spectrum Cluster nodes so that we can place the configuration files like keytabs, SSL certs etc, in a common location which is accessible by all cluster machines.
Edge node must have IBM Spark Installation directory present to configure it in Gathr configs.
Gathr user must have Read/write permissions to NFS location.
If kafka service is there, then it requires keystore.jks and trustore.jks file with respective certificates passwords.
If Kerberos enabled, it requires Gathr installation user keytab file which can access all kerberised services.
Gathr Deployment Steps in Manual Mode
Copy tar bundle to your location from https://arrival.gathr.one
Untar this bundle:
tar -xvzf Gathr-5.0.0-SNAPSHOT.tar.gz
- Running DDL/DML scripts for Gathr on Postgres db.
- Create a database in Postgres on which Gathr will run.
CREATE DATABASE gathribm;
GRANT ALL PRIVILEGES ON DATABASE gathribm TO postgres;
Go to Gathr/db_dump and create db_dump_postgres.sh file with below contents and make sure it should have execute permission.
#!/bin/bash

echo "DB dump on $1 machine script are in $2 location"
echo "DB name $3"
if echo "$3"|grep -i act
then
psql -U postgres -d $3 -a -f $2/pgsql_1.2/activiti.sql -W -h $1 -w postgres
else
for i in pgsql_1.2 pgsql_2.0 pgsql_2.2 pgsql_3.0  pgsql_3.2  pgsql_3.3  pgsql_3.4 pgsql_3.5 pgsql_3.6 pgsql_3.7 pgsql_3.8 pgsql_4.0 pgsql_4.1 pgsql_4.2 pgsql_4.3 pgsql_4.4 pgsql_4.4.1 pgsql_4.5 pgsql_4.6 pgsql_4.7 pgsql_4.8 pgsql_4.9 pgsql_4.9.1 pgsql_4.9.2 pgsql_4.9.3 pgsql_5.1.0
do
if echo $i|grep -i pqsql_1.2
then
for j in streamanalytix_DDL.sql streamanalytix_DML.sql logmonitoring_DML.sql
do
psql -U postgres -d $3 -a -f $2/$i/$j -W -h $1 -w postgres
done
else
for j in streamanalytix_DDL.sql streamanalytix_DML.sql
do
psql -U postgres -d $3 -a -f $2/$i/$j -W -h $1 -w postgres
done
fi
done
fi
- Run the above script:
export PGPASSWORD=postgres

./<shell script> <DB_IP> <script location till db_dump> <DB name>
For e.g. - ./db_dump_postgres.sh  <Postgres_IP> $GATHR_HOME/db_dump gathribm
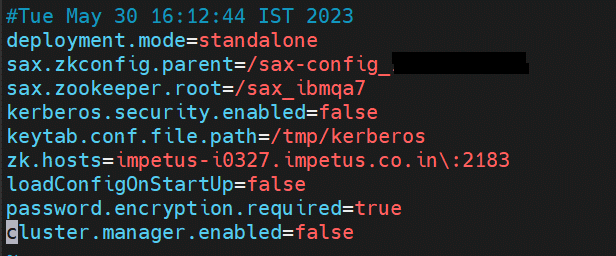
- Edit Gathr/conf/config.properites and update below properties:
zk.hosts=<MACHINE_IP>\:2181
sax.zkconfig.parent=/sax-config_<MACHINE_IP>
sax.zookeeper.root=/sax_<any_unique_name>
Example:
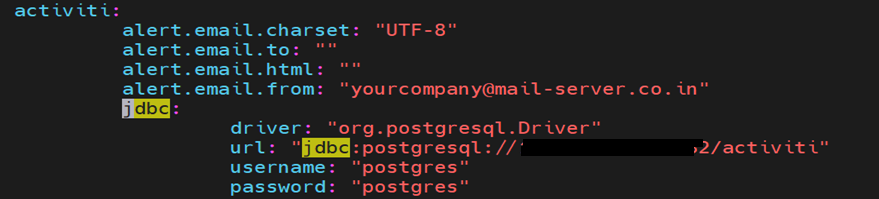
- Edit Gathr/conf/yaml/env-config.yaml, In this file below parameters needs to be updated:
zk: Change zk hosts: to machine_IP/Hostname instead of localhost.

Database & JDBC: Update 4 properties in JDBC section – driver, url, username & password.

In Activity section also Update the postgres configs:
Example:
Update database.dialect as per the database:

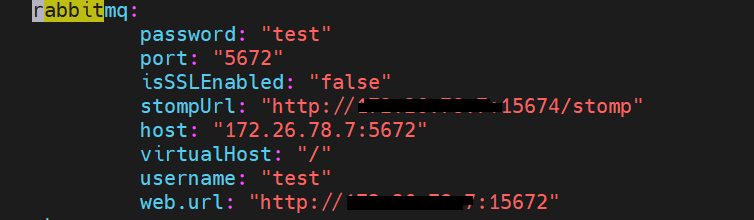
RabbitMQ:
Update host, port, web.url, username, password, stopmUrl according to your RabbitMQ service:
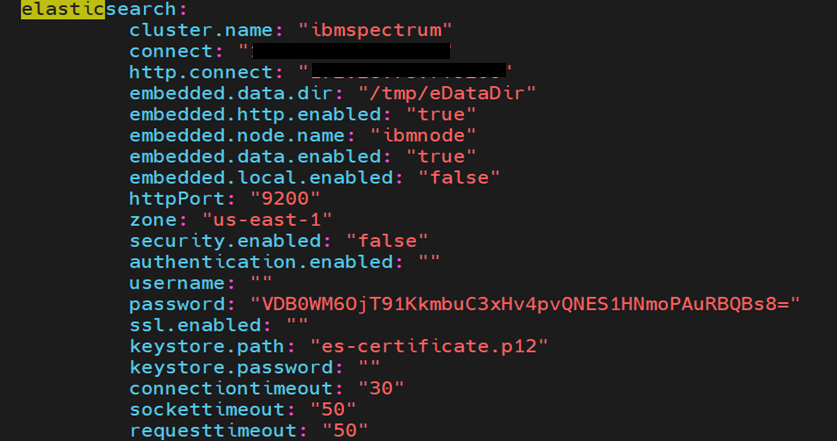
Elasticsearch:
Update cluster.name, connect, http.connect, httpPort according to your Elasticsearch service:
Update Gathr Installation Directory:

Update Web URL of Gathr:

Update UI host and port of Gathr:


Update the IBM section with gathr-ibm-service url and is.enabled property:

Update the python path as per your Gathr installation directory:

- Go to Gathr/server and extract tomcat.tar.gz
tar -xvzf tomcat.tar.gz
Copy Gathr.war & gathr-ibm-service.war from Gathr/lib to Gathr/server/tomcat/webapps
Unzip Gathr.war & gathr-ibm-service.war in Gathr/server/tomcat/webapps
unzip Gathr.war -d Gathr
unzip  gathr-ibm-service.war -d gathr-ibm-service
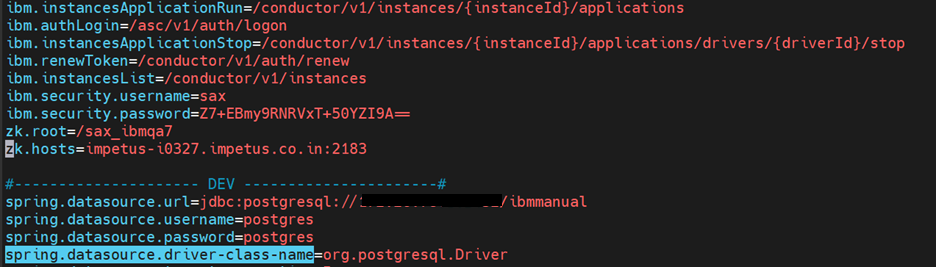
- Edit the Gathr/ server/tomcat/webapps/gathr-ibm-service/WEB-INF/classes/ application.properties File.
Provide the zk.root, zk.hosts, spring.datasource.url, spring.datasource.username, spring.datasource.password,& spring.datasource.driver-class-name:
- Edit the Gathr/server/tomcat/conf/catalina.properties file and add the spark jars location for IBM which we have copied in prerequites step 3. Add this jar path in common.loader section of catalina.properties file:
Here we have added : "/data/nfs/var/nfs_share_dir/spark-3.0.1-hadoop-3.2/jars","/data/nfs/var/nfs_share_dir/spark-3.0.1-hadoop-3.2/jars/*.jar"

- Update the gathr.additionaljars.classpath property in Gathr/conf/yaml/common.yaml and give the location of the IBM spark jars:

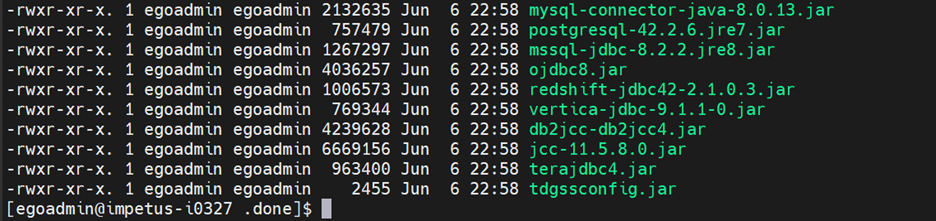
- Copy the below third party jars to Gathr/conf/thirdpartylib folder:
- Now come to Gathr/bin and start Gathr with below command:
./startServicesServer.sh -config.reload=true
Logs are located in <GathrInstallationDir>/logs and <GathrInstallationDir>/server/tomcat/logs directories.
Users can check the log files in these directories for any issues during the installation process.
Post-deployment
- Gathr will open using the below url:
http://<Gathr_IP>:8090/Gathr
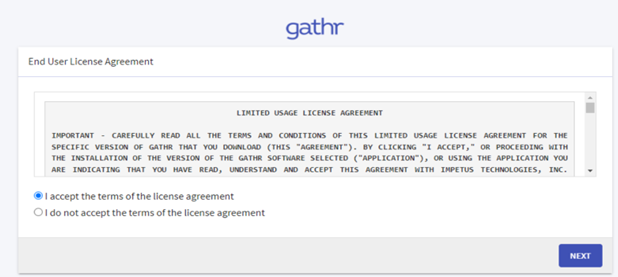
- Accept the End User License Agreement and hit Next button:
- The Upload License page opens:
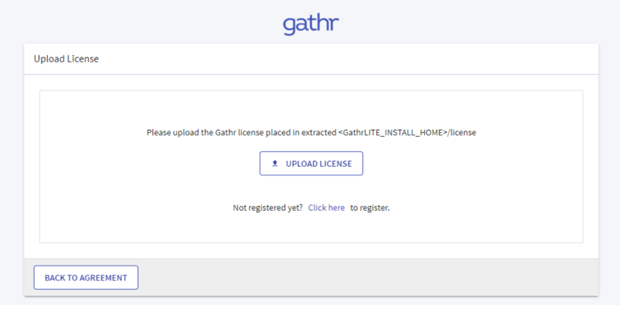
- Upload the license and click “Confirm”
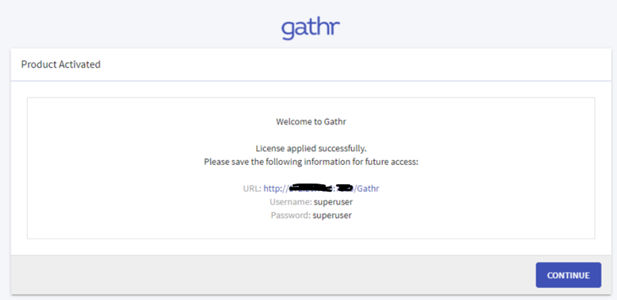
- Login page is displayed:

- Login with superuser/superuser as default creds.
Additional Configurations for adding Gathr
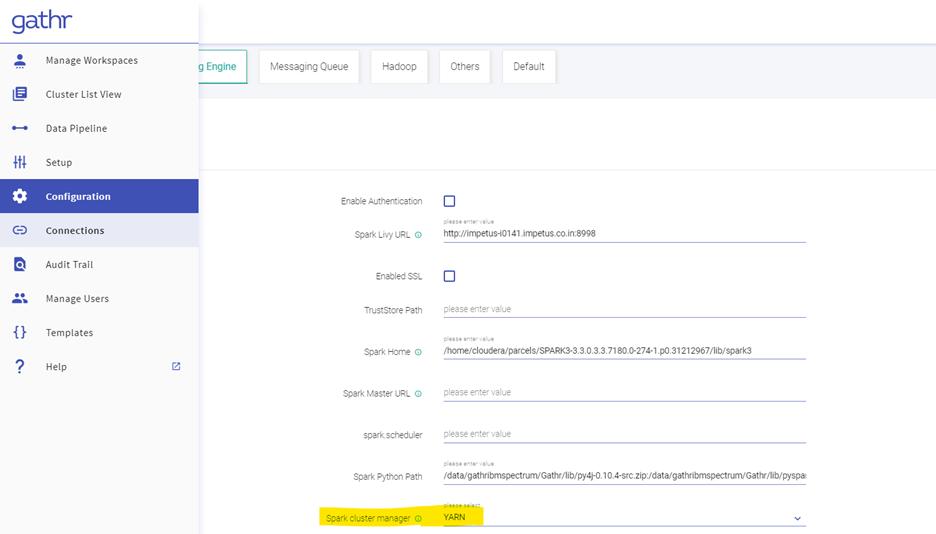
- Go to Configurations. Processing Engine and select YARN as the Spark Cluster Manager. Click on Save.
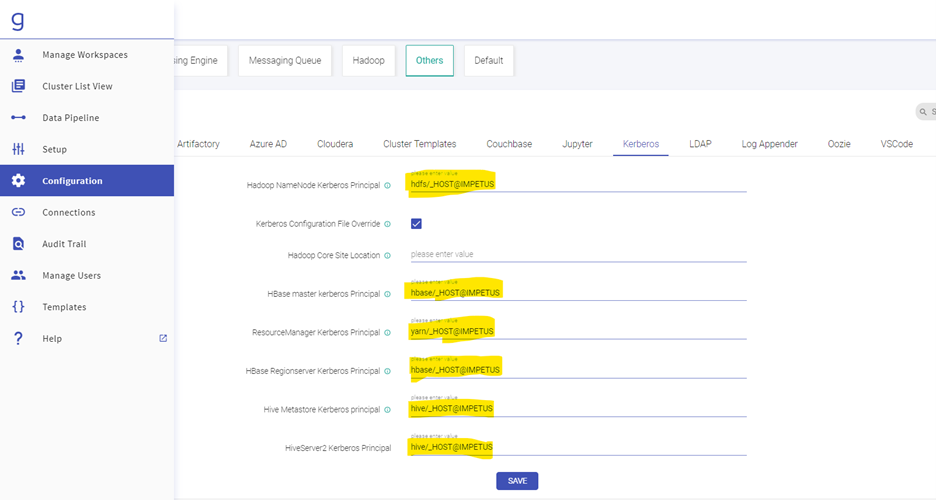
- Go to Configuration, then click Others followed by Kerberos and Edit your Kerberos Principals accordingly. Click on Save.
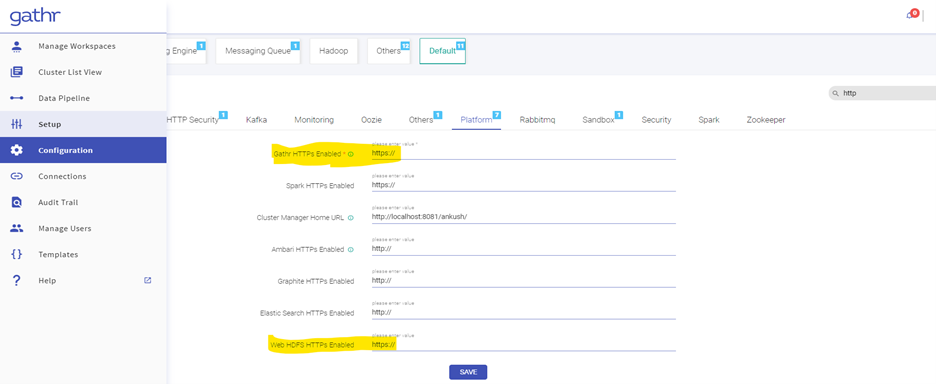
- Go to Configuration in the search box type http, Click on Default and then Platform, Edit the Gathr and HDFS URL as https:// and finally Click on Save.
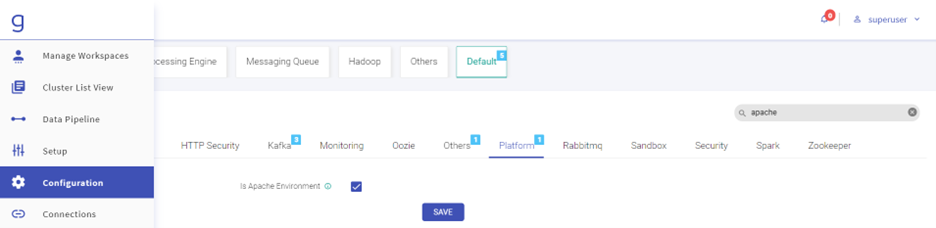
- Go to Configurations, then click Default. Search “Apache” and select “Is Apache Env”. Click on Save.
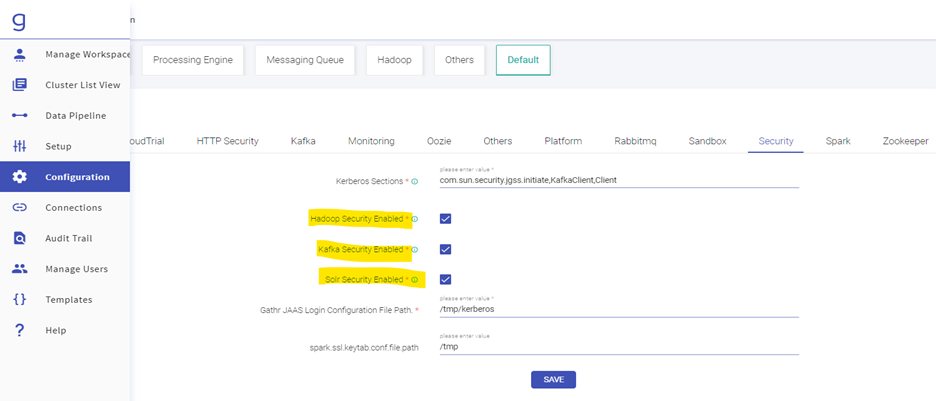
- Go to Configuration. Click on Default and then Security. Enable the check boxes of Hadoop, Kafka & Solr security. Click on Save.
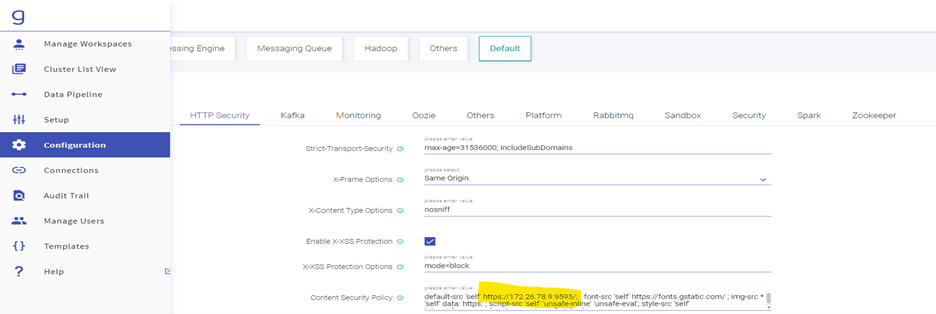
- For Starting Frontail Server on SSL go to Go to Configuration. Click on Default, then HTTP Security and in content security policy sections add you IP instead of localhost.
Now Go to Gathr/bin folder and start the frontail server command, change the key.path & certificate.path accordingly (this is when your Gathr is SSL enabled. If not, then you can simply run ./startFrontailServer.sh to start the frontail server):
./startFrontailServer.sh -key.path=/etc/ssl/certsnew/my_store.key -certificate.path=/etc/ssl/certsnew/gathr_impetus_com.pem
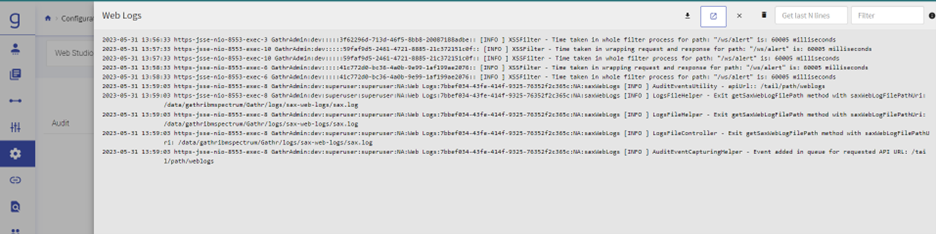
- Web Logs can be seen through UI.
Creating Connection on Gathr
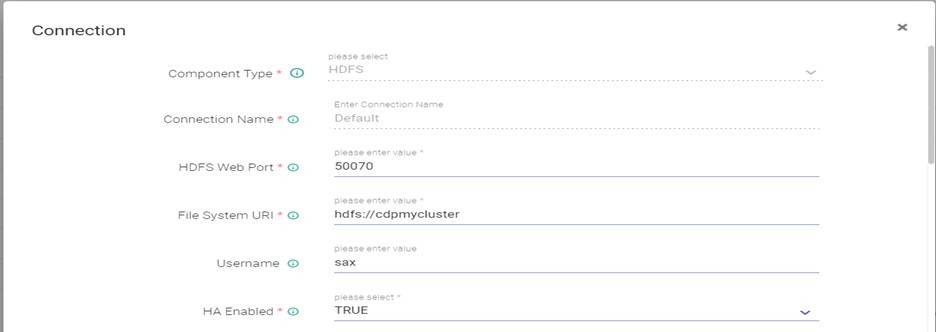
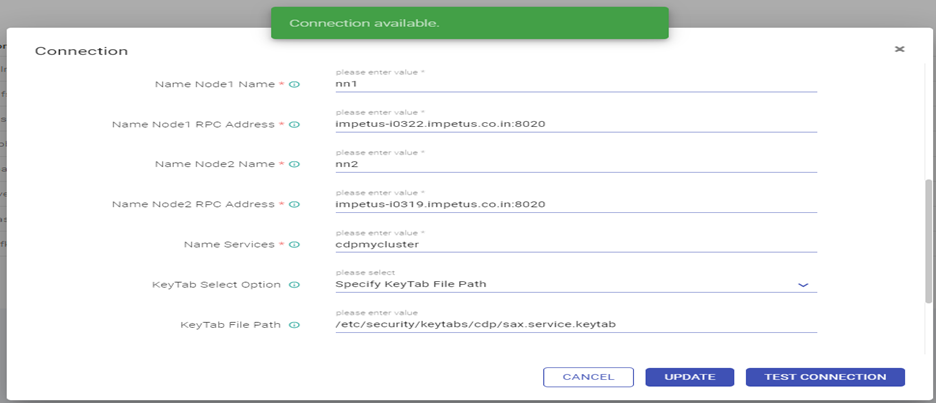
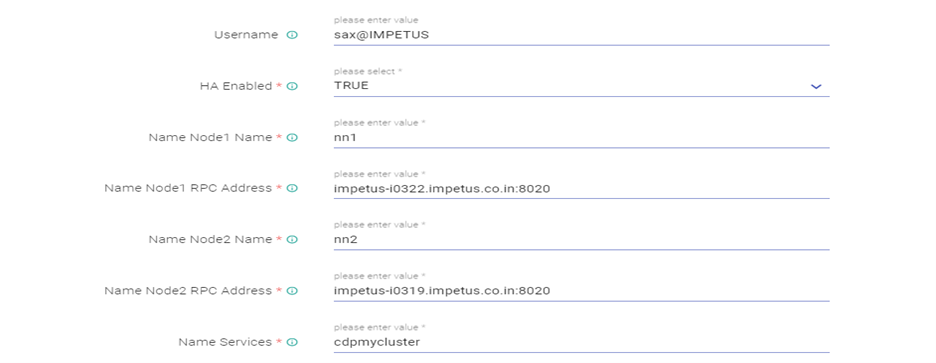
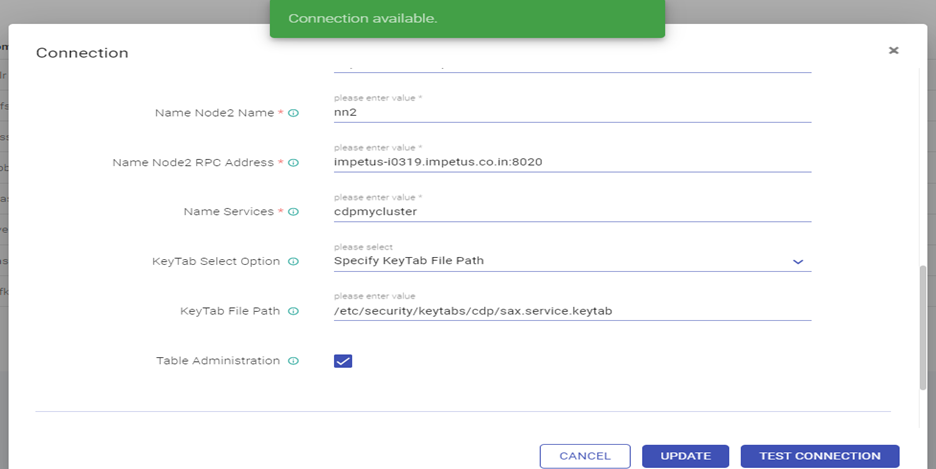
- Edit the HDFS Connection as below: Test connection (Connection should be available) and updated
- Edit the Hive Connection as below: Test connection (Connection should be available) and updated
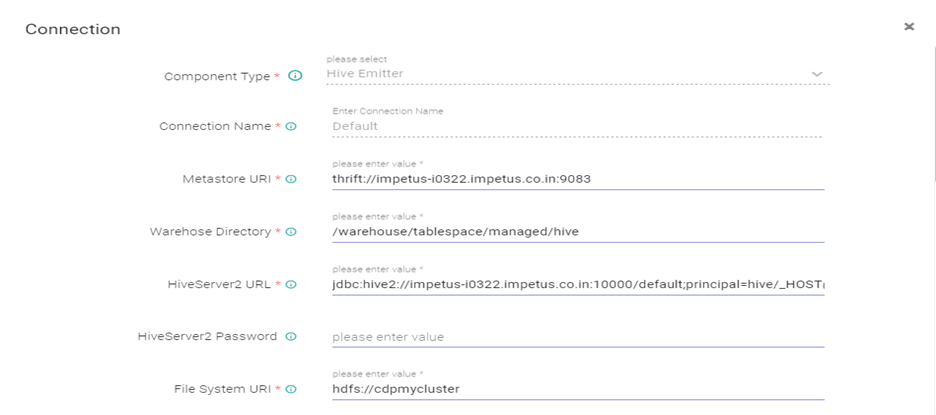
Hive server 2 url - jdbc:hive2://impetus-i0322.impetus.co.in:10000/default;principal=hive/_HOST@IMPETUS;ssl=true
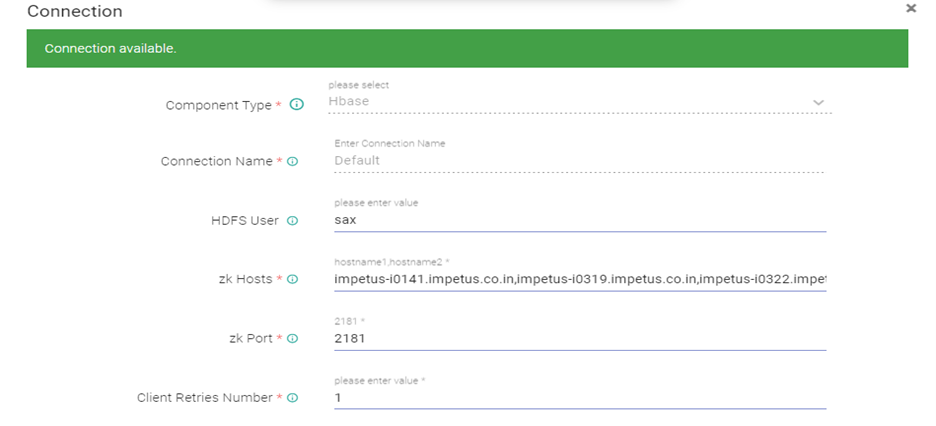
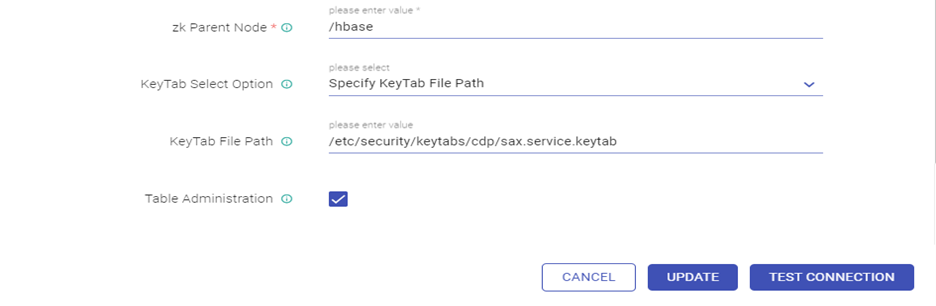
- Edit the HBase Connection and Test connection (Connection should be available) and updated.
- Edit the Solr Connection and Test connection (Connection should be available) and updated.
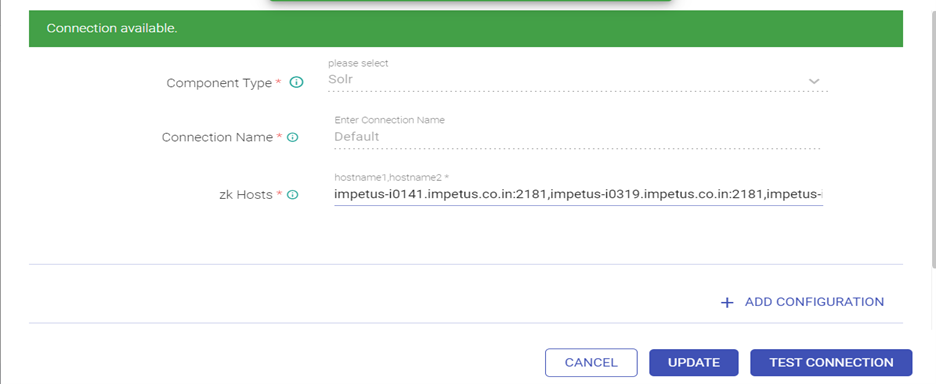
ZK Hosts - <zk_hosts:port>/<solr_zk_node>
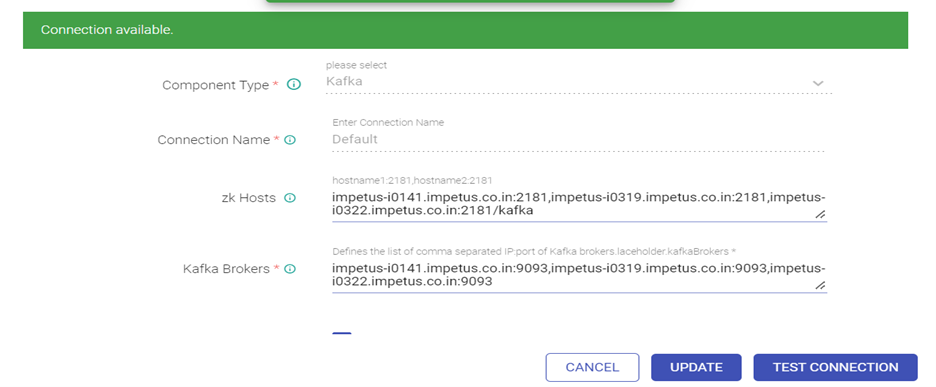
Edit the Kafka connection as below.
Provide ZK hosts & Kafka Brokers:
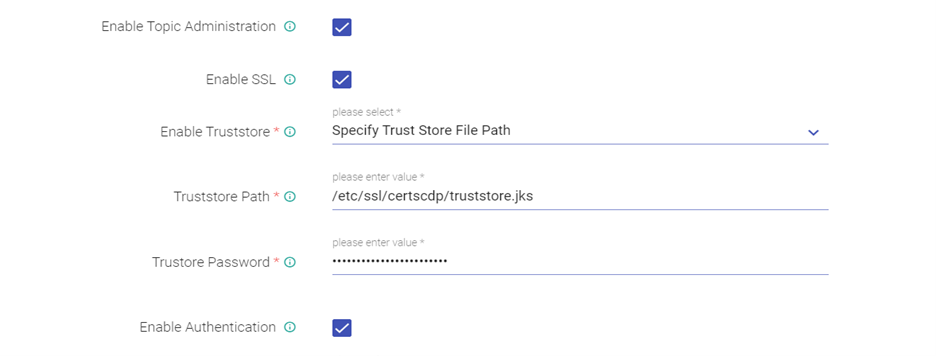
Enable Topic Administration, Enable SSL and Authentication for Kafka, Provide truststore path and password:
Give keystore path and password:

Enable Kerberos:
Enter SASL Configuration as below:
com.sun.security.auth.module.Krb5LoginModule required useKeyTab=true principal="sax@IMPETUS" keyTab="<Keytab_Path> " storeKey=true serviceName="kafka" debug=true;
Give user Principal & Security Protocol as below:
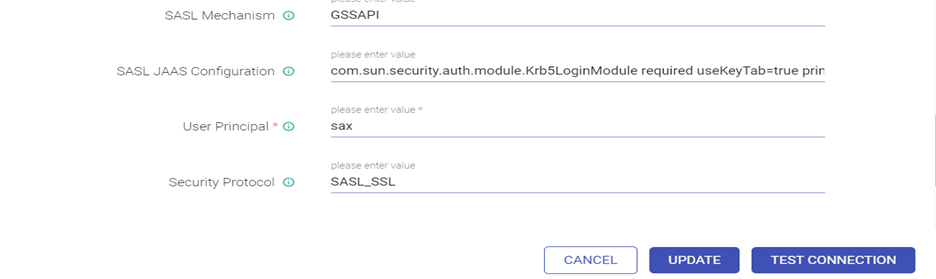
Test connection (Connection should be available) and updated.
If you have any feedback on Gathr documentation, please email us!