Installing Jupyter, IDEs and Sparkmagic on Centos/RHEL
💡 The component versions that are mentioned in this topic are for representational purpose only. For the Gathr supported component version details, see Component Versions Supported →
You can install Jupyter using Docker or on the Host Machine.
If you do not have root permission, then the installation steps can be considered for presentational purposes. (i.e, the root/sax/Gathr user in the installation steps will be the non-root user for ex., <IDE_USER>).
To Install using Docker, follow the below link:
https://hub.docker.com/r/streamanalytiximpetus/jupyter
To Install it on Host Machine, follow the below steps:
Prerequisite
Gathr 4.9.0 onwards supports JupyterLab, R Studio and VS Code. Therefore, any existing installation of Jupyter must be uninstalled before proceeding further. Refer to the topic Uninstall Existing Jupyter Version for more details.
Default Python must be 2.7.
Python and Python2 must point to Python 2.7.
Python 3.8.8 must be installed. Python3 must point to Python 3.8.8
pip and pip2 must point to pip2.7.
pip3 must point to pip3.8.8
In addition, the following libraries are required:
gcc (sudo yum install gcc)
python-devel (sudo yum install python-devel)
krb5-devels (sudo yum install krb5-devel)
Uninstall Existing Jupyter Version
Login as root user and run the below commands to uninstall the existing Jupyter version:
pip2 uninstall jupyter
pip2 uninstall jupyter\_core
pip2 uninstall jupyter-client
pip2 uninstall jupyter-console
pip2 uninstall jupyterlab\_pygments
pip2 uninstall notebook
pip2 uninstall jupyter\_highlight\_selected\_word
pip2 uninstall jupyter\_contrib\_core
pip2 uninstall jupyter\_contrib\_nbextensions
pip2 uninstall jupyter\_nbextensions\_configurator
pip2 uninstall nbformat
pip2 uninstall qtconsole
pip2 uninstall nbconvert
pip2 uninstall sparkmagic
Jupyter Installation
To install Jupyter, login with root user and use the following command:
root> pip3 install jupyter
JupyterHub Installation
To install JupyterHub, login with root user and do as follows:
Check nodejs version, otherwise install it using the below commands:
curl --silent --location https://rpm.nodesource.com/setup\_12.x | sudo bash -
wget https://nodejs.org/dist/v12.1.0/node-v12.1.0-linux-x64.tar.gz
sudo yum -y install nodejs
Check node version node --version v12.1.0
Install JupyterHub using Python3:
python3 -m pip install jupyterhubUntar the custom proxy package
configurable-http-proxy-gathr-hub.tar.gzthat you have received from Gathr support using the below command:tar -zxvf configurable-http-proxy-gathr-hub.tar.gzGo to the config HTTP home directory and run the below commands to install the custom proxy:
npm install
npm install -g
Install Jupyter Notebook and JupyterLab using the below commands:
python3 -m pip install notebook
python3 -m pip install jupyterlab
IDEs Installation
Gathr supports JupyterLab, VS Code and RStudio Integrated Development Environments (IDEs) that can be used with JupyterHub.
The subsequent topics cover the installation steps for the Gathr supported IDEs.
JupyterLab Installation
To install JupyterLab, with the root user use the following command:
root> pip3 install jupyterlab
If the following error occurs while installing Jupyter, then first run the commands given below:
ERROR: ipykernel requires Python version 3.4 or above.
root> pip3 install ipython
root> pip3 install ipykernel
Now, install Jupyter again.
pip3 install sudospawner==0.5.2
As a root user, run the following command:
root> pip3 install jupyter\_contrib\_nbextensions
Install Gathr Python Library
Install the Gathr python library (on node where Jupyter is running).
A python library is written to provide the functionality of reading sources, fetching data from sources, and creating a data frame in notebooks.
Dependent Libraries
Run commands as a root user. It will install all the prerequisites python libraries.
root> pip install numpy==1.14
root> pip install pandas==0.22
root> pip install scipy==1.1.0
root> pip install sklearn
root> pip install scikit-learn==0.19.1
root> pip install matplotlib
root> pip3 install numpy==1.19.2
root> pip3 install pandas==1.2.4
root> pip3 install scipy==1.6.2
root> pip3 install sklearn
root> pip3 install scikit-learn==0.24.1
root> pip3 install matplotlib==3.4.2
Follow the steps below to Install Gathr Python Library on the node where Jupyter is running:
Go to
Gathruser’s home folder.~/Create a directory named
.gathrand create asax.configfile inside it (as shown below).gathr\sax.configAdd the following content in
sax.configfile.[DEFAULT] SAX\_URL = <sax\_url> SAX\_DATA\_SOURCE\_GATEWAY = Gathr/notebook/sourceDetail SAX\_SSL\_ENABLE = <ssl\_enable> SSL\_CERTIFICATE\_PATH = <certificate\_path>Change <sax_url> entry with Gathr hostname/ipaddress and port (i.e http://localhost:8090).
By default, a user can keep <ssl_enable> as FALSE.
If SSL is enabled (i.e. Gathr application is running with https), then change <ssl_enable> as TRUE and change <certificate_path> with the location of the certificate that will be used to access the application.
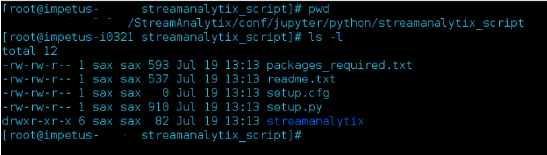
Open a terminal, login as root user and change the directory to <gathr_installation_dir>/conf/jupyter/python/gathr_script.
If Jupyter is installed on some other node, then copy the folder <gathr_installation_dir>/conf/jupyter/python to that machine and continue the following steps.
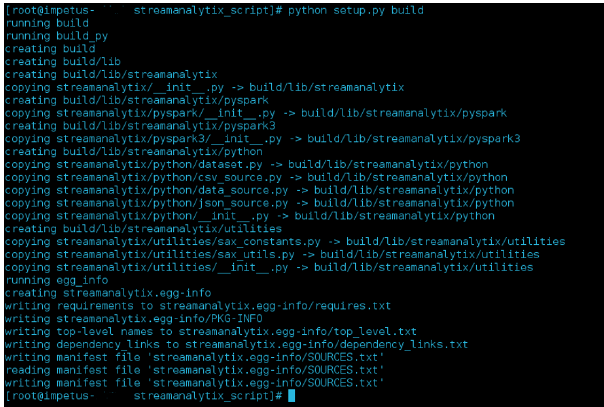
Run the below command:
root> python3 setup.py buildThis will build the library as shown in screenshot below:
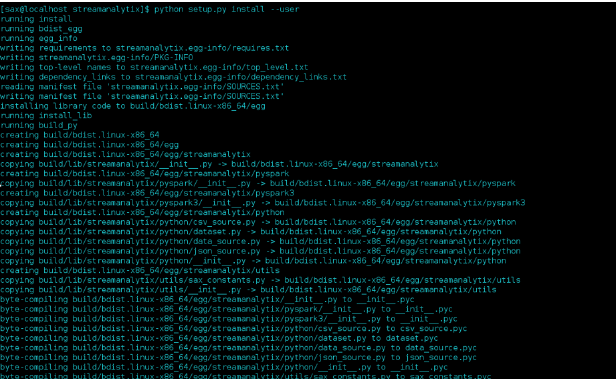
Now run the install command as a root user.
root> python3 setup.py installRepeat Step 3 and Step 4 with Python 2 as well using the below commands:root> python2 setup.py build root> python2 setup.py installIt will install required packages if not available and install Gathr python library.
Check installation folder of Gathr using command:
pip show gathr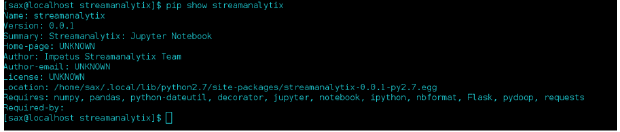
Now to check whether Gathr library is available in python environment, go to python console and run the command:
>>> import gathr
If Gathr is not properly installed, you will get an error.
Auto-Create Notebook Using REST API
On the node where Jupyter is running, login using the
Gathruser and navigate to folder «gathr_Installation_Dir»/conf/jupyter/python/autonotebook.gathr> cd <<gathr\_Installation\_Dir>>/conf/jupyter/python/autonotebookRun the
auto\_create\_notebook.pyscript using the following command:gathr> python3 auto\_create\_notebook.py &It will start service on port 5000. If you want to change the port then give the port number as an argument.
Example: python auto_create_notebook.py port=5004.
By default, it will create log file at folder from where script is started with name
auto\_create\_notebook.log. If you want to change log file path, then while starting script, give an argument as log file path and name.Example:
gathr> python3 auto\_create\_notebook.py logfile=/my/log/folder/auto\_create\_notebook.log port=5004 &Port and Logfile are optional.To configure Jupyter in Gathr, see Jupyter in Configuring Properties.
Install Python Kernel on Jupyter
Install python2/python3 kernel on Jupyter for python2.7 and python 3.8 as follows:
Run the following commands with root user:
- python2 -m pip install ipykernel
- python3 -m pip install ipykernel
- python2 -m ipykernel install
- python3 -m ipykernel install
R and RStudio Installation
To install the necessary runtime dependencies for R, you will need to enable additional repositories for third-party or source packages by using the following commands:
# Enable the Extra Packages for Enterprise Linux (EPEL) repository
$ sudo yum install https://dl.fedoraproject.org/pub/epel/epel-release-latest-7.noarch.rpm

# On RHEL 7, enable the Optional repository
$ sudo subscription-manager repos --enable "rhel-\*-optional-rpms"

# If running RHEL 7 in a public cloud, such as Amazon EC2, enable the
# Optional repository from Red Hat Update Infrastructure (RHUI) instead
$ sudo yum install yum-utils
$ sudo yum-config-manager --enable "rhel-\*-optional-rpms"
Specify R Version
Define the version of R that you want to install.
This environment variable will be used in all subsequent steps.
You can install a different version of R by specifying the desired version in this step.
Terminal
$ export R\_VERSION=4.0.5
Download and Install R
Download and install the desired version of R using the below command:
curl -O https://cdn.rstudio.com/r/centos-7/pkgs/R-${R\_VERSION}-1-1.x86\_64.rpm
$ sudo yum install R-${R\_VERSION}-1-1.x86\_64.rpm
Verify R Installation
To make sure that R is installed successfully run the below command:
Terminal
$ /opt/R/${R\_VERSION}/bin/R --version
Create a Symlink to R
To ensure that R is available on the default system PATH variable, create symbolic links to the version of R that you installed using the below command:
Terminal
$ sudo ln -s /opt/R/${R\_VERSION}/bin/R /usr/local/bin/R
$ sudo ln -s /opt/R/${R\_VERSION}/bin/Rscript /usr/local/bin/Rscript
RStudio IDE Setup
Installation location: /opt/R/<R_VERSION>/bin/R/
Install RStudio Server using the below command:
wget https://download2.rstudio.org/server/centos7/x86\_64/rstudio-server-rhel-1.4.1717-x86\_64.rpm
Install RStudio using below command:
sudo yum install rstudio-server-rhel-1.4.1717-x86\_64.rpm
Verify whether RStudio services are running using the below commands:
sudo systemctl status rstudio-server.service
sudo systemctl start rstudio-server.service (if it is not started already)
sudo systemctl enable rstudio-server.service
Check to verify if the IDE is pointing to the below URL on the browser:
http://<host_IP>:8787
Code Server and VS Code Installation
Follow the steps given below to install VS Code:
Login with root user and navigate to " / "
Create directory for VS Code using the below command:
mkdir code-serverGive full access to the directory created using the below command:
chmod -R 777 code-serverInstall code server from below URL:
wget https://github.com/cdr/code-server/releases/download/v3.11.0/code-server-3.11.0-linux-amd64.tar.gzUntar the copied zip file using the below command:
tar -xvzf code-server-3.11.0-linux-amd64.tar.gz in /code-server/code-server-3.11.0-linux-amd64
JupyterHub With IDEs
There are certain prerequisites for Gathr supported IDEs before starting them behind JupyterHub.
Prerequisites
The required IDEs must be installed. For more details, see IDEs Installation.
If you have root permission perform the below steps.
To create users run the below commands:
root> adduser sax
root> passwd sax (Password = sax)
Edit the /etc/sudoers file and add the below properties:
root> vi /etc/sudoers
**sax ALL=(ALL) NOPASSWD: JHPROCESSES**
**Cmnd\_Alias JHPROCESSES = /usr/local/bin/jupyterhub, /usr/local/bin/python3.8**
If you do not have root permission, then follow the below steps:
Create OS user group and users that are going to utilize IDE services must be a part of this group. i.e., <IDE_GROUP>
Edit /etc/sudoers with root user and add the below properties for respective IDE’S:
For VSCode:
Runas\_Alias JUPYTER\_USERS = <IDE\_USER>
Cmnd\_Alias JUPYTER\_VSCODE\_CMD = <IDE\_INSTALLATION\_PATH>/code-server-3.11.0-linux-amd64/bin/code-server
<IDE\_USER> ALL=(%<IDE\_GROUP>) NOPASSWD:JUPYTER\_VSCODE\_CMD
<IDE\_USER> ALL=(%<IDE\_GROUP>) NOPASSWD:/usr/local/bin/sax-vscode-spawner
<IDE\_USER> ALL=(%<IDE\_GROUP>) NOPASSWD:/usr/local/bin/jupyterhub
<IDE\_USER> ALL=(%<IDE\_GROUP>) NOPASSWD:/usr/local/bin/python3.8
For Juypter
Runas\_Alias JUPYTER\_USERS = <IDE\_USER>
Cmnd\_Alias SUDO\_SPAWNER\_CMD = /usr/local/bin/sudospawner
<IDE\_USER> ALL=(%IDE\_GROUP) NOPASSWD:SUDO\_SPAWNER\_CMD
<IDE\_USER> ALL=(%IDE\_GROUP) NOPASSWD:/bin/kill
<IDE\_USER> ALL=(%<IDE\_GROUP>) NOPASSWD:/usr/local/bin/jupyterhub
<IDE\_USER> ALL=(%<IDE\_GROUP>) NOPASSWD:/usr/local/bin/python3.8
Next, create a backup of remote_user_auth.py at the below location (If available or else ignore this step):
<HOST>: <python installation path>/lib/python3.x/site-packages/jhub\_remote\_user\_authenticatorUse the below command:
mv remote\_user\_auth.py remote\_user\_auth\_old.pypython3 -m pip install jhub\_remote\_user\_authenticatorCopy the file remote_user_auth.py and paste at the location:
<HOST>: /usr/local/lib/python3.x/site-packages/jhub\_remote\_user\_authenticatorCreate a new directory using the below command:
mkdir /<IDE\_INSTALLATION\_PATH>/virtual\_envUpdate permissions using the below command:
chmod 777 -R /<IDE\_INSTALLATION\_PATH>/virtual\_envFrom:/<Gathr_installation_dir>/upgrade/Gathr/conf/non-container/jupyterhub/
copy vscodespawner @
/<IDE_INSTALLATION_PATH>/ Run the following command from the above folder:
python3 setup.py installInstall Python virtual environment using below command:
pip3 install virtualenvMake sure python3.x.json is present at {Gathr_installation_dir}/ conf/common/templates/virtualEnvironments.Create folder /<IDE_INSTALLATION_PATH>/jupyterhub_config_file_vscode [sax@<HOST>, <HOST1>, <HOST2>, and so on.]
Create a new directory using the below command:
mkdir /<IDE\_INSTALLATION\_PATH>/ jupyterhub\_config\_file\_vscodeUpdate permissions using below command:
chmod 777 -R /<IDE\_INSTALLATION\_PATH>/jupyterhub\_config\_file\_vscodeChange the directory using below commands:
cd /<IDE\_INSTALLATION\_PATH>/jupyterhub\_config\_file\_vscode
cd /<IDE\_INSTALLATION\_PATH>/
Update permissions using the below command:
chmod 777 \* .Run via root - in /<IDE_INSTALLATION_PATH>/jupyterhub_config_file_vscode to generate config file
jupyterhub\_config.py.jupyterhub --generate-configUpdate the below properties: /<IDE_INSTALLATION_PATH>/jupyterhub_config_file_vscode/jupyterhub_config.py
c.JupyterHub.authenticator\_class = 'jhub\_remote\_user\_authenticator.remote\_user\_auth.RemoteUserAuthenticator'

c.JupyterHub.spawner\_class = 'vscodespawner.SaxVSCodeProcessSpawner'
c.Spawner.cmd = ['<CODE\_SERVER\_INSTALLATION\_LOCATION>/bin/code-server']
c.JupyterHub.hub\_bind\_url = 'http://HOST:7071'
c.JupyterHub.bind\_url = 'http://HOST:7000'
c.ConfigurableHTTPProxy.command = ["configurable-http-proxy","--base-prefix", "/"]
c.ConfigurableHTTPProxy.api\_url = "http://HOST:7001"
c.JupyterHub.statsd\_port = 7125

Note: If JupyterHub is running behind HA Proxy, then append Hub base URL as below:

c.JupyterHub.bind\_url = 'http://HOST:7000/<unique placeholder for each machine; example- VSC1>'
c.ConfigurableHTTPProxy.command = ["configurable-http-proxy","--base-prefix", "VSC1"]
If it is non-root user then change the spawner_class as mentioned below by keeping the remaining properties as it is:
c.JupyterHub.spawner\_class = 'vscodespawner.vscode\_sudo\_spawner.SaxVSCodeSudoProcessSpawner'For all the other hosts, update the above addresses accordingly.Create a folder /<IDE_INSTALLATION_PATH>/jupyterhub_config_file_lab [sax@<HOST>] using the below command:
|mkdir /<IDE\_INSTALLATION\_PATH>/jupyterhub\_config\_file\_lab|Update permissions using the below commands:
chmod 755 -R /<IDE\_INSTALLATION\_PATH>/jupyterhub\_config\_file\_labChange the directory using the below commands:
cd /<IDE\_INSTALLATION\_PATH>/Update permissions using below command:
chmod 755 \* .Run via root - in /<IDE_INSTALLATION_PATH>/jupyterhub_config_file_lab
jupyterhub --generate-configUpdate below properties in /<IDE_INSTALLATION_PATH>/jupyterhub_config_file_lab/jupyterhub_config.py
c.JupyterHub.authenticator\_class = 'jhub\_remote\_user\_authenticator.remote\_user\_auth.RemoteUserAuthenticator'
c.Spawner.default\_url = '/lab'
c.Spawner.cmd = ['/usr/local/bin/jupyterhub-singleuser']
c.LocalProcessSpawner.shell\_cmd = ['bash', '-l', '-c']
c.Spawner.args = ['--NotebookApp.allow\_origin=\*', '--NotebookApp.tornado\_settings={"headers":{"Content-Security-Policy":"frame-ancestors \* self "}}']
c.JupyterHub.tornado\_settings = {"headers":{"Access-Control-Allow-Origin":"\*", "Content-Security-Policy":"frame-ancestors \* none "}}
c.JupyterHub.hub\_bind\_url = 'http://HOST:7571'
c.JupyterHub.bind\_url = 'http://HOST:7500'
c.ConfigurableHTTPProxy.api\_url = "http://HOST:7501"
c.JupyterHub.statsd\_port = 7525

Note: If JupyterHub is running behind HA Proxy, then append Hub base URL as below:

c.JupyterHub.bind\_url = 'http://HOST:7000/<unique placeholder for each machine; example- jupyter>'
If it is non-root user then change the spawner_class and add sudospawner_path as mentioned below by keeping the remaining properties as it is:
c.JupyterHub.spawner\_class = 'sudospawner.SudoSpawner' c.SudoSpawner.sudospawner\_path = '/usr/local/bin/sudospawner'For all the other hosts, update the above addresses accordingly.Copy the loadBalancer.sh file from the below location:
<HOST>: <gathr installation path>/conf/non-container/customLoadBalancer/loadBalancer.shPaste it to:
/home/
of IDE machine Update permissions using the below command:
chmod 755 /home/< user with SSH permission to all the hosts >/loadBalancer.shFor all the other hosts, update the permissions accordingly.Create the folder structure /home/<IDE_USER>/.gathr/sax.config file and add the below content to
sax.configfile:IF GATHR IS NON SSL : [DEFAULT] SAX\_URL = <sax\_url> SAX\_DATA\_SOURCE\_GATEWAY = Gathr/notebook/sourceDetail IF GATHR IS SSL Enabled: [DEFAULT] SAX\_URL = https://<HAPROXY> SAX\_DATA\_SOURCE\_GATEWAY = Gathr/notebook/sourceDetail SAX\_SSL\_ENABLE = TRUE SSL\_CERTIFICATE\_PATH = <Certificates\_path>/<certificate\_name>.pemNow go to /IDE_INSTALLATION_PATH/gathr_script folder and run the below commands:
python3 setup.py build</p><p>python3 setup.py install
JupyterHub with Autnotebook
nohup <PYTHON\_INSTALL\_PATH>/bin/<PYTHON3.8> $<IDE\_INSTALLATION\_LOCATION\_VALUE>/autonotebook/auto\_create\_notebook.py &
JupyterHub with VSCode
Start JupyterHub for VS Code via <IDE_USER> user from the location: <IDE_INSTALLATION_PATH>/jupyterhub_config_file_vscode using the below command:
nohup sudo /usr/local/bin/python3.8 /usr/local/bin/jupyterhub -f jupyterhub\_config.py &
JupyterHub with Jupyter Lab
Start JupyterHub for JupyterLab via <IDE_USER> user from the location: <IDE_INSTALLATION_PATH>/ jupyterhub_config_file_lab using the below command:
nohup sudo /usr/local/bin/python3.8 /usr/local/bin/jupyterhub -f jupyterhub\_config.py &
SSL in JupyterLab
If SSL is required in Jupyter Lab then follow the below steps:
Create
.keystorefile, if not already done using the below command:keytool -genkeypair -keystore $(hostname -f).keystore -keyalg RSA -alias $(hostname -f) -dname "CN=$(hostname -f),OU=Impetus,O=Impetus,L=Indore,ST=MP,C=IN" -storepass Impetus1! -keypass Impetus1! -ext san=dns:$(hostname -f),dns:localhost,ip:$(hostname -i)Create
keystore.jksfile, if not already done.Create
.pemfile, if not already done.keytool -export -alias $(hostname -f) -keystore $(hostname -f).keystore -rfc -file $(hostname -f).pemCreate
keystore.p12file using the below command:keytool -importkeystore -srckeystore keystore.jks -destkeystore keystore.p12 -deststoretype PKCS12Create
.keyfile using the below command:openssl pkcs12 -in keystore.p12 -nodes -nocerts -out $(hostname -f).keyAdd the below entries in
jupyterhub\_config.pyfiles [for vscode and lab] and restart JupyterHub.c.JupyterHub.ssl\_cert = '<path to pem file created in step 3 above >' c.JupyterHub.ssl\_key = '<path to key file created in step 5 above>'Update the above pem and key path accordingly as per the machine.Import pem files to Gathr machine’s jvm, if not already done.
In Gathr, update below:
Prerequisites Details Configurations> Default> Sandbox Sandbox Jupyterhub IDE SSL Enabled : true
Sandbox RStudio IDE SSL Enabled : falsePrerequisites Details Configurations> Others> Jupyter jupyter.url : <make it https> Configurations> Others> VSCode vscode.url : <make it https>
Sparkmagic Installation
Remove the existing spark kernals using the below command (root):
root> jupyter kernelspec uninstall pysparkkernel sparkkernel sparkkernel pyspark3kernel
Again, do the same steps where Jupyter is installed.
To install Sparkmagic, login with root user and run the following command:
References: https://github.com/jupyter-incubator/sparkmagic
root> pip3 install sparkmagic==0.17.1
root> jupyter nbextension enable --py --sys-prefix widgetsnbextension
root> jupyter labextension install “@jupyter-widgets/jupyterlab-manager”
root> jupyter labextension enable “@jupyter-widgets/jupyterlab-manager”
For validating the location of Sparkmagic, run the following command:
root> pip3 show sparkmagic
Now, execute the below command:
root> cd <location of spark magic>
Then run the following commands to install kernels, this will activate Scala, Pyspark, and Python kernels in Sparkmagic for further use:
root> jupyter-kernelspec install sparkmagic/kernels/sparkkernel
root> jupyter-kernelspec install sparkmagic/kernels/pysparkkernel
root> jupyter-kernelspec install sparkmagic/kernels/sparkrkernel
root> jupyter serverextension enable --py sparkmagic
Configuration for Gathr User
Login with Gathr user and follow the below steps:
Create directory
~/.sparkmagicif it does not exist.Create
config.jsonfile at path~/.sparkmagicand add details as given in example_config.json.Provide Livy URL under all kernels (i.e. kernel_python_credentials etc.) in
config.json(default is localhost).
Make sure that in the
config.jsonfile theauthvariable is given as None.
Adding Custom jar in Notebook Class Path
The configuration steps to add a custom jar in Notebook class path (Gathr User) are given as follows:
Upload
spark-notebook.jar,ojdbc8.jar,mysql-connector-java-8.0.13.jarandhive-warehouse-connector-assembly-1.0.0.3.1.0.0-78.jarto Hadoop file system of the cluster.Provide uploaded jar location in file
~/.sparkmagic/config.jsonunder the below properties:jars
conf > spark.driver.extraClassPath
conf > spark.executor.extraClassPath
Make sure to use the below format to specify HDFS URL for the preferred environment:For CDP: “hdfs://cdpservice/”
For Apache: hdfs://nameservice/
For CDH: hdfs://cdh630service/
Provide ZooKeeper entries in file
~/.sparkmagic/config.jsonunder the following properties:spark.executor.extraJavaOptions
spark.driver.extraJavaOptions
These Zookeeper entries are present at the following location:
<<gathr_Installation_Dir>>/conf/config.properties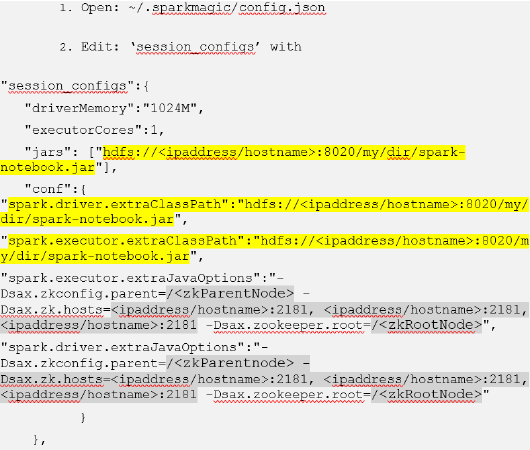 If namenode is ssl enabled, then follow the below steps to create the certificate and export the variable REQUESTS\_CA\_BUNDLE.
Certificate Configuration
Follow the steps given below for certificate configuration and to connect to the Python and Anaconda repositories:
Get Root CA Bundle.
You may find it at the location:
/etc/pki/tls/cert.pem, or/etc/pki/ca-trust/extracted/pem/tls-ca-bundle.pemIf
/etc/pki/tls/cert.pemfile is available, create a copy of the file and append the below certificate content at the end of the copied .pem file, then proceed to Step 3.If Hadoop is in HA mode then create two certificates (one for each name node) and append those certificate contents in the copied .pem file.echo -n |openssl s\_client -connect <namenode\_host>:<namenode\_port> | sed -ne '/-BEGIN CERTIFICATE-/,/-END CERTIFICATE-/p' > impetus-<namenode\_host>.pem keytool -genkeypair -keystore wn0-saxkaf.keystore -keyalg RSA -alias cmhost-dname "CN=$(hostname -f),OU=Impetus,O=Impetus,L=Indore,ST=MP,C=IN" -storepass Impetus1! -keypass Impetus1! keytool -keystore /opt/cloudera/security/jks/truststore.jks -importcert -alias$(hostname -f) -file $(hostname -f).pem -storepass impetusFor generating certificate for Livy, use the below command:
echo -n |openssl s\_client -connect <livy\_host>:<livy\_port> | sed -ne '/-BEGIN CERTIFICATE-/,/-END CERTIFICATE-/p' > impetus-<livy\_host>.pemMerge the generated certificates (
cert.pem,namenode\_host.crtandlivy.crt) into a single file and place this file in /home/<Gathr User>.Export the generated certificate using the
REQUESTS\_CA\_BUNDLEvariable in.bashrcfile pointing to the combined certificate .pem file.Make sure that the certificates that are generated have 666 permissions using the below command:
chmod 666 <cert\_name>Restart the Jupyter Notebook service.
Perform these steps where Jupyter is running.
WebHDFS SSL Enabled
If the WebHDFS is SSL enabled then follow the below steps:
Create server side certificate for active name node for the box where Jupyter is running.
If Hadoop is in HA mode then create two certificates (one for each name node) and combine and create a single certificate using these:
Keep it at location (on same box) which can be accessible by Jupyter service

In .bashrc file make certificate’s entry like: export REQUESTS\_CA\_BUNDLE=/home/sax/hdfsssl7815.crt
Restart the Jupyter Notebook service.
Post Installation
After installation is complete, make sure that the following services are running:
Jupyter notebook on port 8888
Auto create notebook service on port 5000
Troubleshooting
Pyspark/Scala Error
If the following error occurs while opening pyspark or scala notebook:
The code failed because of a fatal error:Failed to register auto viz for notebook.Then, first check pandas version using the below command:
pip show pandasIf it is 0.23, then, downgrade it to version 0.22 using below commands:
root> pip uninstall pandas
root>pip install pandas==0.22
Now, open
config.jsonfile at path~/.sparkmagic. Search for entryuse\_auto\_vizand change its value tofalse.If the notebook takes time to create spark session in pyspark and scala notebooks and the session is not up in 60 seconds, then open the
config.jsonfile at path~/.sparkmagic. Search for entrylivy\_session\_startup\_timeout\_secondsand increase the number of seconds (i.e 120).Also, make sure that the configurations given in
config.jsonfile at path~/.sparkmagicshould be syntactically correct.Otherwise, sparkmagic library will fail to parse this JSON and will not be able to use pyspark and scala notebooks.
If there is any version mismatch for Pyspark/Spark, then place the Pyspark libs in
/pysparklibs.
If you have any feedback on Gathr documentation, please email us!