Setup Gathr on AWS - Manual Deployment
The objective of this topic is to assist the user to install Gathr on AWS environment.
AWS Portal Access
To Setup Gathr, the user should have sufficient privileges to create and manage resources (Resource Group, Virtual machines, Virtual Networks, Subnet, Network Security Group, Gathr Webstudio) in AWS.
Hardware and Software Configurations
The below table provides the system requirements for the Gathr application:
| Hardware/Software | Requirement |
|---|---|
| Machine Type | m5.2xlarge or bigger |
| Disk Space | 30 GB |
| Operating System | Amazon Linux 2, Centos 7.9, RHEL 7 |
| sudo Access | Required during installation |
| Internet Access | Optional (preferred during the installation) |
AWS Gathr Setup
This section covers the steps to create resources in AWS that are essential to support Gathr application ecosystem.
Prerequisites
The following prerequisites are required for setting up Gathr:
VPC to launch AWS resources into a virtual network that you have defined.
Subnets (Public and Private).
NAT Gateway (Internet access for Private Subnet).
Elastic IP (In case if Gathr Webstudio is to be accessed publicly).
Create VPC and Subnets
VPC creation is required only if the user does not plan to launch this AMI in an existing VPC.
Even if you do not create a VPC, make sure that the existing VPC has the setup as described below.
Steps to Create VPC
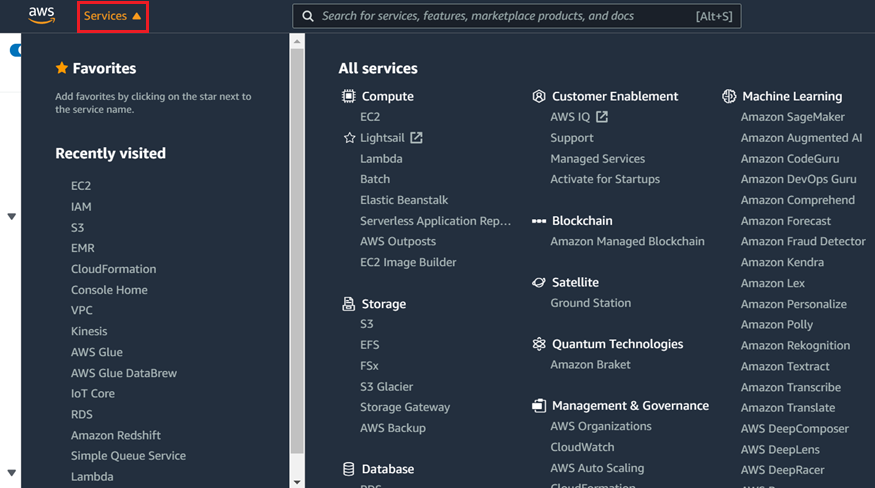
Click the Services drop-down and search for VPC
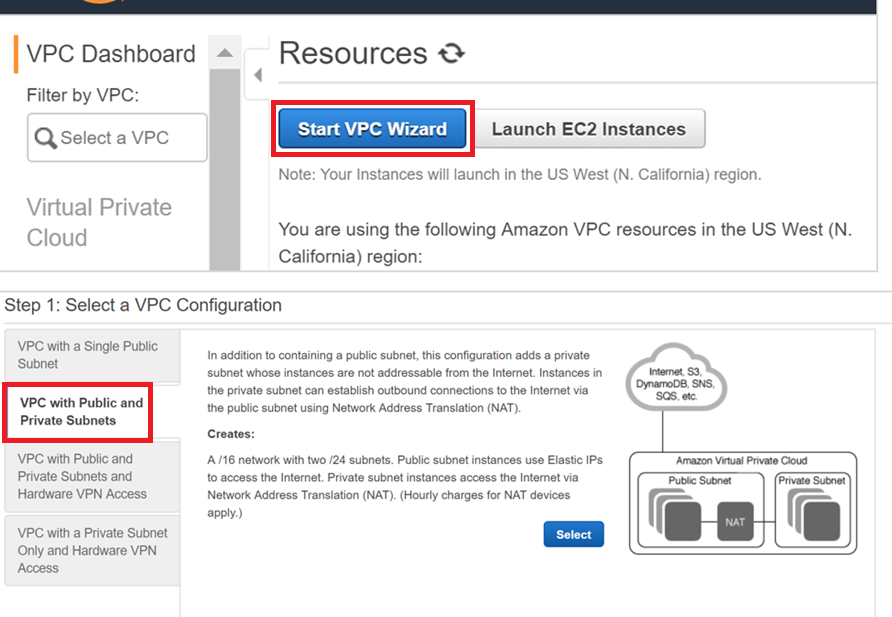
Click Start VPC Wizard and select VPC with Public and Private Subnets.
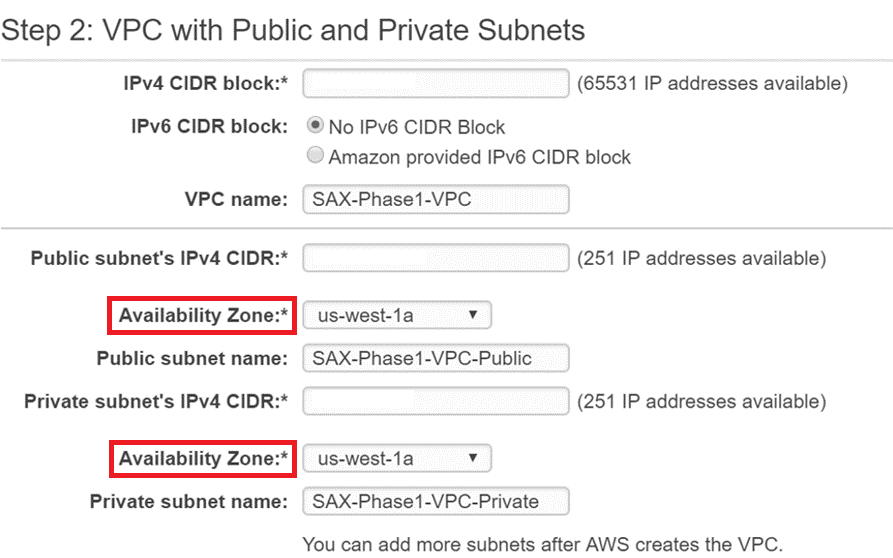
Make sure that the Public and Private subnets are in the same Availability Zone.
Public Subnet that has Internet gateway access for Gathr web interface.
Private Subnet for Gathr application.
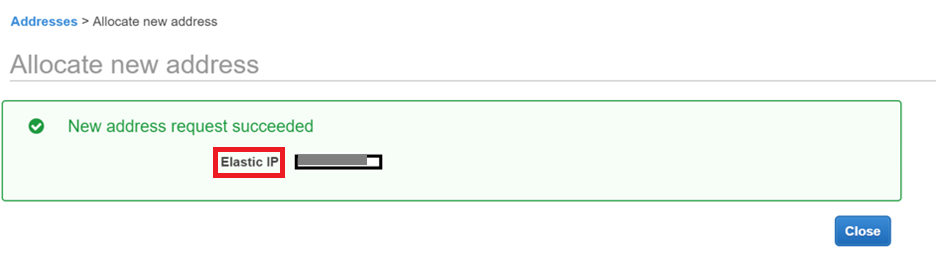
Create a new Elastic IP for the NAT Gateway.
Click Create VPC.
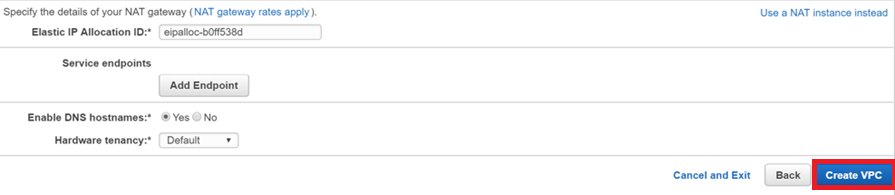
The Virtual Private Cloud is now created.

To know more about how to create a VPC, Subnets and other VPC resources, follow the topic, Create a VPC and Subnets.
IAM Access
This section cover details of IAM roles required to setup Gathr on AWS.
Setup IAM User
An IAM user is required to create an EC2 instance, Security group, VPC, Subnets, S3 bucket, Instance Profile etc.
A user with an AWS root user account has all the access that is necessary to launch Gathr on AWS. Otherwise, you can create an IAM User with the JSON policy.
Setup Role for EMR
You need to create three IAM roles “EMR_AutoScaling_DefaultRole”, “EMR_DefaultRole”, “EMR_EC2_DefaultRole”. These roles will be available as configuration values when you are creating an EMR cluster in Gathr Webstudio.
There are two ways of creating the EMR roles. These are explained below:
- Create EMR Cluster which in-turn creates the required EMR roles.
If you have never created an EMR cluster, then create an EMR cluster in AWS console. It will create the necessary IAM roles in user’s AWS account.
- Create the EMR roles manually.
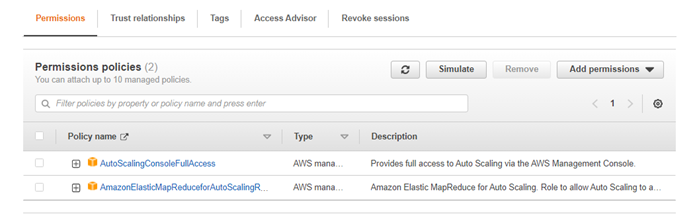
Create IAM Role: “EMR_AutoScaling_DefaultRole” and add the policies to it as shown in the screenshot below:
Next, update the ‘Trust Relationship’ of the above IAM Role with the content provided below:
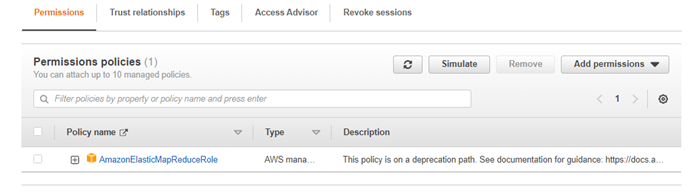
{
  "Version": "2012-10-17",
  "Statement": [
    {
      "Effect": "Allow",
      "Principal": {
        "Service": [
          "application-autoscaling.amazonaws.com",
          "elasticmapreduce.amazonaws.com",
          "ec2.amazonaws.com"
        ]
      },
      "Action": "sts:AssumeRole"
    }
  ]
}
Create IAM Role: “EMR_DefaultRole” and add the given policies to it as shown in the screenshot below:
Next, update the ‘Trust Relationship’ of the above IAM Role with the content provided below:
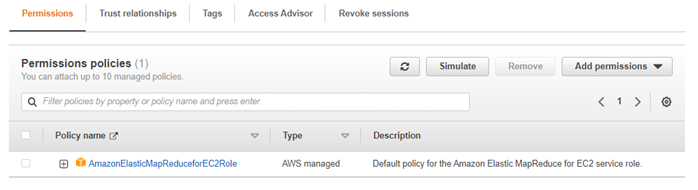
{
  "Version": "2008-10-17",
  "Statement": [
    {
      "Sid": "",
      "Effect": "Allow",
      "Principal": {
        "Service": "elasticmapreduce.amazonaws.com"
        },
      "Action": "sts:AssumeRole"
    }
  ]
}
Create IAM Role: “EMR_EC2_DefaultRole” and add the given policies to it as shown in the screenshot below:
Next, update the ‘Trust Relationship’ of the above IAM Role with the content provided below:
{
  "Version": "2012-10-17",
  "Statement": [
    {
    "Effect": "Allow",
    "Principal": {
      "Service": "ec2.amazonaws.com"
      },
    "Action": "sts:AssumeRole"
    }
  ]
}
Setup Role for Gathr Webstudio EC2
Create IAM Role “GathrWebstudio_EC2Role” and add the following inline JSON Policy to it:
{
  "Version": "2012-10-17",
  "Statement": [
    {
      "Sid": "VisualEditor1",
      "Effect": "Allow",
      "Action": [
        "ec2:\*",
        "kms:ListKeyPolicies",
        "kms:ListRetirableGrants",
        "kms:ListAliases",
        "kms:ListGrants",
        "iam:GetPolicyVersion",
        "iam:GetPolicy",
        "s3:ListAllMyBuckets",
        "iam:ListRoles",
        "sts:AssumeRole",
        "elasticmapreduce:\*"
        ],
        "Resource": "\*"
        },
        {
          "Sid": "VisualEditor2",
          "Effect": "Allow",
          "Action": [
            "s3:PutObject",
            "s3:GetObject",
            "iam:PassRole",
            "s3:ListBucket",
            "s3:DeleteObject"
            ],
            "Resource": [
              "arn:aws:iam::<AWS\_Account\_ID>:role/EMR\_EC2\_DefaultRole",
              "arn:aws:iam::<AWS\_Account\_ID>:role/EMR\_DefaultRole","arn:aws:iam::<AWS\_Account\_ID>:role/EMR\_AutoScaling\_DefaultRole",
              "arn:aws:s3:::<S3\_Metadata\_Bucket\_Name>/\*",
              "arn:aws:s3:::<S3\_Metadata\_Bucket\_Name>" ] } ]}
Next, update the ‘Trust Relationship’ of the above IAM Role with the given content provided below:
{
  "Version": "2012-10-17",
  "Statement": [
    {
      "Effect": "Allow",
      "Principal": {
        "Service": "ec2.amazonaws.com"
        },
        "Action": "sts:AssumeRole"
    }
  ]
}
Security Groups
Below are the ports required to be opened in VM Security Group:
| Mandatory Port/Optional Port | Service | Port |
|---|---|---|
| Optional | Zookeeper | 2181 |
| Mandatory | Gathr (Non-SSL/SSL) | 8090/8443 |
| Mandatory | SSH | 22 |
| Optional | RabbitMQ (Non-SSL/SSL) | 5672,15672/15671 |
| Optional | Elasticsearch | 9200-9300 |
| Optional | PostgreSQL | 5432 |
Create the following security groups:
SAX-WebServerSecurityGroup with following permissions:
Inbound permission:

Outbound permission:

SAX-SAXEMR-SecurityGroup with following permissions:
Inbound permission:

The source is same security group “SAX-SAXEMR-SecurityGroup”
Outbound permission:

S3 Bucket
The user requires to create a bucket for sax-metadata in the S3 account. Name it according to your organization’s naming standards. Use the same region that is used to launch Gathr EC2 node.
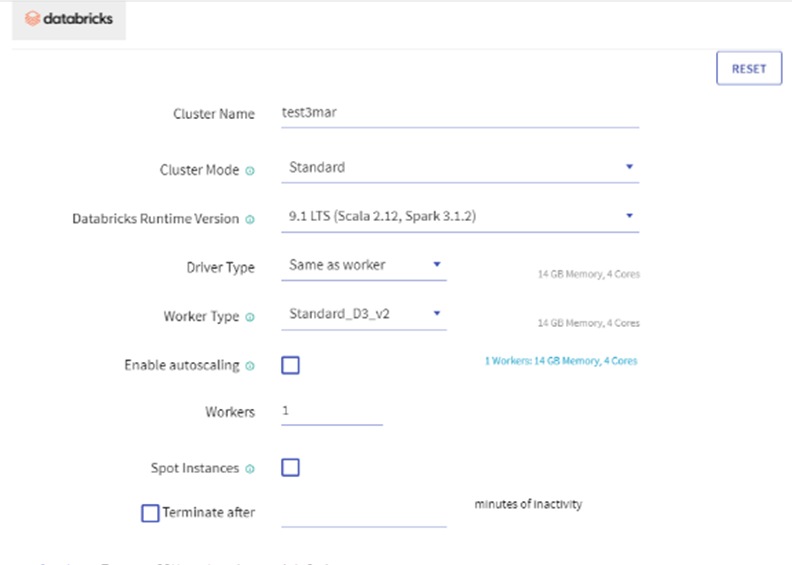
Setup Databricks (If using AWS-Databricks)
For running Gathr jobs on Databricks, the user must have Databricks Enterprise account subscription. Launch EC2 Instance using Databricks VPC and Databricks Public subnet, otherwise the user will be required to setup peering between Gathr Instance VPC and Databricks VPC.
Launch EC2 Instance for Gathr Webstudio
This EC2 instance will have all the required services that are essential for Gathr application to run successfully.
To launch the EC2 Instance do as follows:
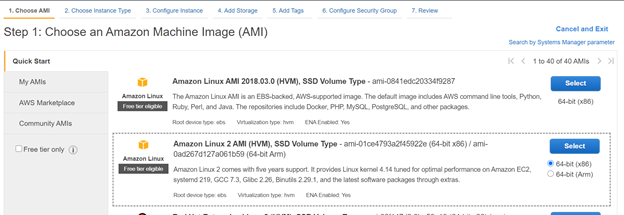
Choose an AMI
Choose Instance Type
Select instance type m5.2xlarge or larger.

Configure Instance
VPC: Select a pre-created VPC from drop down.
Subnet: Select pre-created subnet from drop down.
Auto-assign IP: enable
IAM role: Select “GathrWebstudio_EC2Role” which you have created earlier.
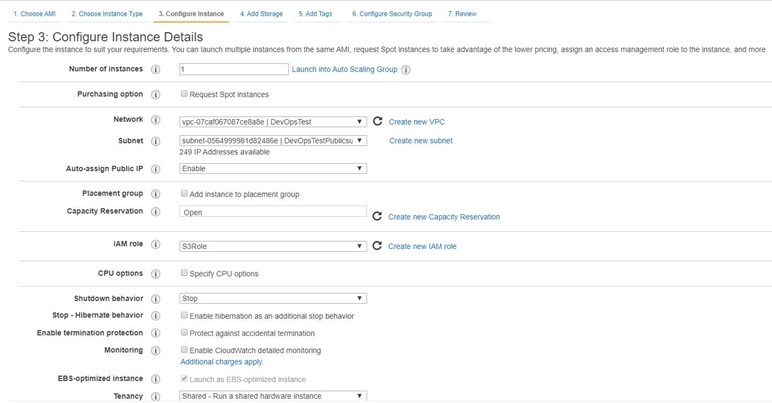
Click next on Network Interface.
On ‘Add Storage’ provide 100 GB storage.

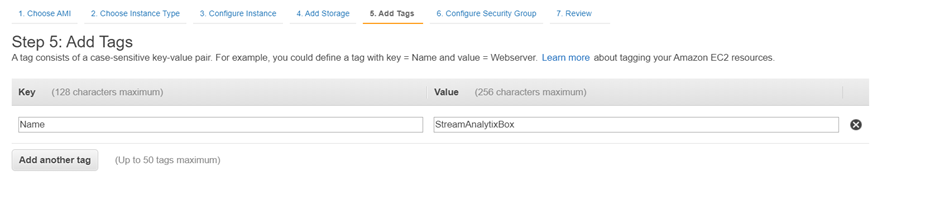
On ‘Add Tags’ provide Name to the EC2 instance.
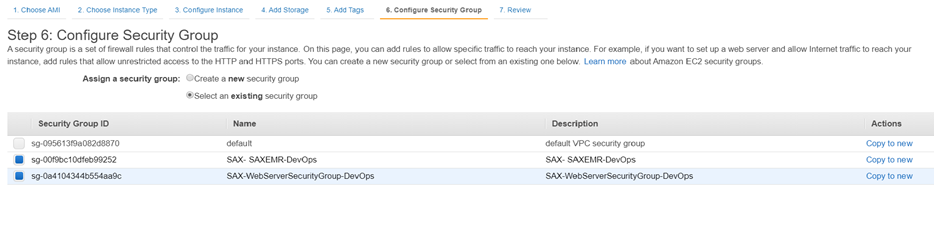
On ‘Configure Security Group’ page Select previously created security group i.e. ‘SAX-WebServerSecurityGroup’ and ‘SAX-SAXEMR-SecurityGroup’.
Review settings and Launch instance by providing the PEM file.
Associate Elastic IP address (Optional)
Please select ’eth0’ as network interface and select Private IP of the instance.
Once the EC2 instance is up and running, continue from Section 4 to start setting up Gathr.
Install Software
This section describes the steps that user should take to install the prerequisite software on the Virtual Machine that has been launched on Cloud.
ssh into Gathr VM to continue with the following steps.
Install Java 8
Install Java 8:
yum install java-1.8.0-openjdk
yum install java-1.8.0-openjdk-devel
Set java home in. bashrc
Get Java Home path by running the following command:
alternatives --config java/usr/lib/jvm/java-1.8.0-openjdk-1.8.0.322.b06-1.el7\_9.x86\_64/jre/bin/java export JAVA\_HOME=/usr/lib/jvm/ java-1.8.0-openjdk-1.8.0.322.b06-1.el7\_9.x86\_64 export PATH=$JAVA\_HOME/bin:$PATH
Install RabbitMQ
This is an optional component. However, it is important for pipeline error handling in Gathr.
Install this package before installing RMQ:
yum -y install epel-release
yum -y install erlang socat
Download the package:
wget https://www.rabbitmq.com/releases/rabbitmq-server/v3.6.10/rabbitmq-server-3.6.10-1.el7.noarch.rpm
rpm --import https://www.rabbitmq.com/rabbitmq-release-signing-key.asc
rpm -Uvh rabbitmq-server-3.6.10-1.el7.noarch.rpm
Start using the below command:
systemctl start rabbitmq-serverEnable it with the below command:
systemctl enable rabbitmq-serverTo check the status, use the below command:
systemctl status rabbitmq-serverEnable the plugins with the below command:
sudo rabbitmq-plugins enable rabbitmq\_managementTo create a test user, provide the below command:
rabbitmqctl add\_user test test
rabbitmqctl set\_user\_tags test administrator
rabbitmqctl set\_permissions -p / test ".\*" ".\*" ".\*"
Install Zookeeper
Install Zookeeper 3.5.7 as follows:
Copy the zookeeper tar file either from
sax\_bundle.Extract it:
tar -zxvf apache-zookeeper-3.5.7-bin.tar.gzCreate
datadirinside zk installation directory.Open
/zookeeper-3.5.7/confandcpzoo\_sample.cfgzoo.cfgandedit zoo.cfg.Set the IP and Port in
zoo.cfgfile: server.1=IP:2888:3888.Start the zookeeper from
/zookeeper-3.5.7/binwith./zkServer.sh start.
Install Postgres 10
Install Postgres 10 as follows:
Install Postgres repo as a root user into the system:
rpm -Uvh https://yum.postgresql.org/10/redhat/rhel-7-x86\_64/pgdg-centos10-10-2.noarch.rpmInstall Postgresql10:
yum install postgresql10-server postgresql10Initialize PGDATA:
/usr/pgsql-10/bin/postgresql-10-setup initdb
And start the postgres: systemctl start postgresql-10.service
Login into Postgres:
su - postgres -c "psql"Change the Postgres password:
postgres=# \password postgres
Settings for PostgreSQL
Login as a postgres user:
su - postgres.
cd /10/data and edit the pg\_hba.conf.
Add the IP’s in IP4 to allow the permission:
host all all 0.0.0.0/0 md5
host replication postgres 10.1.2.0/24 md5
Edit the
postgresql.confand replace listen_address from localhost to *.listen\_addresses = '\*'Restart the Postgres:
systemctl restart postgresql-10.service
Install ElasticSearch 6.4.1
This is an optional component. However, it is important as it is used for monitoring Gathr pipelines.
Install ElasticSearch 6.4.1 as follows:
Copy Elasticsearch from Gathr_bundle.
Extract the bundle.
Open /elasticsearch-6.4.1/conf/elasticsearch.yaml and make these changes:
cluster.name: ES641
node.name: IP of the machine
path.data: /tmp/data
path.logs: /tmp/logs
network.host: IP of the machine
http.port: 9200
discovery.zen.ping.unicast.hosts: ["IP"]
Settings for Elasticsearch
Make sure to increase the max file descriptors [4096] for Elasticsearch process to at least [65536] as follows:Add the line given below in /etc/security/limits.conf
sax soft nofile 65536 sax hard nofile 65536 sax memlock unlimitedSax is the user from which you are starting Elasticsearch.Make sure to increase the max virtual memory areas vm.max\_map\_count [65530] to at least [262144]Run the following command:
sudo sysctl -w vm.max\_map\_count=262144Start Elasticsearch in the background:
nohup ./elasticsearch &
Install Gathr
Install and run in embedded mode
Copy the Gathr tar file from the Gathr_bundle to the Virtual Machine.
Extract the tar.
Run this command to start Gathr in embedded mode:
cd bin ./startServicesServer.sh -deployment.mode=embeddedLogs are located in < GathrInstallationDir >/logs and < GathrInstallationDir >/server/tomcat/logs directories.User can check the log files in these directories for any issues during the installation process.
To open Gathr, http://<Public_IP>:8090/Gathr.
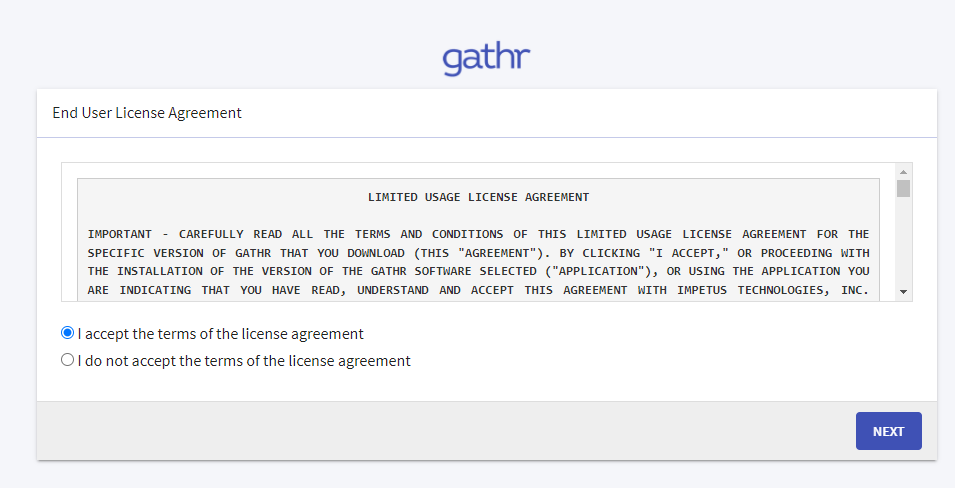
Accept the End User License Agreement and click on the Next button.
The Upload License page opens.
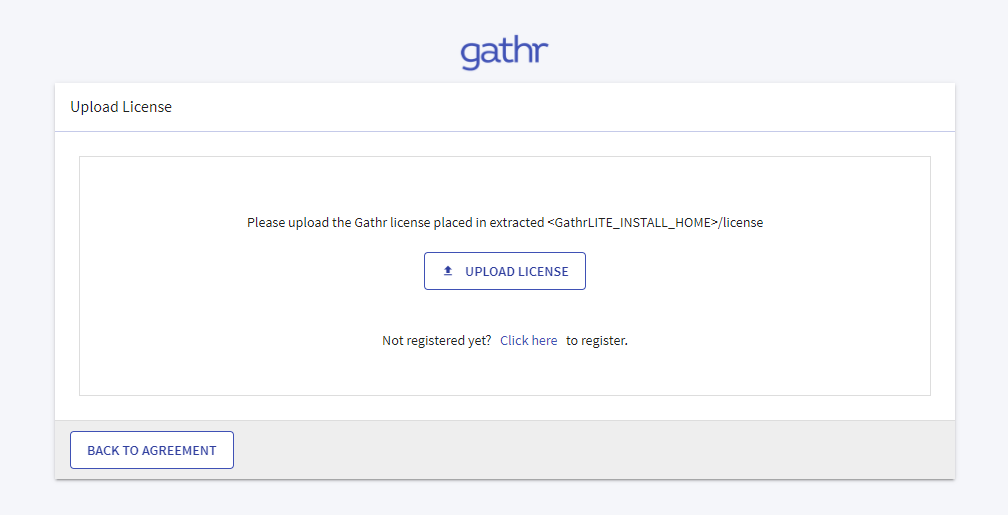
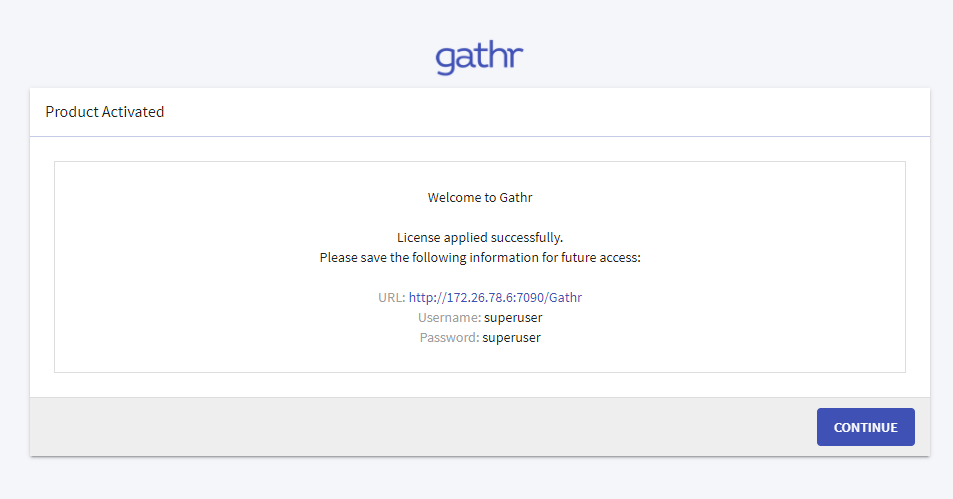
Upload the license and confirm.
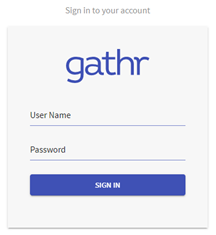
Login page is displayed.
 Now the user will need to switch Gathr from embedded to cluster mode.
Follow the sections given below to switch Gathr from embedded to cluster mode.
Login to Gathr using the default username & password.

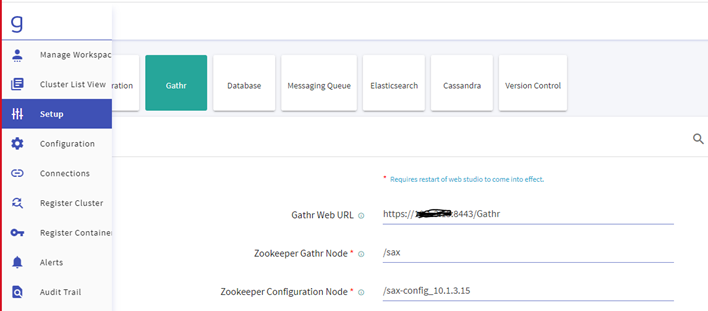
Navigate to the Setup » Gathr and update the below details:
Gathr Web URL
Zookeeper Gathr Node
Zookeeper Configuration Node
Navigate to the Setup » Database and update the below details:
Connection URL
User
Password
Run Script
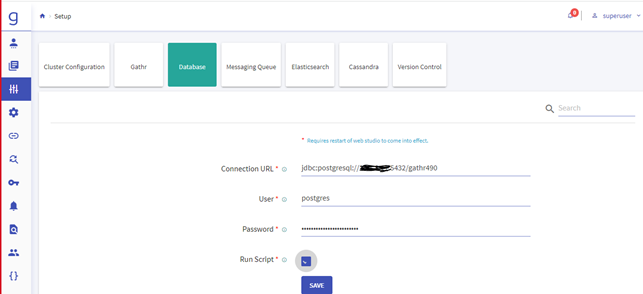 Please check the Run Script and click on Save it will execute the DDL & DML in Gathr Metastore.
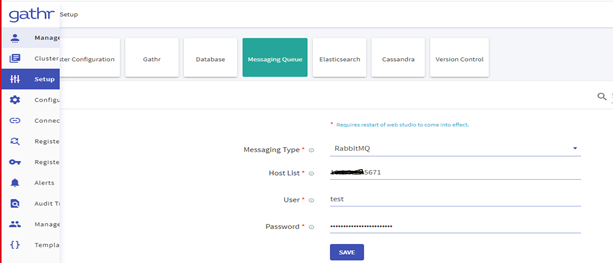
Navigate to the Setup » Messaging Queue and update the below details:
Messaging Type
Host List
User
Password
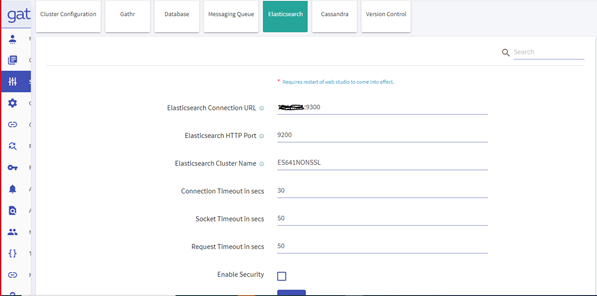
Navigate to the Setup » Elasticsearch and update the below details:
Elasticsearch Connection URL
Elasticsearch Cluster Name
Zookeeper Configuration
Update the Zookeeper properties in Gathr Configuration with the below-mentioned path:
<Gathr\_install\_dir>/conf/yaml/
Update Zookeeper property in the file env-config.yaml:

Update the Zookeeper properties in Gathr Configuration with the below-mentioned path:
<Gathr\_install\_dir>/conf/
Update Zookeeper property in the file config.properties:

After updating the details, restart Gathr with -config.reload=true.

Cloud Vendor War
Copy Cloud Vendor specific war
Copy Cloud Vendor specific war file into tomcat.
For AWS
cp <Gathrinstallationlocation>/lib/emrservice.war <Gathrinstallationlocation>/server/tomcat/webapps/
For AWS-Databricks
cp <Gathrinstallationlocation>/lib/clusterMediator.war <Gathrinstallationlocation>/server/tomcat/webapps/
The war will get extracted in server/tomcat/webapps. Now stop tomcat and configure application files.
For AWS
cd <Gathrinstallationlocation>/bin
./stopServicesServer.sh
update <Gathrinstallationlocation>/server/tomcat/webapps/emrservice/WEB-INF/classes/application.properties file
spring.datasource.url=jdbc:postgresql://<GathrPrivateIP>:5432/DBNAME
spring.datasource.username=username
spring.datasource.password=password
spring.datasource.driver-class-name=org.postgresql.Driver
For AWS-Databricks
cd <Gathrinstallationlocation>/bin
./stopServicesServer.sh

update <Gathr installation location>/server/tomcat/webapps/cluster-mediator /WEB-INF/classes/application.properties file

spring.datasource.url=jdbc:postgresql://<GathrPrivateIP>:5432/DBNAME
spring.datasource.username=username
spring.datasource.password=password
spring.datasource.driver-class-name=org.postgresql.Driver
Configure Cloud Vendor specific details in yaml
Copy Cloud Vendor specific war file into tomcat
For AWS
Configure AWS details in Yaml.
Open config.yaml file from File: (<GathrInstallationDir>/Gathr /conf/yaml/env-config.yaml)
and append the content given below:
emr:
instance.url: "http://<GathrPrivateIP>:8090/emrservice"
s3.jar.upoadPath: "s3://sax-metadata"
s3.log.uri: "s3://sax-metadata"
isEnabled: "true"
region: "us-west-2"
aws s3 cp <Gathrinstallationlocation>/lib/spark-structured-sax-pipeline.jar s3://sax-metaData/
aws s3 cp $SAX\_BUNDLE/init-scripts.sh s3://sax-metaData/
Copy jar & init-scripts on s3
For AWS Databricks
Configure Databricks details in yaml
File: (<Gathrinstallationlocation >/Gathr/conf/yaml/env-config.yaml)
Databricks
dbfs.jar.uploadPath: "/sax-databricks-jars "
mediator.address: "http://<GathrPrivateIP>:8090/cluster-mediator/"
isEnabled: "true"
authToken: "<authtoken>"
instanceUrl: "https://<databricks-instance-url>"
Copy jar & init-scripts on DBFS:
curl 'https://<databricks-instance>/api/2.0/dbfs/put' -H "Authorization: Bearer <personal-access-token-value>" -F contents=@<Gathr installation location>/lib/spark-structured-sax-pipeline.jar -F path="<sax metadata on dbfs path>/spark-structured-sax-pipeline.jar"

curl 'https://<databricks-instance>/api/2.0/dbfs/put' -H "Authorization: Bearer <personal-access-token-value>" -F contents=@$SAX\_BUNDLE/init-scripts.sh -F path="<sax metadata on dbfs path>/init-scripts.sh"
Restart Gathr in Cluster Mode and upload license:
cd <Gathrinstallationlocation>/bin
./startServicesServer.sh -config.reload=true
Basic Sanity
After login with default user (superuser), below steps need to be checked:
Validate Default connections.
Validate Cluster List View and cluster creation.
Validate the workspace and project creation.
Associate token with the created user.
Go to Manage Users, select user for which we need to associate token.

Click on edit icon.
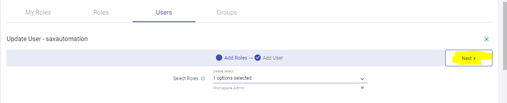
Click on the next button.
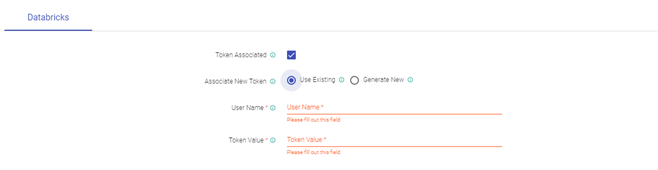
Now, below Databricks section, tick on Token Associated Checkbox and select use existing.
Enter Azure account mail as Username and the Token inside these boxes.
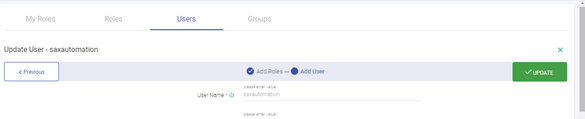
After entering this click on Update Button at right.
Now, logout and login as the workspace user you created. Now the user should also see the Cluster List View.
Create a sample pipeline.
Go to workspace -> project -> pipeline.
Start a local session and configure a basic pipeline. (e.g. DG->RMQ).
Save and exit.
Configure job for the pipeline.
Select either an existing cluster or a new cluster to run this pipeline.

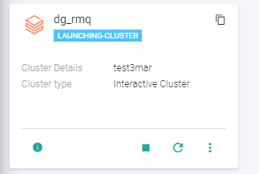
After cluster launch, the pipeline will come in STARTING state then ACTIVE state.
For logs, we can check in Databricks instance URL under Jobs:
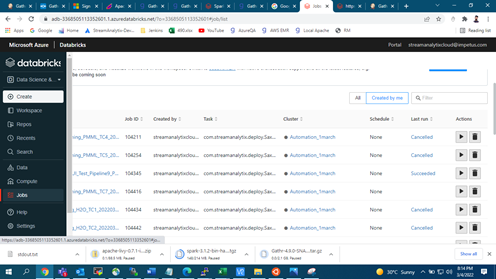
Select your pipeline name for checking any logs.
After the pipeline stops, check the data at the emitter.
Steps to Restart Gathr
In case there are any updates to be done in configurations, you can restart Gathr by providing the below commands:
./startServicesServer.sh -config.reload=true
./stopServicesServer.sh
Steps to Uninstall Gathr
Stop/Kill the Bootstrap Process.
Delete Gathr installation directory and its dependencies (like RMQ, ZK etc)
Delete the Gathr database.
If you have any feedback on Gathr documentation, please email us!