Pipeline Listing Page
If you are a new user and haven’t yet created a pipeline, then the Pipeline page displays an introductory screen. Click the Create a Pipeline button at top right side of the screen.
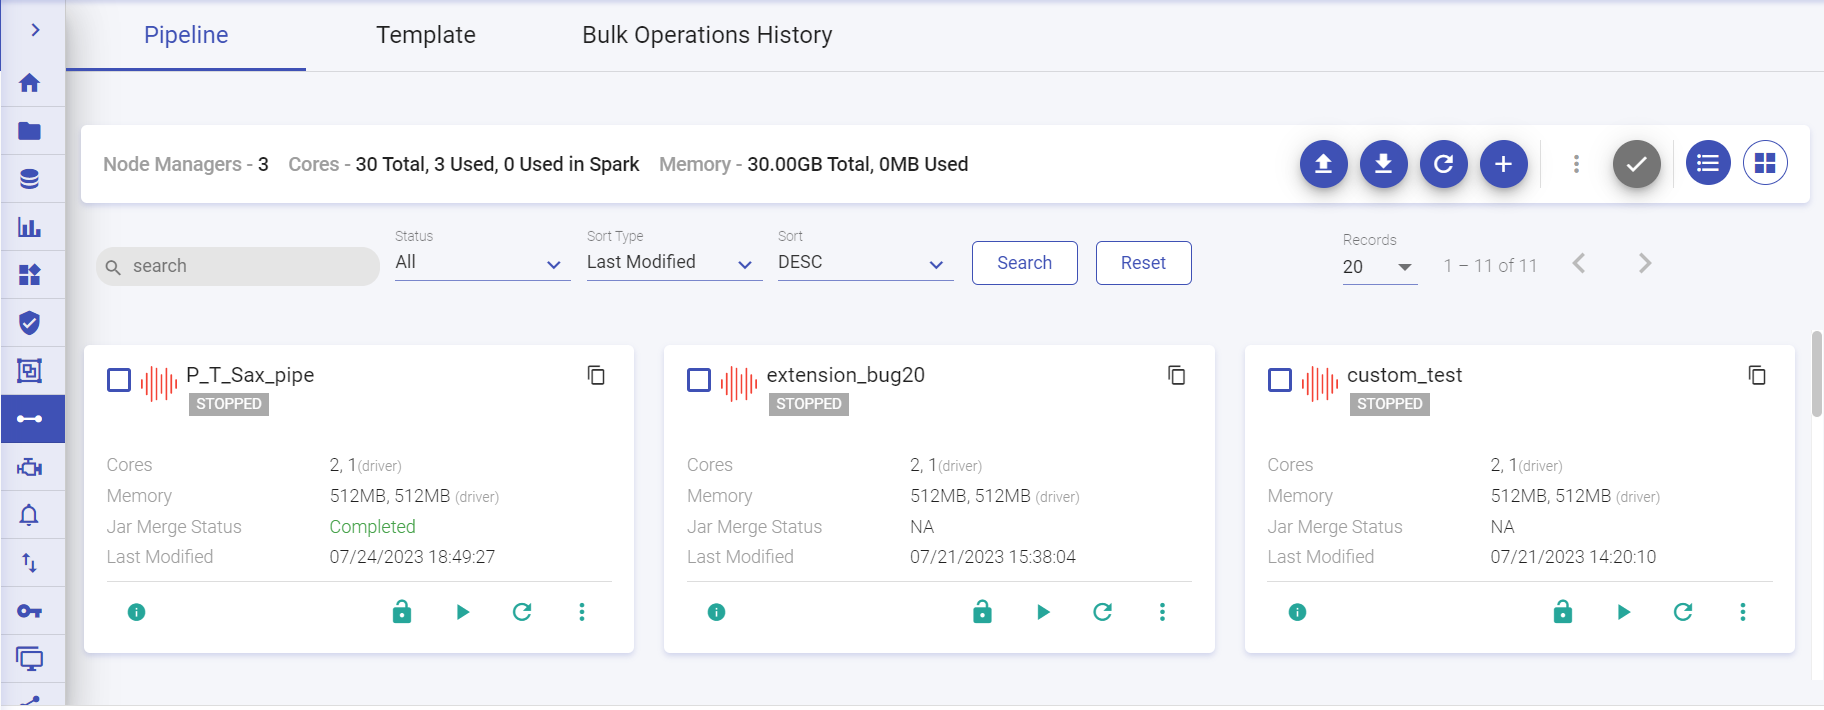
If you have already created pipelines, then the Pipeline listing page displays all the existing pipelines.
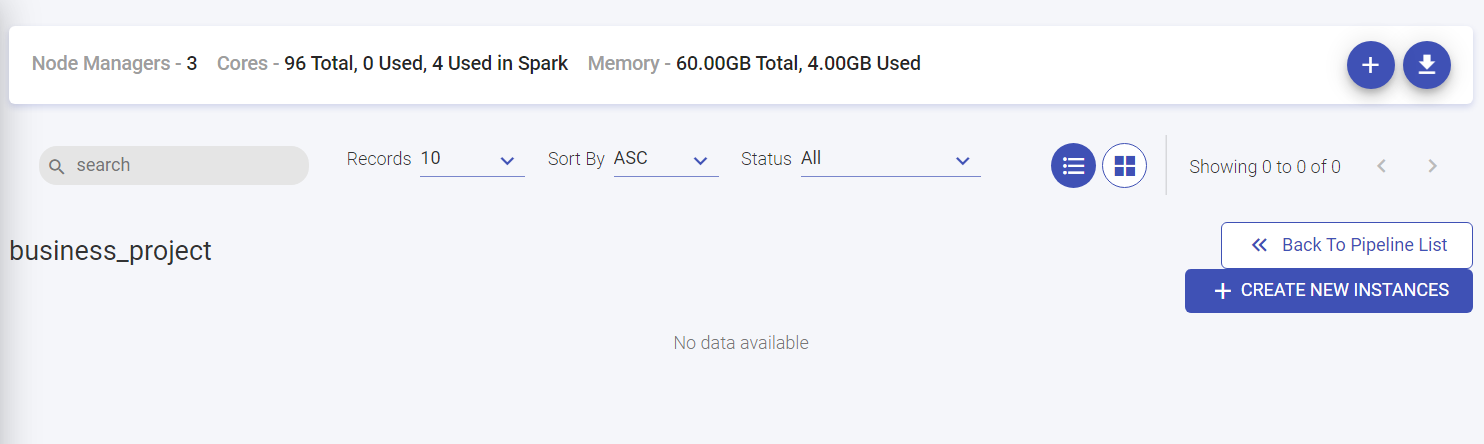
The Pipeline listing page displays Node Managers, Cores and Memory utilized.
Here, Node manager is the count of node through which the cluster is formed, cores reflect the number of cores used in workspaces/project and memory used by project/across workspace.
Next to these are the buttons to Upload Pipeline, Download Sample Project, Refresh Data, Create New Pipeline, Bulk Actions (enabled once the pipeline(s) are selected by checking the checkbox on the particular pipeline tile), Select all for bulk actions (Click to select all pipelines to execute bulk actions), List View and Grid View.
You can create a new pipeline, download sample project and upload a pipeline from your local system.
The listing page has the option to easily search and navigate to the pipeline by the below search options:
You can search the pipeline directly by providing the name of the pipeline in the search bar and click enter.
Alternatively, you can search the pipelines by using the Status search bar. Click the drop-down and select one of the available options: All, Active, Error, Starting, Stopped.
You can also search the pipelines using the Sort Type search bar. click the drop-down and select one of the available options: Last Modified, Name.
You can use the Sort search bar and click the drop-down to select one of the options: ASC or DESC.
The pipeline records can be search upto 500 pages from the Records drop-down option. Arrow button options are available to navigate to previous page and next page respectively.
Bulk Actions
Multiple pipelines can be started, stopped/deleted using bulk operations functionality in Gathr.
You can bulk Start the selected pipeline. Click on the pipeline(s) tile checkbox (top left). Select the Bulk Actions ellipses option available on the pipeline listing page (top-right). Options available are:
Bulk Start
Option to start all the selected pipelines. You can Bulk Start the selected pipeline by clicking on the pipeline(s) tile checkbox (top left).
Bulk Stop
Option to stop all the selected pipelines. You can Bulk Stop the selected pipeline by clicking on the pipeline(s) tile checkbox (top left).
Bulk Delete
Option to delete all the selected pipelines. You can bulk Delete the selected pipeline by clicking on the pipeline(s) tile checkbox (top left). The delete option will not work if pipeline is in active state and used in a Workflow.
You also have an option to select/de-select all for bulk actions next to ellipses option for Bulk Actions.
All the pipeline are listed.
You can navigate to Templates listing page by clicking at the Template tab.
Template are the pipelines in which user can add variables and parameters. Instance(s) are created within the template once these value(s)/parameters are added. To know more, see Templates Introduction →
| Name | Description |
|---|---|
| Pipeline | All the data pipelines fall under this category. |
| Template | Template are the pipelines in which user can add variables and parameters. Instance(s) are created within the template once these value(s)/parameters are added. |
Actions for Pipelines | Create a new pipeline, integrate pipelines, audit the pipelines, clone, download a sample project, deploy on clusters and upload a pipeline from the same or different workspace. |
| Databricks | When a pipeline is deployed on Databricks. |
| Amazon EMR | When a pipeline is deployed on Amazon EMR. |
The Pipeline listing page will display all the batch and streaming data pipeline tiles. User can create a pipeline, download sample project and upload pipeline from options available at the top right of the listing page.
For AWS, the pipelines can be deployed on Databricks and EMR.
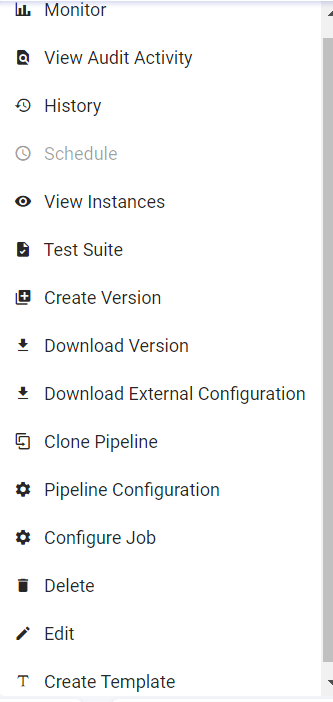
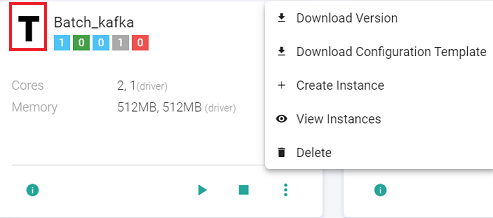
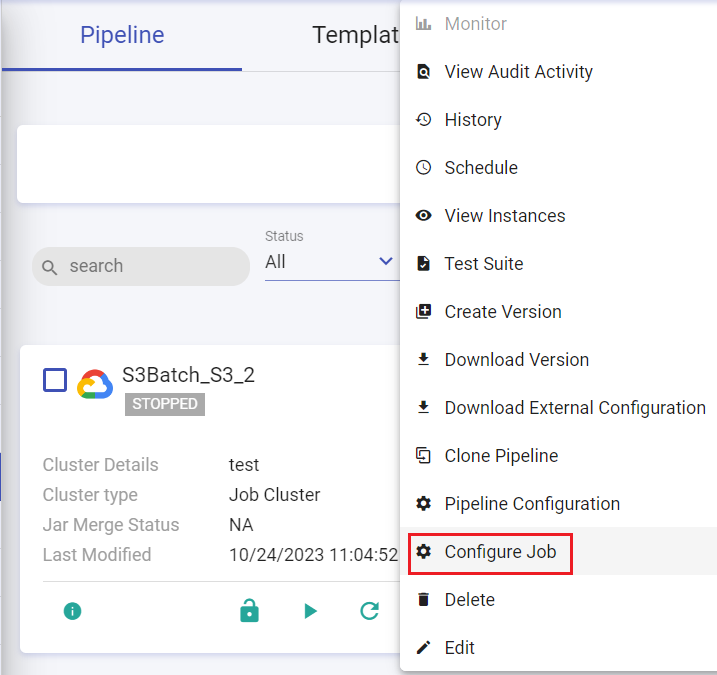
The below image shows actions that can be performed on the pipeline upon clicking the pipeline tile ellipses.
| Name | Description |
|---|---|
| Monitor | Option to monitor the Error Metrics (error/minute) and Error Search results. |
| View Audit Activity | Option to view/search the Pipeline Auditing. |
| History | Option to view the Pipeline History details and statistical summary. |
| Schedule | Option to schedule a pipeline. Available options are: Normal Scheduler and Cron Scheduler. |
| View Instances | Option to View Instances of the pipeline. You can also create new instances. |
| Test Suite | Option to run test suite. |
| Create Version | Option to create version of the pipeline. |
| Download Version | Option to download the version of pipeline. |
| Download External Configuration | Option to download external configuration of the pipeline locally. |
| Clone Pipeline | Option to clone pipeline. |
| Pipeline Configuration | Option to configure the data pipeline. You can configure definition of pipeline and further provide property details. You can also provide details of Channels and Processors under the Schema Change Alert tabs respectively. |
| Configure Job | Option to configure the job. |
| Delete | Option to delete the existing pipeline. |
| Edit | Option to edit the existing pipeline. |
| Create Template | Option to create a new template of the existing pipeline. |
Within the Data Pipeline, user can perform the following actions:
Design, Import and Export real-time data pipeline.
Deploy pipelines on AWS Cloud platform.
Deploy pipelines on either Cloud vendor-Databricks or Amazon EMR.
Drag, drop and connect operators to create applications.
Create Datasets and reuse them in different pipelines.
Create Models from the analytics operators.
Monitor detailed metrics of each task and instance.
Run PMML-based scripts in real-time on every incoming message.
Explore real-time data using interactive charts and dashboards.
There could be a business scenario where the pipeline design remains the same for multiple pipelines, yet the configurations differ.
For an e.g. A user has 3 different Kafka topics containing similar data that needs to go through same kind of processing (Kafka –> Filter –> ExpressionEvaluator –> HDFS). Normally, a user would create two clones of the same pipeline and edit the configuration.
The easier way of doing this is now user can create a pipeline template that comprises of the pipeline structure and multiple instances which only differ in configuration and inherit the pipeline structure of the pipeline template.
Download Configuration Template
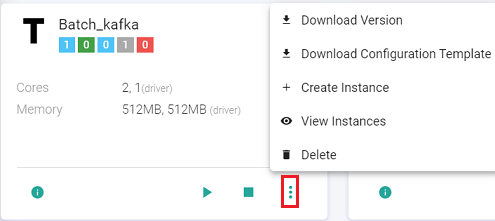
The user can use the Download Configuration Template option to download a json file that contains all the component configurations used in a data pipeline. This will be used to create an instance.
Create Instance
The user will modify the downloaded json file using ‘Download Configuration Template’ option to apply configuration changes for his first instance. For eg. The user changes the topic name in the Kafka channel and saves the modified json file.
The user can create the first instance by clicking the ellipses of the pipeline tile and click View Instance.
On clicking ‘View Instance’ a page opens where user can create an instance by providing instance name and provide configuration used for pipeline instance creation. Provide a name and paste the content of the modified json file that has the amended Kafka topic name.
Click on ‘CREATE’ button to create instance or optionally ‘CREATE & LAUNCH’ to create and launch the instance.
The user can create a template in the data pipeline listing page. Thus, a template can have multiple pipeline instances running using the same set of components and different configurations.
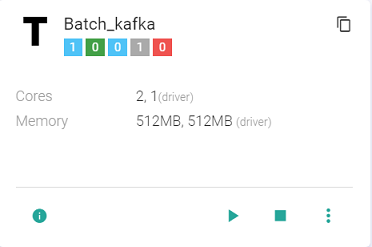
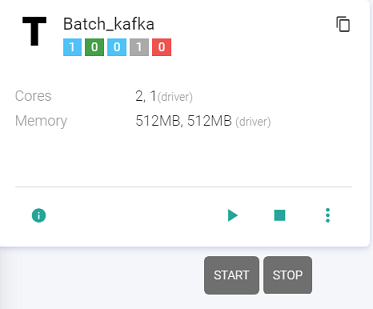
-T stands for Template.
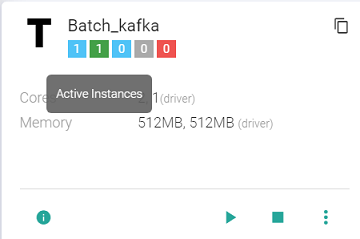
-The Template tile shows following details: Total Instances, Active Instances, Starting Instances, Stopped Instances, Instances in Error.
The user can create further instances and view existing instances as well:

The user can delete the instance. The user cannot delete a template if instances exist. To delete a template, all instances should be deleted first.
Start/Stop Template
The user can Start/Stop the template by clicking at the Start/Stop button available at the template. All the instances must be deleted to delete the template.
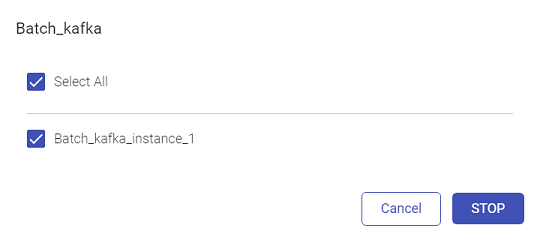
Once the user selects Start, the user will be required to select the instance(s):
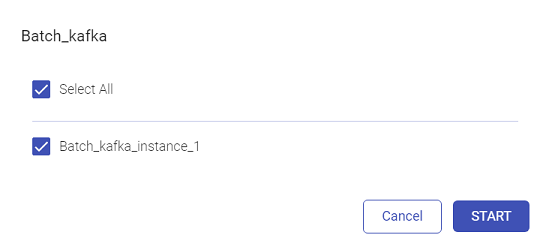
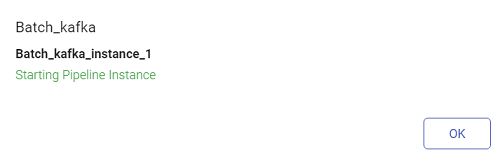
Click Start.
Likewise, to stop the instances, click Stop.
Configure Job
Upon clicking the ellipses of pipeline tile, you can configure job by clicking on the Configure Job option. To configure a job for IBM Spectrum Conductor, below options are provided:
| Name | Description |
|---|---|
| Select Cluster | Select IBM Conductor cluster for job configuration. |
| Instance Group Name | Select Instance Group to configure spark job. |
| Spark Master Url | Master URL to submit or view spark job. |
SPARK CONDUCTOR EGO PROPERTIES
IBM Conductor EGO Configuration
| Name | Description |
|---|---|
| Executor Maximum Slots | Maximum number of executor slots. Default value is 2. |
| Executor Idle Time | Specifies the duration (in seconds) for executor state to remain alive without any workload running on it. Default value is 60. |
| Maximum Slots | Specifies maximum number of slots that an application can get in master node. Default value is 2. |
| Slots Per Task | Specifies number of slots that are allocated to a task. Default value is 1. |
| GPU Max Slots | Specifes maximum number of slots that an application can get for GPU task in a master node. |
| Priority | Specifies the priority of driver and executor scheduling for spark instance group. Valid range is 1-10000. Default value is 5000. |
To add EGO Environment Variable, click the ADD ENVIRONMENT VARIABLE button.
Option to ADD CONFIGURATIONS is also available.
Example, any extra environment and spark job configuration attributes could be provided in these ( examples spark.ego.master.ui.retained.executor.num=500 or spark.ego.submit.file.replication=10 , Default value is the value of dfs.replication in Hadoop core-site.xml ) and Gathr manages these values while submitting job on IBM conductor Instance Group of selected cluster.
Click CONFIRM once details are provided in the Configure Job window.
Configure GCP cluster in data pipeline
You can attach the GCP cluster in your data pipeline for its smooth execution. You can choose either existing long running cluster or a new job cluster for executing pipeline.
Click the Ellipses of the pipeline tile on the pipeline listing page and select Configure Job option.
There are two tabs on the Configure Job window. ie., Cluster and Deployment.
The below options are available under the Cluster tab:
| Name | Description |
|---|---|
| Cluster Type | Option to choose New Cluster option from the dropdown to launch a cluster tha will get terminated once the job is completed. Option to choose Long Running cluster to launch a cluster that will remain running even after pipeline is stopped. |
| Cluster Name | Provide a unique name for the cluster if New Cluster option is selected from Cluster Type. |
| Select Cluster | Choose a long running cluster from the drop-down list if Long Running Cluster option is selected as Cluster Type. |
| Cluster Type | Displays the choosen cluster type. i.e., Standard, Single Node or High Availability. |
| Region | Specifies the cloud dataproc regional service that determines the zones and resources that are available. |
| Zone | Determines the available computing resources and where your data is stored and used. |
| Primary Network | Select the default network or any VPC network created in this project for your cluster to use. |
| Sub Network | Includes the sub networks available in the Compute Engine region you selected for this cluster. |
| Security Configuration | Security Configuration for the cluster. |
| Auto Scaling Policy | Automates cluster resource management based on the auto scaling policy. |
| Scheduled Deletion | Option to schedule deletion. You can delete on a fixed time schedule or delete after cluster idle time period without submitted jobs. The chosen option is displayed here. |
| Internal IP Only | Configure all instances to have only internal IP addresses. |
| Shielded VM | Turn on all the settings for the most secure configuration. Available options are: Enable Secure Boot, Enable vTPM, Enable Integrity Monitoring. |
Software Configuration
| Field | Description |
|---|---|
| Image Version | Cloud Dataproc uses versioned images to bundle the operating system, big data components and Google Cloud Platform connectors into one package that is deployed on your cluster. |
| Enable Component Gateway | Option to provide access to web interfaces of default & selected optional components on the cluster. |
| Optional Components | Select additional component(s). |
| Enter Configuration | Option to provide cluster properties. The existing properties can also be modified. |
Labels
| Field | Description |
|---|---|
| Add Label | Option to add labels. |
Master Nodes
| Field | Description |
|---|---|
| Machine Types | Select GCP machine type from the master node. Available options are: Compute Optimized, Memory Optimized, Accelerator Optimized, General Purpose. |
| Series | Select Series for your Master Node. |
| Instance Type | The maximum number of nodes is determined by your quota and the number of SSDs attached to each node. |
| Primary Disk | The primary disk contains the boot volume, system libraries, HDFS NameNode metadata. |
| Local SSD | Each Solid State Disk provides 375 GB of fast local storage. If one or more SSDs are attached, the HDFS data blocks abd local execution directories are spread across these disks. HDFS does not run on preemptible nodes. |
Worker Nodes
| Field | Description |
|---|---|
| Machine Types | Select GCP machine type from the master node. Available options are: Compute Optimized, Memory Optimized, Accelerator Optimized, General Purpose. |
| Series | Select Series for your Worker Node. |
| Instance Type | The maximum number of nodes is determined by your quota and the number of SSDs attached to each node. |
| Primary Disk | The primary disk contains the boot volume, system libraries, HDFS NameNode metadata. |
| Local SSD | Each Solid State Disk provides 375 GB of fast local storage. If one or more SSDs are attached, the HDFS data blocks and local execution directories are spread across these disks. HDFS does not run on preemptible nodes. |
Secondary Worker Nodes
| Field | Description |
|---|---|
| Instance Count | The maximum number of nodes is determined by your quota and the number of SSDs attached to each node. |
| Preemptibility | Spot and preemptible VMs cost less, but can be terminated at any time due to system demands. |
| Primary Disk | The primary disk contains the boot volume, system libraries, HDFS NameNode metadata. |
| Local SSD | Each Solid State Disk provides 375 GB of fast local storage. If one or more SSDs are attached, the HDFS data blocks and local execution directories are spread across these disks. HDFS does not run on preemptible nodes. |
Initialization Actions
| Field | Description |
|---|---|
| GCS File Path | Provide the GCS file path. |
Click CONFIRM button.
Under the Deployment tab, the below options are available:
| Name | Description |
|---|---|
| Deployment Mode | Options available are: Cluster and Client. |
| Yarn Queue | Option to provide the GCP yarn queue. |
| Driver Cores | Provide the number of driver cores. |
| Driver Memory | Provide driver memory details. |
| Executor Instances | Provide GCP executor instances. |
| Executor Cores | Provide the GCP executor cores. |
| Executor Memory | Provide GCP executor memory details. |
| Extra Driver Java Options | Provide details of Extra Driver Java Options. |
| Extra Executor Java Options | Provide details of Extra Executor Java Options. |
| Extra Spark Submit Options | Provide details of Extra Spark Submit Options. |
Click CONFIRM button.
If you have any feedback on Gathr documentation, please email us!