Elasticsearch Emitter
Elasticsearch emitter allows you to store data in Elasticsearch indexes.
Elasticsearch Emitter Configuration
To add an Elasticsearch emitter to your pipeline, drag the emitter onto the canvas and connect it to a Data Source or processor. The configuration settings are as follows:
| Field | Description |
|---|---|
| Connection Name | All Elasticsearch connections will be listed here.Select a connection for connecting to Elasticsearch. |
| Output Message | Output message which is to be indexed. |
| Index Nested JSON | Select the checkbox if nested JSON fields are to be indexed. If the checkbox is not selected, three additional fields are populated: Index Number of Shards, Index Replication Factor and Output Fields. If selected, these three fields will be hidden and following note be displayed. “Index will be created with ElasticSearch default 5 shards and 1 replication factor.” If this checkbox is selected, you can use curly brackets to avail schema fields in the Index name. |
| Index Number of Shards | Number of shards to be created in Index Store. |
| Index Replication Factor | Number of additional copies of data. |
| Index Name | Index name can also be created using the document/data field like emp_{document_field}. Here{document_field} will be replaced during runtime by the value of document field of that particular record. Index name should be in lower case and follow naming conventions of Elasticsearch. Specify the index name where data is to be indexed. Verify dynamic index creation works only when below condition is fulfilled. 1. Index Nested JSON check box should be selected on ES emitter. 2. Action.auto_create_index: true should be set in Elasticsearch cluster. 3. The field data should always be in lower case otherwise pipeline would fail. |
| Index Type | Index Type could be either Static or Dynamic. Example of Dynamic Index Type: Index type can also be created using the document/data field like emp_{document_field}. Here {document_field} will be replaced during runtime by the value of document field of that record. Notes: 1. Default Index type or blank index type will be index name +“_ type”. 2. Index type should follow naming conventions of elasticsearch. 3. Make sure that in case of a static index name, index type should also be static. |
| Checkpoint Storage Location | Select the checkpointing storage location. Available options are HDFS, S3, and EFS. |
| Checkpoint Connections | Select the connection. Connections are listed corresponding to the selected storage location. |
| Checkpoint Directory | It is the path where Spark Application stores the checkpointing data. For HDFS and EFS, enter the relative path like /user/hadoop/, checkpointingDir system will add suitable prefix by itself. For S3, enter an absolute path like: S3://BucketName/checkpointingDir |
| Time-based Check Point | Select checkbox to enable timebased checkpoint on each pipeline run i.e. in each pipeline run above provided checkpoint location will be appended with current time in millis. |
| ID Field Name | Specify a name for the generated ID field. |
| ID Generator Type | Enables to generate the ID field. Following type of ID generators are available: UUID: Universally unique identifier. Field Values based: In this case, ID is generated by appending the values of selected fields. If you select this option then an additional field – “Key Fields” will be displayed, where you need to select the fields you want to combine. The fields will be appended in the same order as selected on the user interface. Custom: If ID Generator type is selected as Custom, then the below mentioned field will be available: |
| Class Name | If ID Generator Type is selected as Custom then you will be required to provide the class name details. |
Steps to generate the Class name
- Navigate to the Pipeline listing page from the left menu bar and download a sample project file in your local system.

Unzip the downloaded folder & open the project in an IDE of your choice.
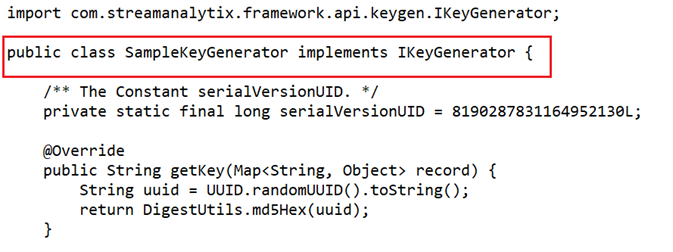
Navigate to the SampleKeyGenerator.java file by entering src folder> main> java> com> yourcompany > custom > ss> keygen.
Implement the custom key generator logic (user can rename the package & class name).
Compile the maven project.
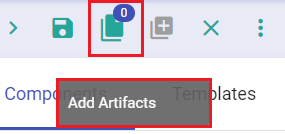
Upload the compiled jar in gathr pipeline. To upload the compiled jar, enter the pipeline canvas where you are creating your pipeline. Click the ADD Artifacts button available at the top right of the canvas.
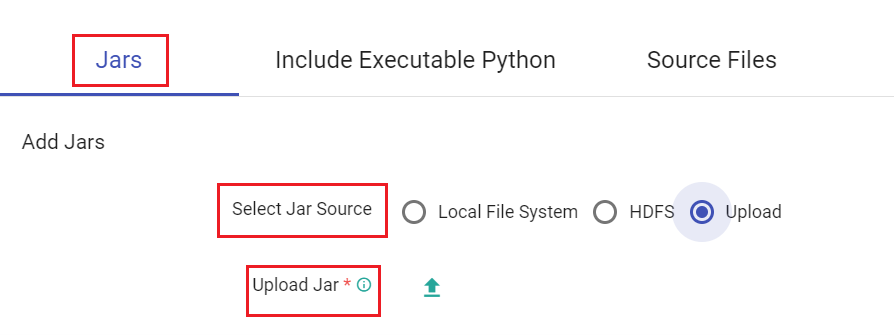
You can ADD Jar through Local File System, HDFS or Upload options available. Select Upload option and upload the jar file.
- Enter the fully classified class name in Class name. eg - com.yourcompany.custom.ss.keygen.SampleKeyGenerator
Further fields of ElasticSearch configuration that are available are mentioned below:
| Field | Description |
|---|---|
| Emitter Output Fields | Output fields of the emitter. |
| Connection Retries | Number of retries for component connection. Possible values are -1, 0 or positive number. -1 denotes infinite retries. |
| Output Mode | Output mode to be used while writing the data to Streaming sink. Append: Output Mode in which only the new rows in the streaming data will be written to the sink. Complete Mode: Output Mode in which all the rows in the streaming data will be written to the sink every time there are some updates. Update Mode: Output Mode in which only the rows that were updated in the streaming data will be written to the sink every time there are some updates. |
| Enable Trigger | Trigger defines how frequently a streaming query should be executed. |
| Processing Time | It will appear only when Enable Trigger checkbox is selected. Processing Time is the trigger time interval in minutes or seconds. |
| ADD CONFIGURATION | Enables additional configuration properties of Elasticsearch. |
Click on the Next button. Enter the notes in the space provided.
Click on the DONE button for saving the configuration.
If you have any feedback on Gathr documentation, please email us!