Kafka Emitter
Kafka emitter stores data to Kafka cluster. The supoorted data formats are JSON and DELIMITED.
Kafka Emitter Configuration
To add a Kafka emitter to your pipeline, drag the Kafka emitter onto the canvas and connect it to a Data Source or Processor.
The configuration settings of the Kafka emitter are mentioned below.
Connection Name
Select from the existing connections or navigate to the left menu to Connections Page to create a new Kafka connection. Once the connection is created, the same will be available to be selected here.
Topic Name Type
Topic Name Type could be either Static or Dynamic.
Static: When you select Static, field “Topic Name” is pertained as a text box. Provide a unique topic name to emit data.
Dynamic: With Dynamic, topic name will be populated with a drop down of the field names of incoming dataset. On selecting any of the field name, it will create topics based on the value of the selected field name in the topic name. (which means at runtime it will create topics dynamically using the selected field name values.)
Topic Name
Specify the name of the topic to which you want to emit or send your data.
Each piece of data sent to Kafka will be associated with a specific topic, making it easier to organize and manage data streams within your Kafka cluster.
In case of Dynamic Topic Name Type, at runtime the Kafka Emitter will take the value of the selected field as a topic name for each incoming records.
Partitions
Enter how many partitions you want the Kafka topic to be divided into.
Each partition stores messages in order, like chapters in a book, making it easier to manage and process large amounts of data.
By specifying the number of partitions for a topic, you determine how Kafka distributes and manages the data within that topic.
Replication Factor
Set the replication factor for the topic. It determines how many copies of each partition are stored across different Kafka brokers.
If set to 1, each partition will have only one copy. Increasing the replication factor improves fault tolerance, ensuring that data remains available even if some brokers fail.
For a topic with replication factor N, Advanced Kafka will tolerate up to N-1 failures without losing any messages committed to the log.
Producer Type
Determine how messages are sent to Kafka:
Async (Asynchronous): The producer sends messages in the background without waiting for a response from the Kafka broker. This means that the producer can continue to send messages without being blocked by network latency or broker responsiveness. However, there is a risk of message loss if the producer does not receive confirmation of successful delivery from the broker.
Sync (Synchronous): The producer waits for acknowledgment from the Kafka broker after sending each message. This ensures that messages are successfully delivered to Kafka before proceeding to send the next message. While synchronous sending provides stronger guarantees of message delivery, it can introduce latency and reduce overall throughput, especially when network conditions are poor or brokers are under heavy load.
Output Format
Choose the data type format in which the emitted data will be structured.
Options are:
JSON
Avro
Delimited
Select the format that best suits your use case.
Delimiter
Select the message field separator. This option appears when the output format is set to DELIMITED.
Avro Schema Source
Select the Source of Avro Schema:
Input Text Schema: Manually enter the text schema in the field, Input Schema.
Schema Registry: It allows you to enter a schema registry subject name for Avro schema, in the field, Subject Name.
Auto Generate Schema: Schema generated is automatic based on the previous incoming dataset.
Output Fields
Specify the fields in the message that should be part of the output data.
Message Key
The type of key you want to store in Kafka along with the data. It can be stored in the following types:
Field Value: This option uses the values of specific fields present in the dataset as the message key. The values of these fields are concatenated together using a delimiter (such as “#”) to form the message key. This option is useful when you want to use existing data fields as keys in Kafka.
Field Value Hash: Similar to the “Field Value” option, this option also uses the values of specific fields present in the dataset as the basis for the message key. However, instead of using the raw field values, it calculates a hash value (such as MD5 or SHA-256) of these values concatenated together using a delimiter (such as “#”). This can be useful for hiding or disguising sensitive data while still ensuring a consistent key for each message.
UUID: This option generates a universally unique identifier (UUID) to be used as the message key. UUIDs are unique across time and space, making them suitable for ensuring message uniqueness in Kafka topics. This option is often used when no natural key exists in the dataset or when strict message uniqueness is required.
Static Value: This option allows you to specify a fixed/static value to be used as the message key for all messages. This can be useful for scenarios where all messages should have the same key, such as when partitioning data by a constant value. Provide a static value to be used as a key.
None: No specific key is used for messages. In this case, Kafka will automatically assign a partition for each message based on its own partitioning strategy.
Kafka Partitioner
Determine which partition within a Kafka topic a message should be written to. Partitioning mechanisms are:
Round Robin (Default): Evenly distributes messages across partitions in a round-robin fashion.
It does not consider message content but rather assigns partitions sequentially, cycling through each partition in turn.
This option ensures a balanced distribution of messages across partitions.
Key Based: In key based partitioning, the hash of a message’s key is used to map messages to partitions.
Example:
Order ID (Key) Hash Value Partition Assigned 123 1 Partition 1 456 0 Partition 0 123 (repeated) 1 Partition 1 Here:
Order ID (Key) is the unique identifier for each order.
Hash Value is a hash function applied to the order ID by Kafka.
Partition Assigned is the partition of the “orders” topic that the message will be placed into based on the hash value.
Therefore, in the given example:
When an order with ID “123” is received, its hash value is calculated to be 1. So, it is assigned to Partition 1.
Similarly, when an order with ID “456” is received, its hash value is calculated to be 0. Therefore, it is assigned to Partition 0.
If another order with ID “123” is sent later on, Kafka remembers that its hash value is 1. Hence, it will be consistently assigned to Partition 1, ensuring that all orders with the same ID are stored together.
Select the key(s) for key based partitioner and proceed with emitter configuration.
Custom: Define your own logic for partitioning messages. You can tailor the partitioning strategy to your specific needs or business requirements.
Steps to use Custom Kafka Partitioner
1. Download Sample Project
From your Project’s menu, navigate to the Pipelines page, and download sample project.
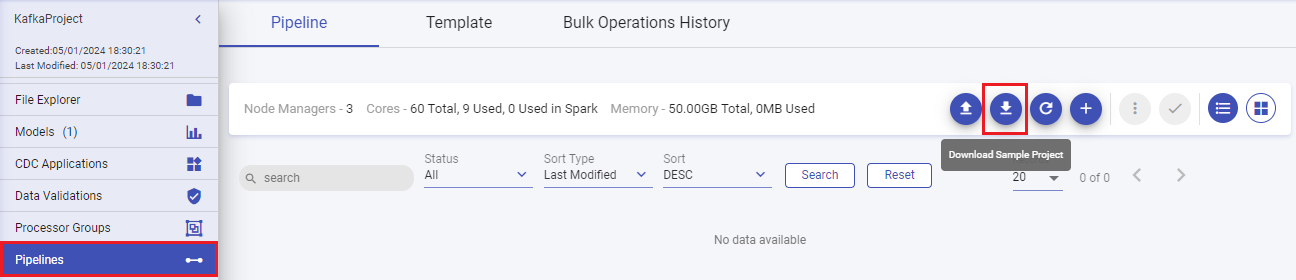
A zip file “sax-spark-ss-sample.zip” gets downloaded.
Unzip the file and navigate to the below path:
\sax-spark-ss-sample\sax-spark-ss-custom-component\src\main\java\com\yourcompany\custom\ss\partitioner
2. Write Custom Partition Logic
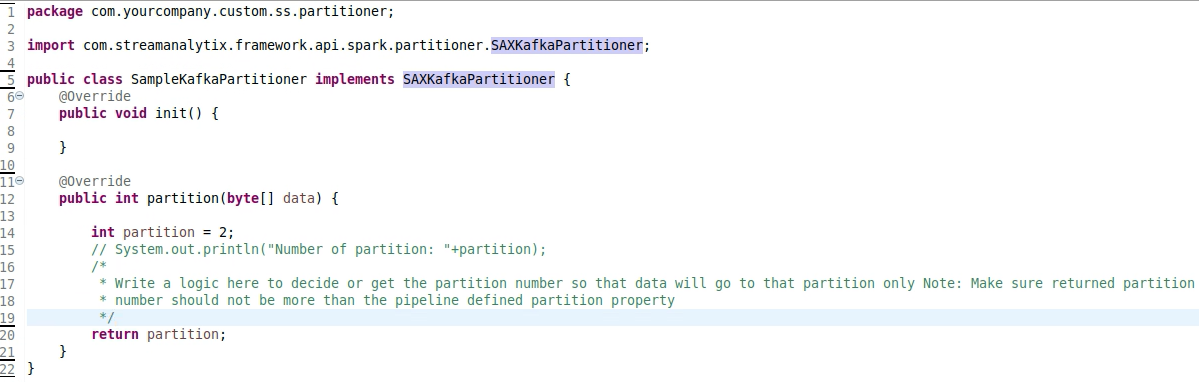
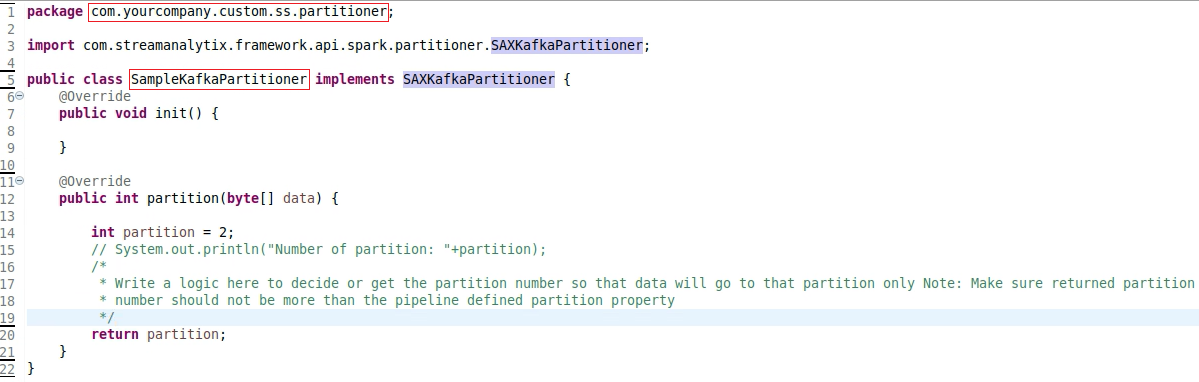
A file named “SampleKafkaPartitioner.java” will be available inside the partitioner directory. Open the file to write your custom partitioning code.
Custom Kafka Partitioner Example:
Save the file and close it.
Navigate to the root directory “sax-spark-ss-custom-component” and open it in any command line tool.
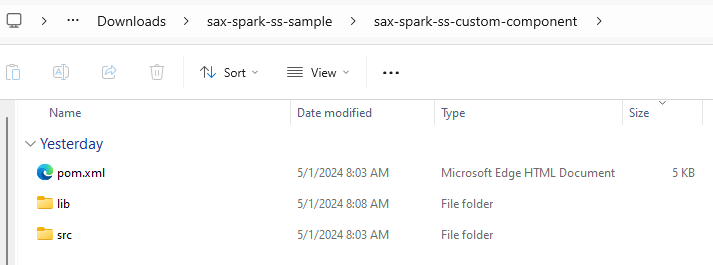
Now, a package needs to be generated that can be uploaded to Gathr to use the custom partitioning logic.
Run the below command in the root directory where the .pom file is kept.
Make sure that you have Java and Maven installed in your system to build the custom package. Recommended is Java 8.mvn clean installA Target folder will get created in your root directory containing a .jar file.
3. Use Custom Partition Logic in Gathr
Switch to Gathr’s Pipeline canvas and use the Add Artifacts option to open the Add Jars section.
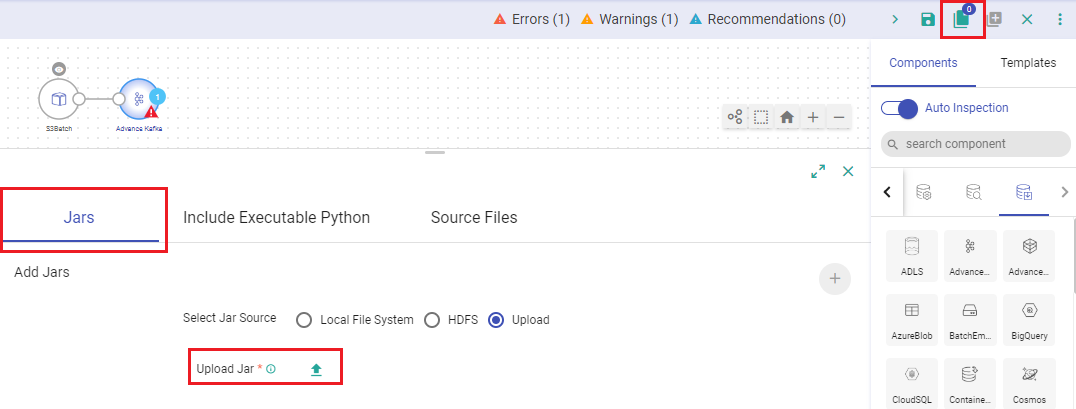
Upload the JAR file containing all the dependencies.
Right-click the Advanced Kafka Emitter and open it’s configuration.

Select the “Kafka Partitioner” as Custom.
Provide the fully qualified class name of custom partition code for Kafka emitter.
For example, fully qualified class name for the below sample will be: com.yourcompany.custom.ss.partitioner.SampleKafkaPartitioner
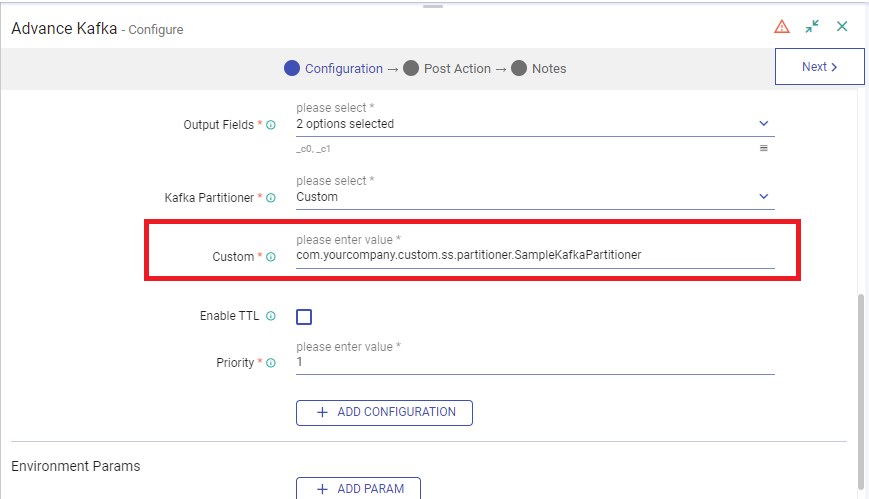
Continue with the emitter configuration.
Enable TTL
Check this box to activate Time to Live (TTL) for records. When enabled, records will only persist in the system for a specified duration.
TTL Value
Specify the duration for which records should persist, measured in seconds.
Output Mode
Choose the output mode for writing data to the Streaming emitter:
Append: Only new rows in the streaming data will be written to the target.
Complete: All rows in the streaming data will be written to the targer every time there are updates.
Update: Only rows that were updated in the streaming data will be written to the target every time there are updates.
Enable Trigger
Define how frequently the streaming query should be executed.
Trigger Type
Choose from the following supported trigger types:
One-Time Micro-Batch: Processes only one batch of data in a streaming query before terminating the query.
Fixed Interval Micro-Batches: Runs a query periodically based on an interval in processing time.
Processing Time
This option appears when the Enable Trigger checkbox is selected. Specify the trigger time interval in minutes or seconds.
If you have any feedback on Gathr documentation, please email us!