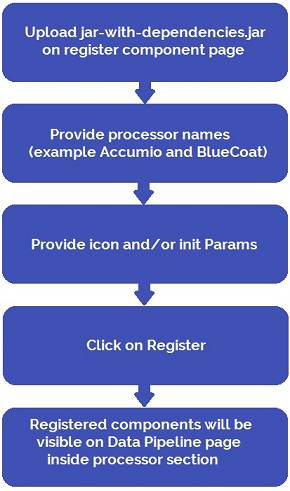
Register Entities allows you to register custom components i.e. custom parsers, data sources and processors to be used in the pipelines.
There are following types of entities:
Upload a customized jar to create a customized component that can be used in data pipelines. A rich library of pre-defined functions and user defined functions. Use variables in your pipelines at runtime as per the scope. Create multiple holiday calendar which can be then used in Workflow.
Each entity is explained below.
Use Register Component to register a custom component (Channel and Processor) by uploading a customized jar. Those custom components can be used in data pipelines.
Register Components tab comes under Register Entities side bar option.
Download a sample jar from Data Pipelines page, customize it as per your requirement, and upload the same on Register Components page.
Gathr allows you implement your custom code in the platform to extend functionalities for:
Channel: To read from any source.
Processor: To perform any operation on data-in-motion.
Custom code implementation allows importing custom components and versioning.
You can download a Maven based project that contains all the necessary Gathr dependencies for writing custom code and sample code for reference.
Pre-requisites for custom code development
Steps for Custom Code Implementation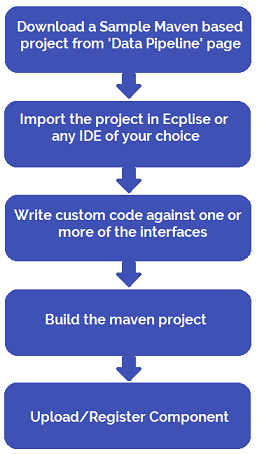
Provide all the dependencies required for the custom components in pom.xml available in the project.
• Build project using mvn clean install.
• Use jar-with-dependencies.jar for component registration.
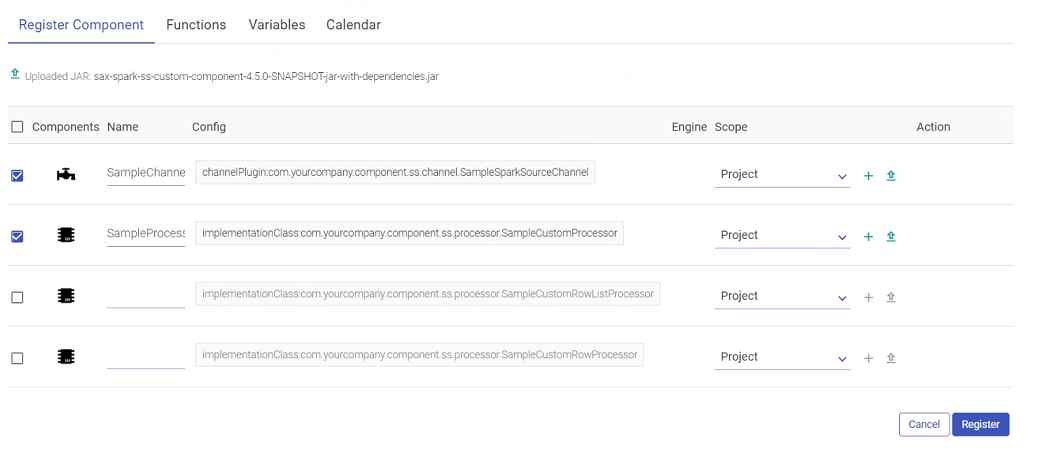
The list of custom components is displayed on the page shown below and the properties are described below:
Perform following operation on uploaded custom components.
l Change scope of custom components (i.e. Global/Local)
l Change icon of custom components.
l Add extra configuration properties.
l Update or delete registered custom components.
Version Support (Versioning) in component registration
Register multiple versions of a registered component and use any version in your pipeline.
- As shown in the above image, the user can view the details of listing page of the created Component including details such as Components, Owner, Parent Project (the project in which the Component is registered), Scope (Workspace/Project), Owner, so on and so forth.
- If you have used any registered component in the pipeline, make sure that all the registered components (ones registered with single jar) should be of the same version. If you have registered a component with a fully qualified name, then that component cannot be registered with another jar in the same workspace.
- If same jar is uploaded having same FQN, a new version of that component will get created.
Functions enables you to enrich an incoming message with additional data that is not provided by the source.
Gathr provides a rich library of system-defined functions as explained in the Functions section.
Allows you to use variables in your pipelines at runtime as per the scope.
To add a variable, click on Create New Variable (+) icon and provide details as explained below.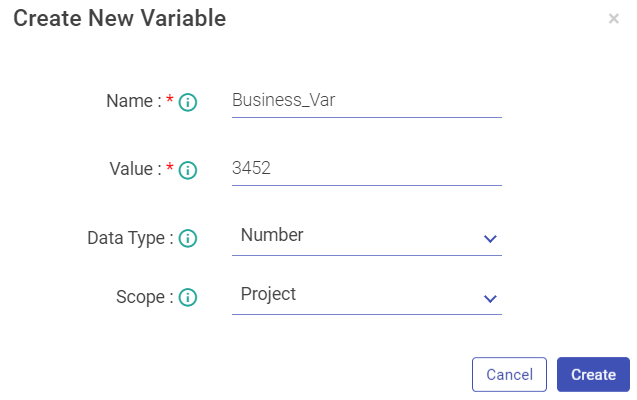
For example, if you create the following variables: Name, Salary and Average.
Then by calling the following code, you will get all the variables in the varMap in its implementation class.
Map<String, ScopeVariable> varMap = (Map<String, ScopeVariable>) configMap.get(svMap);
If you want to use the Name variable that you have created by calling the following code you will get all the details of the scope variables.
The variable object has all the details of the variable Name, Value, Datatype and Scope.
ScopeVariable variable = varMap.get(Name);
String value = variable.getValue();
Variable listing page (shown below)
Note: As shown in the above image, the user can view the details of listing page of the created Variable including details such as Name, Initial value, Data Type, Parent Project (the project in which the Variable is created), Scope (Workspace/Project), so on and so forth.
You can now add Scope Variable so that you can use these variables to reuse and update them as and when needed on pipeline and pipeline components.
Scope Variable Support is added for below components with their respective location where the scope variable will be populated with the help of @.
Cobol (Data Source) --> copybookPath --> dataPath
HDFS (Data Source) --> file path
Hive (Data Source) --> Query
JDBC (Data Source) -- > Query
GCS (Batch and Streaming) (Data Source)--> File Path
File Writer (Emitter)--> File Path
@{Pipeline.filepath} = /user/hdfs
@{Workspace.filepath} = /user/hdfs
@{Global.filepath}/JSON/demo.json = /user/hdfs/JSON/demo.json
@{Pipeline.filepath + '/JSON/demo.json'} = /user/hdfs/JSON/demo.json
@{Workspace.filepath + “/JSON/demo.json”} = /user/hdfs/JSON/demo.json
@{Global.lastdecimal + 4} // will add number = 14.0
The user can create holiday calendars from Register Entities < Calendar< Calendar listing page. There will be a + icon to create the calendar.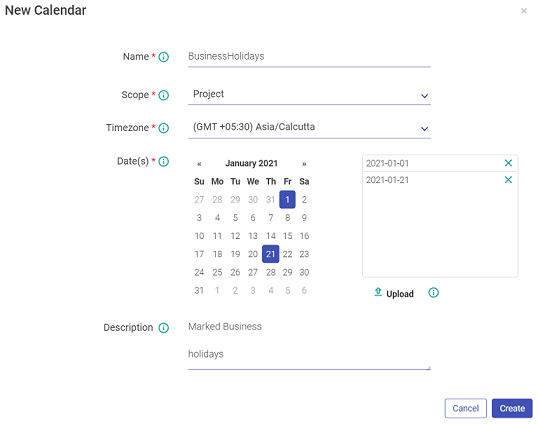
Note: These calender can be used in the Workflow.
Calendar Listing (shown below):
Note: As shown in the above image, the user can view the details of listing page of the Calendar including details such as Name, Dates, Parent Project (the project in which the Calendar is created), Scope (Workspace/Project), so on and so forth.
